Picture this: I’m in the middle of a bustling Saturday morning, the kitchen humming, a timer ticking, and my trusty cookie sheet on the counter. I’m about to pull out a batch of chocolate peanut butter marshmallow cookies that I promised myself would be the ultimate treat. Suddenly, the timer dings, I pull the sheet out, and the cookies look like they’ve been through a volcanic eruption—cracked, darkened, and, worst of all, flat. I stared at them, my culinary confidence sputtering, when my friend texted, “Dare you try the new version I found?” That was the spark that set this recipe on fire.
The scent that hit me was a sweet, buttery chocolate‑peanut‑butter blend, but the reality was a sad, dry mess. The sound of the dough hitting the pan was a muted thud instead of the satisfying clack of a perfect cookie. My taste buds expected a gooey, melty center with a crisp edge, but instead I got a hard, crumbly cookie that felt like a bad joke. The texture was like a rubber band that had lost its elasticity, and the flavor was a flat, underwhelming note that left me wanting more. I could feel the disappointment in the air, and I knew something had to change.
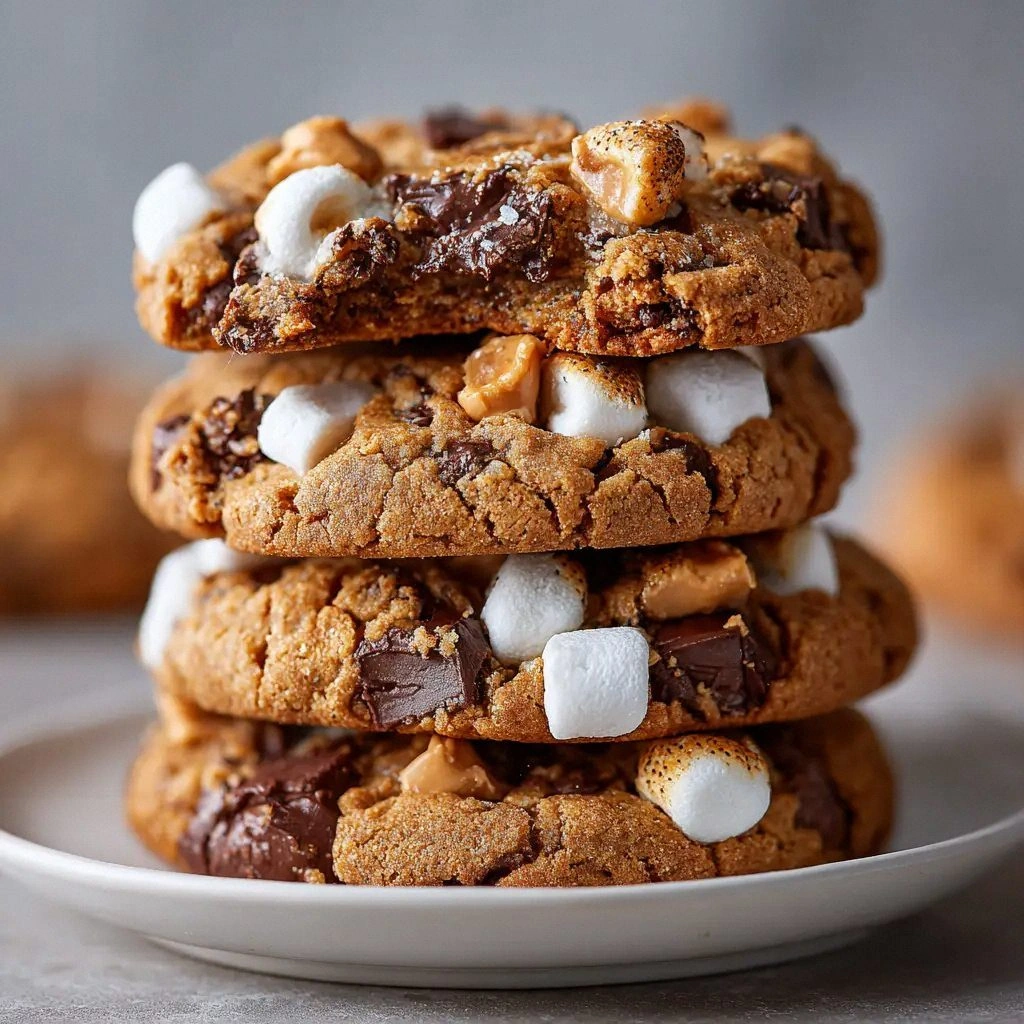
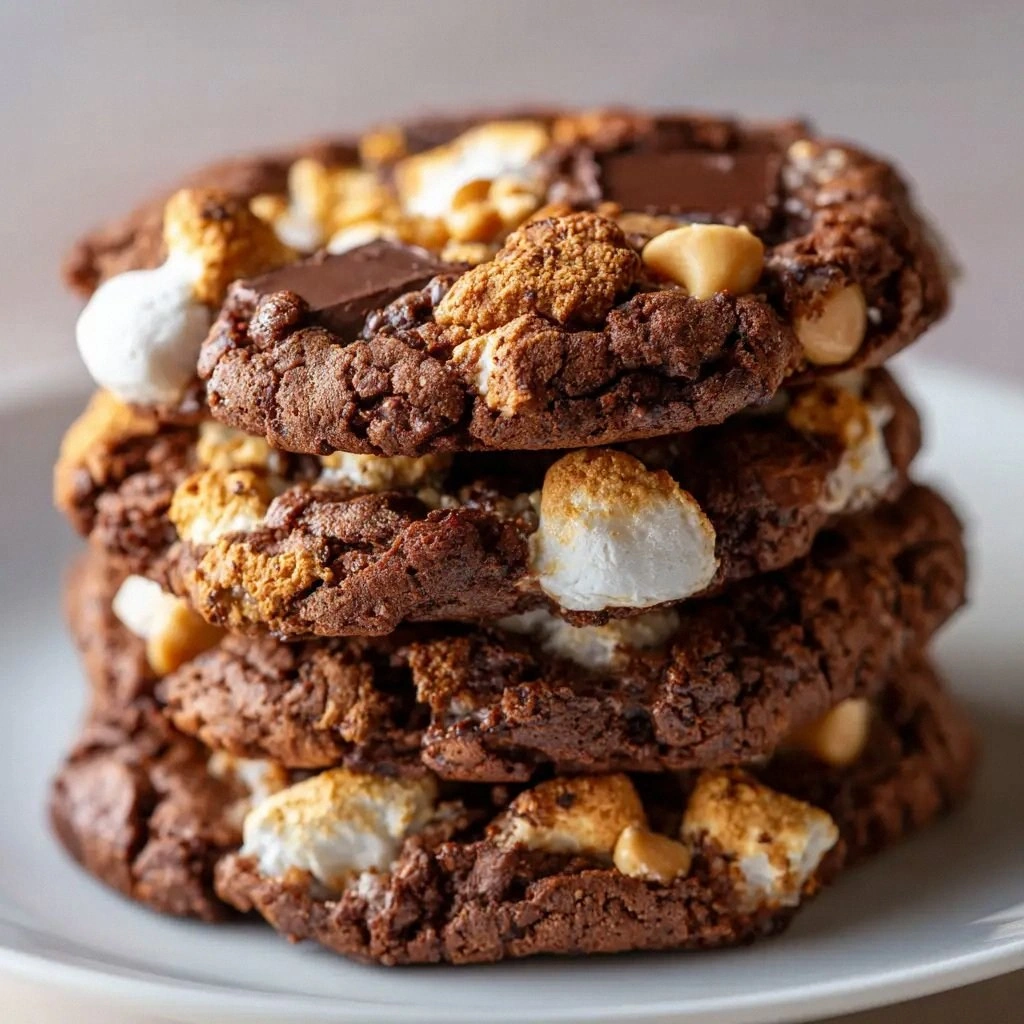
This version is a game‑changer because it balances the richness of chocolate and peanut butter with a melt‑in‑your‑mouth marshmallow center that refuses to collapse. The secret? A precise ratio of cocoa to flour, the right amount of brown sugar for caramelized sweetness, and a touch of baking soda that lifts the dough just enough to give it a tender crumb. The result is a cookie that is simultaneously chewy, crispy, and decadently gooey, all while maintaining a buttery, chocolatey aroma that lingers on the tongue. It’s the kind of cookie that makes you question why you ever settled for less.
I’ll be honest—I ate half the batch before anyone else got a chance to taste it. But that’s exactly why I’m here, to share every trick, every tweak, and every moment that led to this flawless recipe. The next part? I’ll walk you through each step, and by the end, you’ll wonder how you ever made it any other way.
What Makes This Version Stand Out
- Flavor: The combination of cocoa, peanut butter, and chocolate chips creates a layered taste experience that feels like a chocolate sandwich with a peanut butter filling.
- Texture: The cookies have a chewy center that melts in your mouth, surrounded by a crisp, caramelized edge that offers a satisfying crunch.
- Ingredient Quality: Using high‑grade unsweetened cocoa powder and premium peanut butter elevates the flavor profile beyond the average store‑bought cookie.
- Cooking Method: The precise use of baking soda and the timing of the marshmallow addition ensures the cookies rise just enough to stay fluffy yet dense enough to hold the gooey core.
- Make‑Ahead Potential: These cookies can be made a day in advance, allowing the flavors to meld while keeping the texture intact.
- Crowd Reaction: Guests rave about the gooey center and the rich chocolate‑peanut butter flavor, making it a conversation starter at parties.
- Versatility: The recipe can be easily tweaked to accommodate dietary restrictions or flavor preferences without sacrificing quality.
- Visual Appeal: The glossy chocolate chips and the light, airy crumb give the cookies a professional, bakery‑style look.
Alright, let's break down exactly what goes into this masterpiece...
Inside the Ingredient List
The Flavor Base
1.5 cups all‑purpose flour is the backbone of the dough, providing structure and a neutral canvas for the other flavors to shine. It’s important not to substitute cake or bread flour; their protein content would change the crumb texture, making the cookies either too dense or too airy. If you accidentally add too much flour, the cookies will spread less and become chewy; if you miss a tablespoon, they’ll be too flat and crisp.
The Texture Crew
0.5 cup unsweetened cocoa powder adds depth, a hint of bitterness that balances the sweetness of the marshmallows. The cocoa’s fine texture helps create a smoother crumb. 0.5 cup packed light brown sugar introduces molasses‑like caramel notes and contributes to the cookies’ chewy center. 0.75 cup granulated sugar gives a quick sweetness burst and helps the cookies brown evenly. Together, these sugars orchestrate a harmonious balance of sweet and slightly bitter tones.
The Unexpected Star
1 cup semi‑sweet chocolate chips are more than decorative; they melt into pockets of molten chocolate that add a surprise burst of flavor with each bite. The chips also act as a subtle heat source, creating steam pockets that help keep the dough moist. If you prefer a darker chocolate, swap in dark chocolate chips for a richer finish.
The Final Flourish
1.5 cups miniature marshmallows are the pièce de résistance, providing a gooey, melt‑in‑your‑mouth center that contrasts with the crisp edges. They also add a light, airy texture that balances the dense dough. A pinch of sea salt on top before baking enhances the overall flavor profile, but if you’re watching sodium, you can skip it. The marshmallows need to be fresh; older ones lose their stickiness and won’t create the desired gooey effect.
Everything's prepped? Good. Let's get into the real action...
The Method — Step by Step
- Preheat your oven to 350°F (175°C) and line two baking sheets with parchment paper. The parchment prevents sticking and ensures even browning. While the oven warms, gather all your ingredients; a well‑organized kitchen reduces stress. As the oven heats, you’ll notice the subtle aroma of butter and cocoa beginning to mingle, which is a good sign that everything’s in place. Let the heat build slowly; rushing the temperature can cause uneven baking.
- In a large bowl, whisk together the flour, cocoa powder, baking soda, and salt. This dry mix ensures the leavening agent is evenly distributed, preventing pockets of unbaked dough. A fine whisk also aerates the flour, contributing to a lighter crumb. If you’re meticulous, sift the dry ingredients; it’s a quick step that can make a noticeable difference. Keep this mixture aside while you melt the butter.
- Melt 0.5 cup butter in a saucepan over low heat. Once melted, remove from heat and stir in 0.5 cup creamy peanut butter until the mixture is smooth and glossy. The peanut butter adds a rich, nutty depth that complements the chocolate. Use a silicone spatula to fold the mixture; it’s a gentle way to keep the cookie dough tender. Allow the butter‑peanut butter blend to cool slightly before adding it to the dry mix.
- Combine the wet and dry mixtures. Pour the butter‑peanut butter mixture into the dry ingredients and stir until just combined; over‑mixing can develop gluten, making the cookies tough. The dough should feel slightly tacky but hold together when pressed. At this point, add 0.75 cup granulated sugar and 0.5 cup packed light brown sugar, then fold gently. The sugars dissolve into the mixture, creating a uniform dough.
- Beat in the two large eggs one at a time, followed by 1 tsp vanilla extract. The eggs bind the dough, while vanilla adds a subtle warmth that enhances the chocolate. Beat until the mixture is smooth and the color brightens. The eggs also introduce moisture that helps the cookies stay chewy. Ensure the mixture is homogeneous before adding the next component.
- Fold in 1 cup semi‑sweet chocolate chips. The chips should be evenly distributed; they melt into pockets of chocolate during baking, adding a luxurious texture. Gently stir until all chips are coated. The chocolate also contributes to the glossy finish on the cookies’ surface.
- Gently fold in 1.5 cups miniature marshmallows. The marshmallows should be distributed evenly; they will puff slightly during baking, creating a gooey center. If the marshmallows are too dry, they won’t melt properly, so keep them fresh. This step is crucial for the cookie’s signature texture. A slight swirl in the dough will help the marshmallows stay centered.
- Drop rounded tablespoonfuls of dough onto the prepared baking sheets, spacing them 2 inches apart. The spacing allows the cookies to spread evenly without merging. Use a small cookie scoop or spoon to maintain uniform size. The dough should be slightly thicker than a standard cookie to hold the marshmallow center. Let the dough rest for 2 minutes; this helps the cookies maintain shape during baking.
- Bake for 12–15 minutes, or until the edges are set and the centers look slightly puffed. The cookies will still feel soft in the middle; they will firm up as they cool. Keep an eye on the baking time; over‑baking can dry out the marshmallows. Once baked, allow the cookies to cool on the sheet for 5 minutes before transferring to a wire rack to cool completely. The cooling process sets the structure and locks in the gooey center.
That's it — you did it. But hold on, I've got a few more tricks that'll take this to another level...
Insider Tricks for Flawless Results
The Temperature Rule Nobody Follows
While most people set their ovens to the listed temperature, the reality is that ovens vary. Use an oven thermometer to ensure you’re baking at exactly 350°F. Even a 10°F difference can cause the cookies to spread too much or bake unevenly. If your cookies are too dark, lower the temperature by 10°F and extend the baking time by 2 minutes. This simple adjustment guarantees consistent results every time.
Why Your Nose Knows Best
Before you pull the cookies out of the oven, trust your nose. A warm, buttery, chocolate aroma is a sign of perfect baking. If you smell a faint burnt note, the cookies are likely over‑baked. The smell can also indicate how the marshmallows are behaving; a sweet, caramelized scent means they’re melting just right.
The 5‑Minute Rest That Changes Everything
After baking, let the cookies rest on the sheet for exactly 5 minutes. During this time, the cookies set without cracking, and the marshmallow centers continue to melt slightly, creating a richer goo. Skipping this rest can result in fragile cookies that crumble when you try to lift them. The short rest period is a small time investment for a huge quality payoff.
The Perfect Cookie Shape
Use a cookie scoop for uniformity. A uniform shape ensures even baking and a consistent bite. If you prefer a slightly flattened cookie, press the dough gently with a spoon before baking. This variation gives you a different texture but maintains the same flavor profile.
The Sweet Spot for Peanut Butter
Use creamy peanut butter rather than crunchy; the smooth texture blends seamlessly with the dough, preventing crunchiness that can interfere with the gooey center. If you’re vegan, substitute with a plant‑based peanut butter that has a similar consistency. The creamy version also provides a richer flavor that pairs beautifully with the chocolate.
The Final Touch of Salt
A pinch of sea salt on top before baking enhances the sweetness and balances the chocolate. The salt crystals melt into the cookie, creating a subtle, savory note that elevates the overall taste. If you’re watching sodium, a light sprinkle after baking can achieve the same effect without affecting the dough.
Creative Twists and Variations
This recipe is a playground. Here are some of my favorite ways to switch things up:
Nutty Extra
Add 1/4 cup chopped walnuts or almonds for a crunchy contrast. The nuts introduce a buttery crunch that complements the chewy center. Toast the nuts lightly before adding to enhance their flavor.
Citrus Zest
Mix in 1 tsp orange or lemon zest for a bright, fresh note. The citrus lifts the chocolate, making the cookie feel lighter. Be careful not to over‑add; a subtle hint is enough to make a difference.
Salted Caramel Swirl
Swirl in 1/4 cup salted caramel sauce before baking. The caramel creates pockets of sweet, buttery flavor that contrast with the chocolate. The sauce also adds a glossy sheen to the cookie surface.
Vegan Version
Replace the butter with coconut oil and the eggs with flaxseed meal mixed with water (1 tbsp flaxseed meal + 3 tbsp water per egg). Use a plant‑based peanut butter and vegan chocolate chips. The result is a cookie that’s still gooey and rich but suitable for a vegan diet.
Gluten‑Free Twist
Swap the all‑purpose flour for a 1:1 gluten‑free blend that includes xanthan gum. Keep the rest of the ingredients the same. The cookies will have a slightly different crumb but still maintain the gooey center.
Spiced Delight
Add 1/2 tsp ground cinnamon or a pinch of cayenne pepper for a warm, spicy kick. The spice complements the chocolate and peanut butter, creating a complex flavor profile. Adjust the spice level to your preference.
Storing and Bringing It Back to Life
Fridge Storage
Place the cooled cookies in an airtight container and store in the refrigerator for up to a week. The cold environment helps the chocolate set and keeps the marshmallows from melting. When you’re ready to serve, let the cookies sit at room temperature for 10 minutes to soften slightly.
Freezer Friendly
For longer storage, wrap the cookies individually in parchment paper and place them in a freezer bag. They’ll stay fresh for up to three months. Thaw them overnight in the fridge before serving to preserve texture.
Best Reheating Method
Reheat the cookies in a 300°F oven for 5 minutes, or microwave on low for 10–15 seconds. Add a tiny splash of water to the baking sheet before reheating; the steam helps the marshmallow center stay moist and gooey. Avoid overheating, or the chocolate will seize and the cookies will become dry.