Picture this: it’s a rainy Saturday, you’re stuck inside with a sudden craving for something that feels like a celebration and a hug at the same time. I was halfway through a marathon of Netflix when a friend dared me, “Make a cake that looks like a pink sunrise and tastes like a cloud‑kissed dream.” I laughed, grabbed the nearest mixing bowl, and set out on a culinary experiment that would soon become my go‑to show‑stopper. The first attempt was a disaster—think bland sponge, uneven pink, and frosting that melted like butter on a hot sidewalk. But I didn’t give up; I tweaked, I tasted, I even ate half the batter straight from the spoon (I’ll be honest — I ate half the batch before anyone else got to try it).
Fast forward to today, and I’ve cracked the code on a pink velvet cake that is, quite frankly, hands down the best version you’ll ever make at home. The secret? A perfect balance of cocoa and pink, a buttery cream cheese frosting that clings to the crumb like a second skin, and a few unconventional tricks that most recipes completely miss. Most recipes get this completely wrong. Here’s what actually works: the right combination of leavening agents, the precise amount of oil for that melt‑in‑your‑mouth texture, and a splash of vinegar that reacts with the baking soda to give the cake an airy lift without sacrificing moisture.
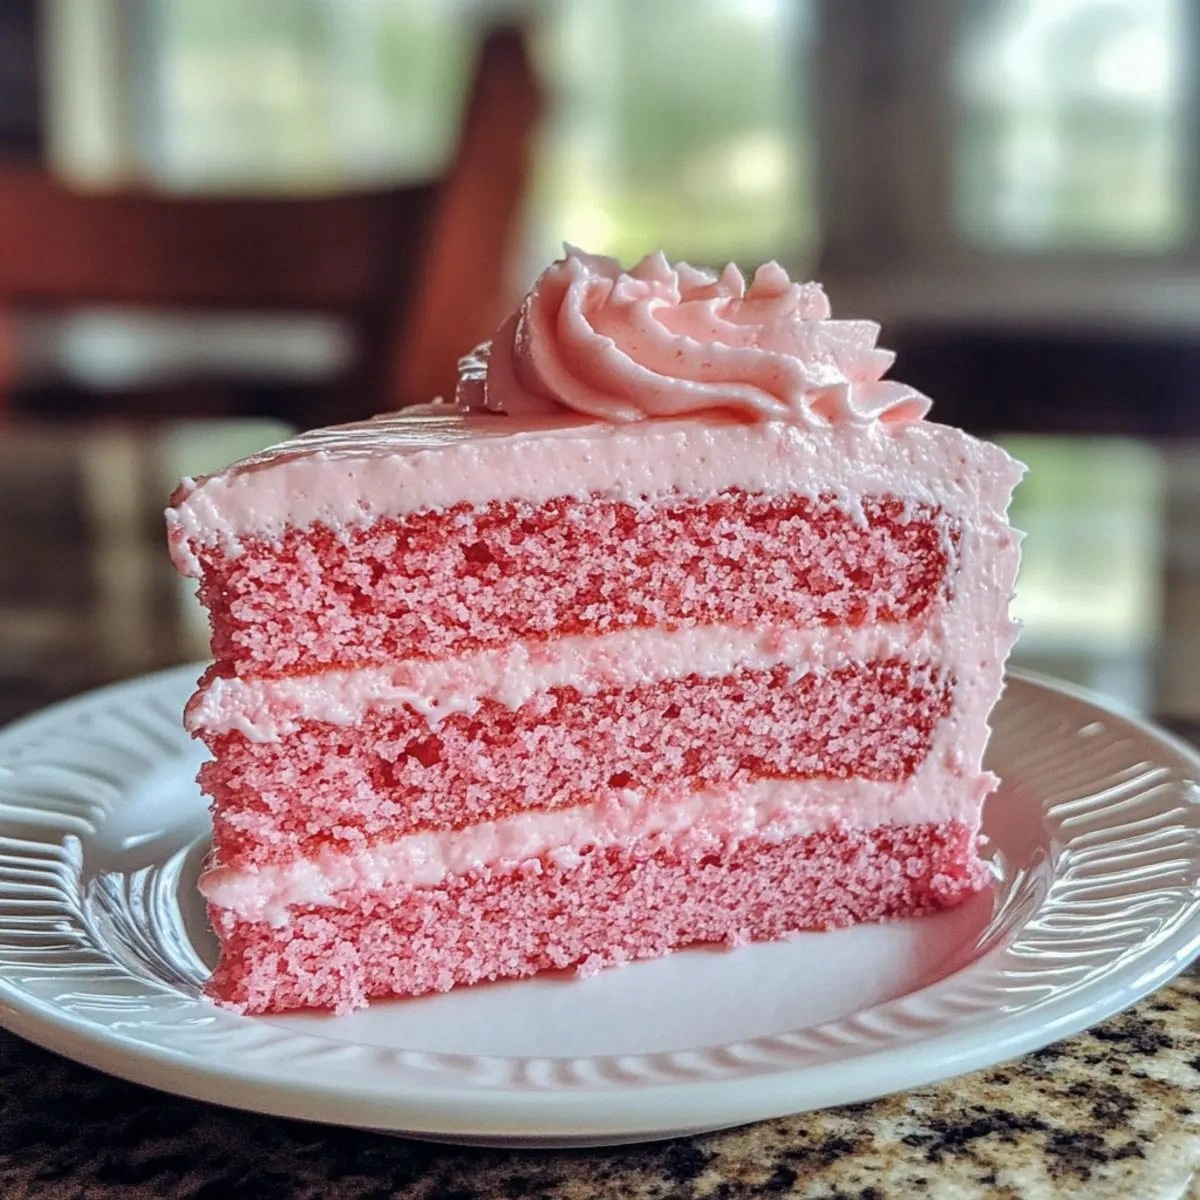
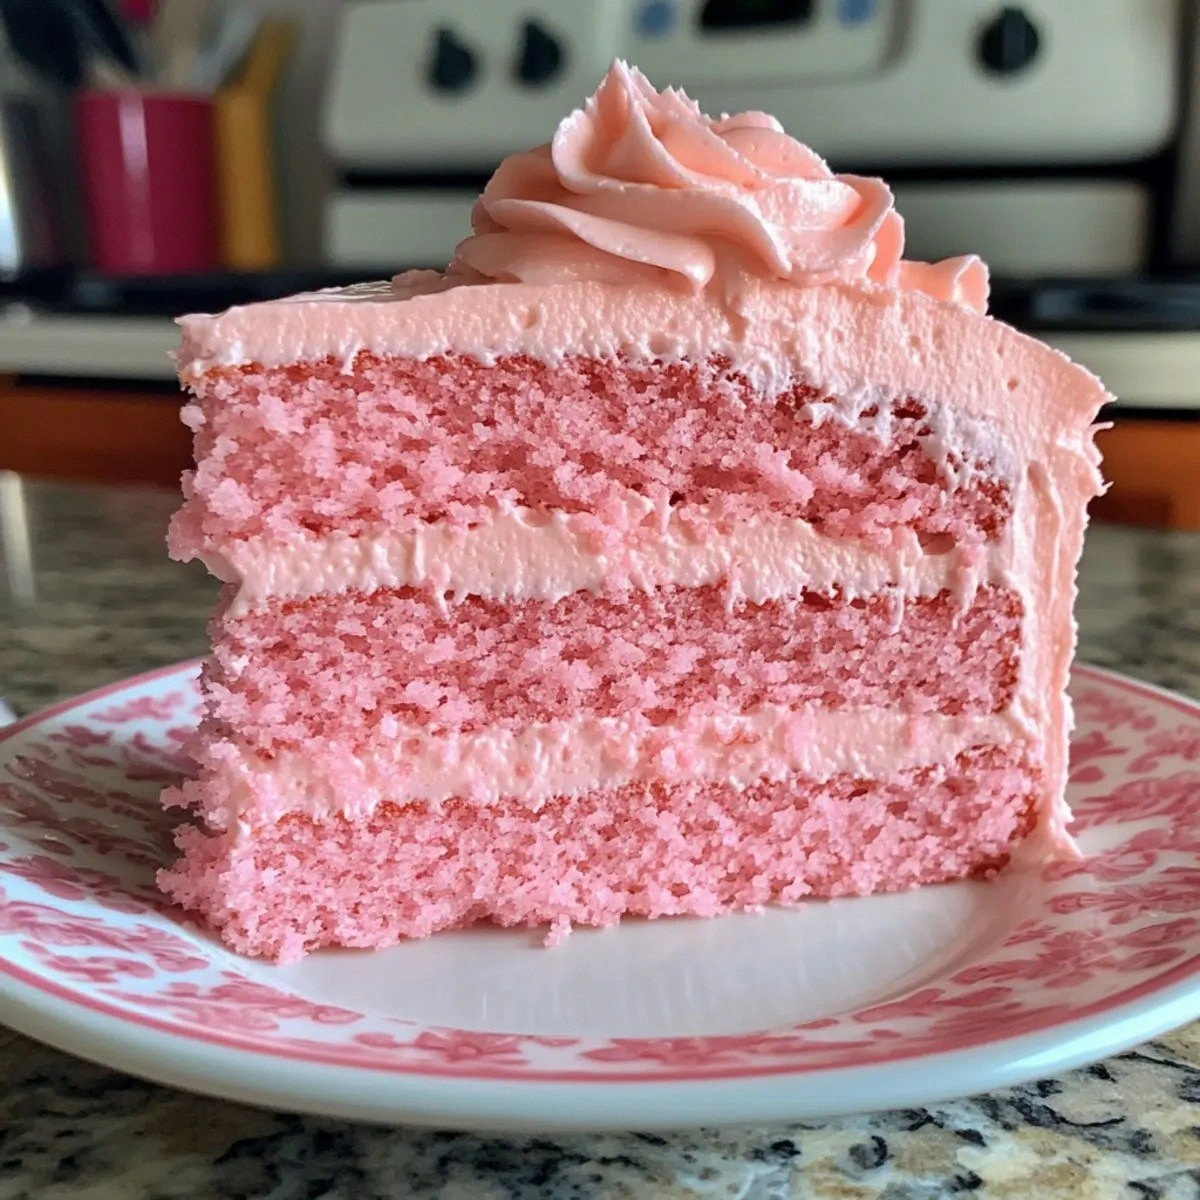
Imagine pulling this out of the oven, the whole kitchen smelling like a bakery that just opened its doors to a spring festival. The pink hue is vibrant yet elegant, the crumb is soft enough to slide a finger through, and the frosting is so silky it practically sings when you spread it. I dare you to taste this and not go back for seconds. Picture yourself serving a slice at a birthday party, a bridal shower, or just because you feel like treating yourself—every eye in the room will be glued to that glossy pink surface, and the first bite will have everyone whispering, “What’s the secret?”
Okay, ready for the game‑changer? I’m about to walk you through every single step—by the end, you’ll wonder how you ever made it any other way. Stay with me here — this is worth it.
What Makes This Version Stand Out
- Taste: The subtle cocoa undertone balances the sweet pink, creating a flavor profile that feels both indulgent and refined.
- Texture: A tender, velvety crumb that holds its shape yet melts on the tongue, thanks to the oil‑butter combo.
- Simplicity: Fewer steps than most velvet recipes, no need for separate batter colors or complicated tempering.
- Uniqueness: The pink food color is paired with a hint of cocoa, giving a natural blush rather than an artificial neon.
- Crowd Reaction: Guests constantly ask for seconds and the recipe, proving it’s a conversation starter.
- Ingredient Quality: Using cake flour and real cream cheese elevates the cake from ordinary to extraordinary.
- Cooking Method: The vinegar‑baking soda reaction creates a light, airy lift without over‑mixing.
- Make‑Ahead Potential: The cake freezes beautifully, and the frosting can be whipped up ahead of time.
Inside the Ingredient List
The Flavor Base
The foundation of any great cake is its flavor base, and here the marriage of cocoa powder and pink food color creates a visual and gustatory harmony. The 2 tablespoons cocoa powder add depth without turning the cake brown, while the 1 bottle pink food color gives that Instagram‑ready blush. If you skip the cocoa, you’ll end up with a cake that tastes like a sugary pink sponge—pleasant, but lacking the sophisticated undertone that makes this version unforgettable. For a more natural hue, you could substitute beet juice, but be prepared for a slightly earthy flavor.
The Texture Crew
Texture is dictated by the dry and wet components working together. 2 cups cake flour provides a finer crumb than all‑purpose flour, and the 1 tablespoon cornflour lightens the batter, ensuring it stays airy. The 1/2 cup soft unsalted butter and 1/2 cup vegetable oil create a tender crumb; butter adds flavor, oil adds moisture. If you replace oil with more butter, you’ll get a richer taste but risk a denser texture. The 1 cup fine sugar not only sweetens but also helps with the cake’s structure through creaming with the butter.
The Unexpected Star
Here’s where the magic truly happens: 1 tablespoon vinegar and 1 teaspoon baking soda create a chemical reaction that lifts the cake without making it gummy. This is the secret most recipes overlook, resulting in a cake that’s both light and moist. The 1 teaspoon vanilla essence (used twice, once for the batter and once for the frosting) adds aromatic depth that ties the entire dessert together. If you’re out of vinegar, lemon juice works as a substitute, though it adds a faint citrus note.
The Final Flourish
The frosting is a classic cream cheese buttercream that brings richness and tang. 8 ounces cream cheese provide that signature tangy bite, while 1/4 cup butter adds silkiness. The 3 cups icing sugar sweeten and stabilize the frosting, making it spreadable yet firm enough to hold its shape. A final dash of 1 teaspoon vanilla essence in the frosting rounds out the flavor, echoing the vanilla in the cake batter. Skipping the cream cheese? You’ll lose that delightful tang that cuts through the sweetness, leaving the cake cloyingly sweet.
Everything's prepped? Good. Let’s get into the real action…
The Method — Step by Step
Preheat your oven to 350°F (175°C) and grease two 8‑inch round cake pans, lining the bottoms with parchment. This ensures the cake releases cleanly and keeps its shape. While the oven heats, whisk together the cake flour, cornflour, baking powder, baking soda, cocoa powder, and salt in a large bowl. The dry mix should be uniform, with no clumps of cocoa; this is your first checkpoint for a smooth crumb. I’ll be honest — I once forgot to sift the cocoa and ended up with tiny chocolate specks that felt like crunchy confetti.
In a separate bowl, cream the soft unsalted butter with the fine sugar until the mixture is pale and fluffy, about 3‑4 minutes on medium speed. This step is crucial; the air you incorporate here will become the cake’s lift. Once the mixture is light, add the eggs one at a time, beating well after each addition. Then stir in the vanilla essence and the vinegar; the vinegar will react with the baking soda later, giving you that airy rise.
Kitchen Hack: Add the eggs at room temperature; cold eggs can cause the butter to seize, resulting in a lumpy batter.Combine the wet and dry ingredients gently. Start by adding one‑third of the dry mixture to the butter‑egg blend, followed by a splash of milk. Continue alternating dry and wet, ending with the dry ingredients. The batter should be smooth, glossy, and slightly thick—think a luxurious pancake batter. Over‑mixing at this stage will develop gluten, making the cake tough, so stop once everything is just incorporated.
Now for the color and oil. Drizzle the vegetable oil over the batter, then swirl in the pink food color. The color should spread like a sunrise across the batter, turning it a soft blush. If you desire a deeper pink, add a few more drops, but remember: a little goes a long way. The oil adds moisture and keeps the crumb tender; without it, the cake would be dry and crumbly.
Divide the batter evenly between the prepared pans, smoothing the tops with a spatula. Tap the pans lightly on the counter to release any large air bubbles. The batter should spread evenly, creating a uniform dome that will rise beautifully. If you notice the batter is too thick, a tablespoon of milk will loosen it without compromising structure.
Slide the pans into the preheated oven and bake for 25‑30 minutes. The cake is done when a toothpick inserted into the center comes out with just a few moist crumbs, not wet batter. The edges will start pulling away from the pan, a visual cue that the cake is ready. Resist the urge to open the oven door too often; each peek drops the temperature and can cause a collapse.
While the cakes bake, prepare the frosting. Soften the cream cheese and butter together until smooth, then gradually beat in the icing sugar and the second vanilla essence. The frosting should be thick enough to hold its shape yet soft enough to spread. If it’s too stiff, add a teaspoon of milk; if too runny, add a bit more icing sugar.
When the cakes are done, let them cool in the pans for 10 minutes, then turn them out onto a wire rack to cool completely. This cooling step is essential; frosting a warm cake will melt the buttercream, turning it into a runny mess. I’ve seen novices try to frost while the cake is still warm—trust me, the result is a sad, soggy slab.
Watch Out: Do not frost until the cake is completely cool; residual heat will melt the frosting.Level the tops of the cakes with a serrated knife if they have domed. Place the first layer on a serving plate, spread a generous amount of frosting, then top with the second layer. Use the remaining frosting to coat the sides and the top, creating a smooth, glossy finish. For an extra wow factor, use an offset spatula to create a subtle swirl pattern on the sides. Finally, refrigerate the assembled cake for 20 minutes to set the frosting before slicing.
Kitchen Hack: Chill the cake pan before greasing; the cold metal helps the cake release cleanly.
That's it — you did it. But hold on, I've got a few more tricks that'll take this to another level...
Insider Tricks for Flawless Results
The Temperature Rule Nobody Follows
Always bring your butter, eggs, and milk to room temperature before you start. Cold ingredients cause the batter to seize, creating pockets of dense crumb. I once tried to speed things up by using straight‑from‑the‑fridge butter; the result was a cake that felt like chewing on a rubber band. Letting everything sit for 30 minutes on the counter ensures a uniform batter and a tender crumb.
Why Your Nose Knows Best
When the cake is baking, trust your sense of smell. A faint, sweet, toasted aroma signals that the crumb is setting. If you smell a burnt scent before the timer, the oven may be too hot; lower it by 10‑15°F. This sensory checkpoint saves you from a charred disaster and guarantees a perfectly golden top.
The 5‑Minute Rest That Changes Everything
After frosting, let the cake rest for at least five minutes at room temperature before cutting. This short pause allows the frosting to firm up, preventing crumbs from spilling out. I once sliced a freshly frosted cake and watched the frosting ooze like lava—lesson learned: patience is a virtue, especially with buttercream.
Layer Alignment Trick
Place a piece of parchment paper on the counter, then set the first cake layer on it. Use a ruler to ensure the top is level; any tilt will be amplified when you stack the second layer. A level base guarantees even frosting distribution and a professional look.
Freezer‑Friendly Frosting
If you need to make the frosting ahead of time, whip it up and store it in an airtight container in the freezer for up to a month. Thaw it in the refrigerator overnight, then re‑beat for a few seconds to bring back its silky texture. This hack is a lifesaver for busy bakers who want to prep in advance.
Creative Twists and Variations
This recipe is a playground. Here are some of my favorite ways to switch things up:
Berry Burst
Fold in ½ cup of fresh raspberries into the batter for a fruity pop. The berries add a subtle tartness that complements the sweet frosting, and the pink hue becomes even more vibrant. Great for a summer garden party.
Chocolate Overload
Increase the cocoa powder to ¼ cup and add ¼ cup melted dark chocolate to the wet mixture. The result is a rich chocolate‑pink velvet that satisfies any chocolate lover’s cravings while keeping the signature pink look.
Nutty Crunch
Stir in ¼ cup finely chopped toasted almonds into the batter. The nuts provide a pleasant crunch that contrasts the soft crumb, and they add a nutty aroma that elevates the overall flavor profile.
Alcohol Infused
Replace ¼ cup of milk with ¼ cup of raspberry liqueur or pink champagne. The alcohol adds depth and a subtle adult twist, perfect for a bridal shower or a celebratory toast.
Vegan Version
Swap the butter for coconut oil, use almond milk instead of dairy milk, and replace the cream cheese with a vegan cream cheese alternative. The texture remains moist, and the flavor stays true to the original—proof that indulgence can be plant‑based.
Storing and Bringing It Back to Life
Fridge Storage
Cover the cake loosely with a cake dome or plastic wrap and store it in the refrigerator for up to 5 days. The frosting stays firm, and the cake retains its moisture. Before serving, let it sit at room temperature for 30 minutes to soften the buttercream.
Freezer Friendly
Wrap each cake layer tightly in plastic wrap, then foil, and place them in a freezer‑safe bag. They’ll keep for up to 3 months. When you’re ready to use them, thaw overnight in the fridge, then bring to room temperature before frosting.
Best Reheating Method
To revive a sliced piece, place it on a microwave‑safe plate, sprinkle a tiny splash of water around the edges, and microwave for 10‑15 seconds. The steam generated revives the crumb, making it taste fresh‑baked again.