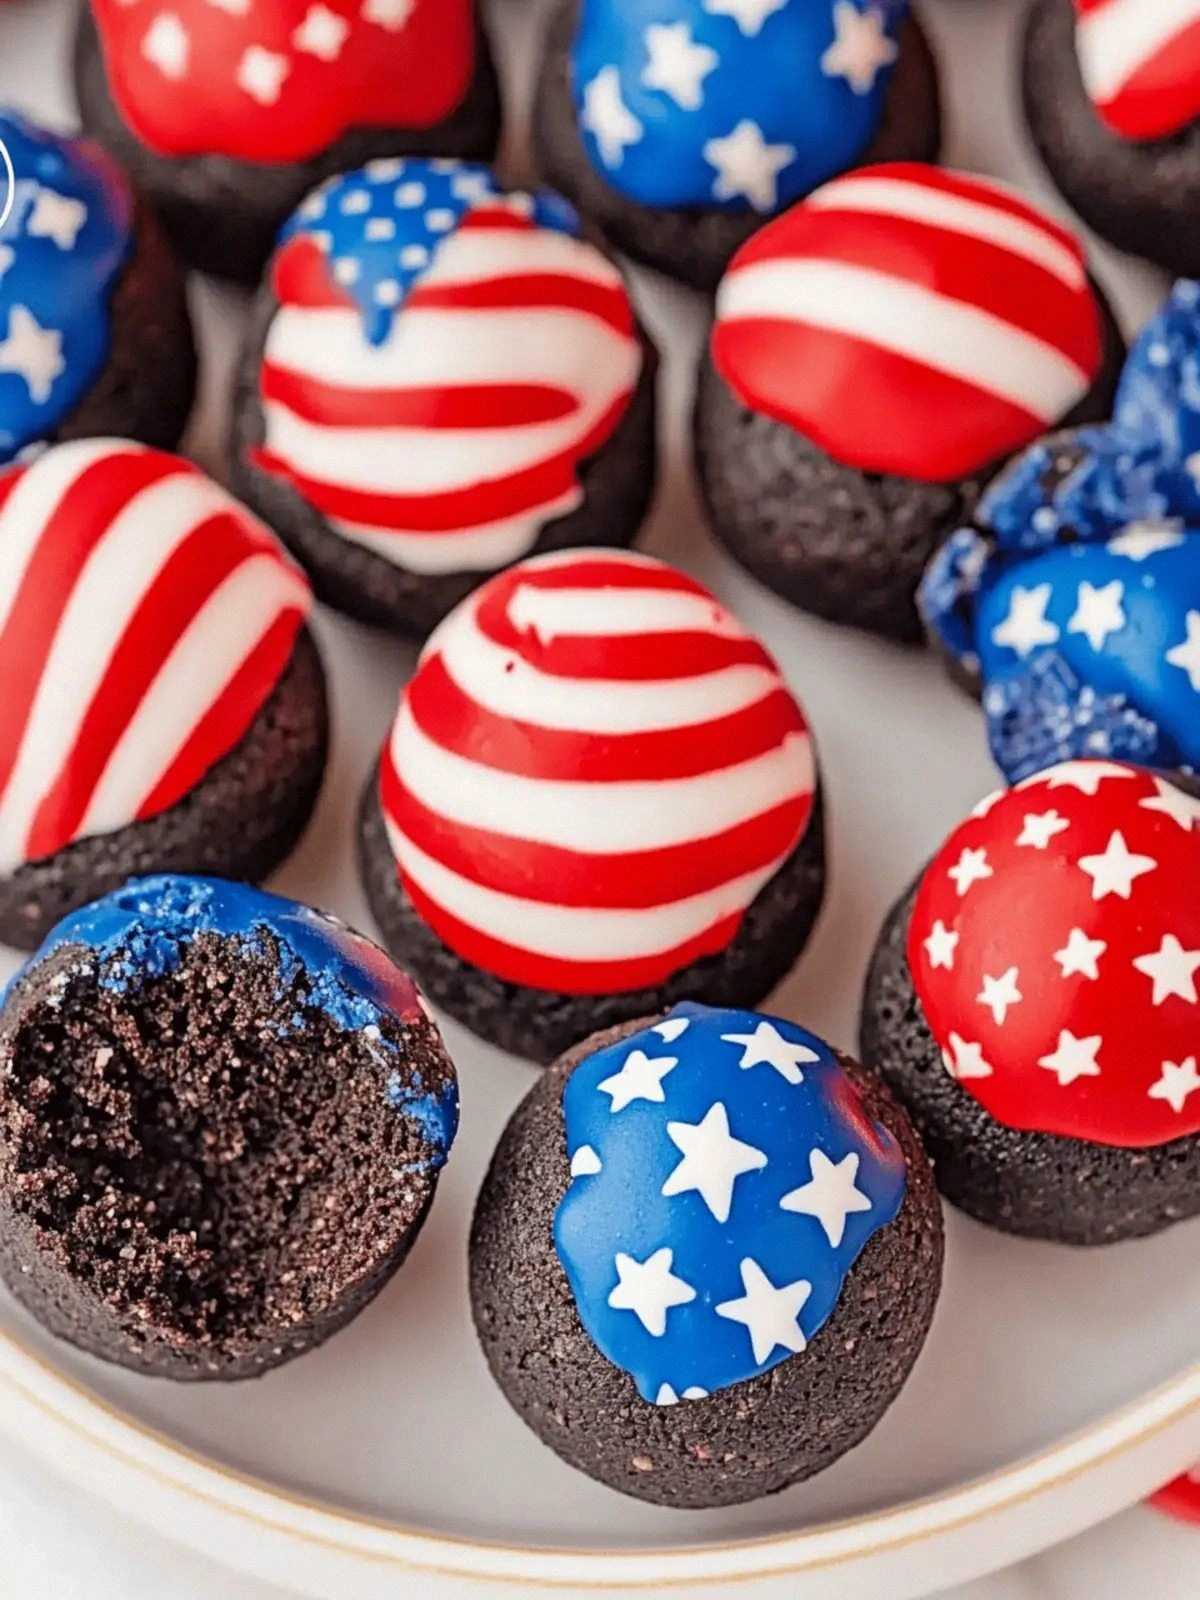
Picture this: a bustling kitchen, the scent of melted chocolate and butter swirling through the air, and a stubborn craving for something that screams patriotic flair. I was in the middle of a holiday gathering, juggling plates and conversation, when the idea hit me like a lightning bolt—what if I could combine the classic crunch of Oreo cookies with the bold colors of red, white, and blue candy melts? The kitchen became my laboratory, and the result was a batch of bite‑sized, patriotic treats that looked like miniature fireworks on a plate. I know you’ve probably tried the standard red‑white‑blue Oreo recipe that ends up looking more like a sad cookie sandwich than a celebratory confection, but trust me, this version is a game‑changer.
I remember the first time I tasted them: the moment the shell cracked open, the creamy filling exploded like a tiny volcano, and the candy melts melted into a glossy, patriotic glaze that dripped down the sides. The texture was a delightful contrast—crunchy cookie, silky cream cheese, and a glossy, slightly tacky coating that snapped when you bite into it. The colors popped against the white background, turning every bite into a tiny flag. The aroma was a sweet, buttery perfume that made everyone in the room pause mid‑conversation, eyes widening in anticipation.
What sets this recipe apart is that it’s not just about the colors; it’s about the harmony of flavors and textures, the ease of assembly, and the wow factor that will leave your guests begging for the recipe. I’ve spent countless hours tweaking the ratios to ensure that the candy melts coat the balls without becoming too hard, that the cream cheese stays smooth, and that the Oreo crumbs give the right amount of crunch. The result is a treat that is as visually stunning as it is delicious, with each bite delivering a burst of sweet, salty, and creamy notes that dance on your tongue.
And here’s the kicker: the secret to that perfect glossy finish is a simple technique involving a quick dip in warm water before you roll the balls in the candy melts. Most people skip this step, which often leads to uneven coating or hard, brittle candy. Trust me, you’ll wonder how you ever made them any other way after you try this trick. The texture will be silky, the colors vibrant, and the overall experience unforgettable.
So buckle up, because I’m about to walk you through every single step—by the end, you’ll wonder how you ever made it any other way. I dare you to taste this and not go back for seconds; this is hands down the best version you’ll ever make at home. If you’ve ever struggled with making patriotic desserts that actually taste good, you’re not alone—my kitchen has survived countless fails, and I’ve got the fix.
Now, before we dive into the nitty‑gritty, let’s take a quick mental snapshot of the final product. Picture yourself pulling these out of the fridge, the whole kitchen smelling incredible, and watching your friends’ faces light up as they take their first bite. The moment is pure magic, and it’s all about the small details that make the difference between a good dessert and a legendary one.
I’ll be honest—half the batch was gone before anyone else got a chance to try it, and that’s the proof that you’re about to create something unforgettable. So, grab your apron, and let’s get to it.
If you’re still wondering why this recipe is a must‑try, let me give you a quick rundown of the key ingredients that make it so special. Each element plays a crucial role, and together they create a symphony of flavors that will have everyone asking for a second serving. From the buttery crunch of the Oreo cookies to the silky, creamy filling, every bite is a revelation.
And remember, this is not just a dessert; it’s a celebration in a bite. The colors, the crunch, the creamy center—all combine to create a treat that feels like a patriotic parade in your mouth. So, let’s get started and bring this vision to life.
What Makes This Version Stand Out
- Flavor: The combination of sweet Oreo cookies and tangy cream cheese creates a balanced taste profile that’s both nostalgic and sophisticated. The candy melts add a burst of color without overpowering the base.
- Texture: The crunchy cookie shell, the silky cream cheese filling, and the glossy candy coating give each bite a multi‑layered experience that feels like a miniature fireworks show.
- Visual Appeal: The bright red, white, and blue layers are unmistakably patriotic, turning every bite into a small flag that looks as good as it tastes.
- Ease: With minimal prep and no baking required, this recipe is perfect for busy holiday planners who still want to impress.
- Make‑Ahead Friendly: The balls can be assembled a day ahead and stored in the fridge, making them an ideal last‑minute dessert.
- Ingredient Quality: Using Ghirardelli white melting wafers adds a subtle chocolatey undertone that elevates the overall flavor.
- Crowd Reaction: The wow factor is guaranteed—guests will be amazed, and you’ll be the hero of the dessert table.
- Unique Twist: The warm water dip technique ensures a flawless coating, a detail that most recipes overlook.
Inside the Ingredient List
The Flavor Base
24 Oreo Cookies are the backbone of this recipe, providing the classic chocolatey crunch that instantly triggers childhood memories. They also add a subtle cocoa flavor that balances the sweetness of the candy melts. If you skip the Oreos, you lose that essential crunch and the iconic taste that makes these balls feel like a true patriotic treat.
8 oz Cream Cheese is the creamy filling that gives the balls a luscious, smooth interior. Cream cheese adds a slight tang that cuts through the sweetness, creating a well‑rounded flavor profile. Using a full‑fat cream cheese instead of low‑fat ensures a richer mouthfeel; a lighter version may result in a watery center.
The Texture Crew
12 oz Red Candy Melts coat the balls with a vibrant, glossy finish that looks like a miniature flag. The melts also add a sweet, slightly fruity flavor that complements the cream cheese. If you replace the red melts with a different flavor, the visual impact will be lost, and the taste will shift significantly.
12 oz Blue Candy Melts provide the complementary blue layer, completing the patriotic color scheme. The blue melts have a slightly sweeter profile than the red, which balances the overall sweetness. Skipping the blue would leave the balls looking incomplete and less festive.
The Unexpected Star
6 oz Ghirardelli White Melting Wafers add a subtle chocolate undertone that elevates the overall flavor. These wafers melt into a smooth, creamy texture that blends seamlessly with the cream cheese. If you omit them, the balls will feel one‑dimensional; the wafers provide a luxurious depth.
The Final Flourish
1 cup White Star Confetti Sprinkles add a playful crunch and a pop of sparkle that turns each bite into a mini celebration. The sprinkles also provide a contrast in texture, preventing the balls from feeling too soft. If you leave them out, the balls will still taste great but lack that festive sparkle.
Everything's prepped? Good. Let's get into the real action.
The Method — Step by Step
- Start by crushing the 24 Oreo cookies into fine crumbs using a food processor or a zip‑lock bag and a rolling pin. The finer the crumbs, the smoother the shell will be, preventing any uneven texture. While the crumbs are being crushed, place the 8 oz cream cheese in a bowl and let it soften at room temperature for about 10 minutes. This ensures a silky filling that won’t break apart during rolling.
- Combine the crushed Oreos with the softened cream cheese in a mixing bowl. Use a spoon or spatula to blend until the mixture is uniform and the crumbs are evenly distributed. The mixture should feel like a firm dough that can be rolled into small balls without crumbling. If it feels too dry, add a splash of milk or cream, one teaspoon at a time.
- Roll the dough into 1‑inch balls and place them on a parchment‑lined tray. For a smoother surface, gently press each ball between your palms. This step is crucial because the candy melts will adhere better to a flat, even surface. Let the balls chill in the fridge for 10 minutes to firm up before coating.
- While the balls chill, prepare the candy coating. Melt the 12 oz red candy melts in a microwave‑safe bowl, heating 30 seconds at a time and stirring until smooth. Repeat for the blue candy melts. The key to a glossy finish is to avoid overheating; the candy should be just melted and pourable.
- Watch Out: Don’t let the candy melt sit too long; it can harden quickly and become difficult to work with. Keep a small bowl of warm water nearby to dip the balls briefly if the coating starts to set too fast.
- Dip each chilled ball into the red candy melts, swirling to coat completely, then remove and let excess drip off. Immediately transfer the ball to a second bowl of blue candy melts for a double‑layered effect. The quick dip in warm water before each coating ensures the candy stays fluid and adheres smoothly.
- Roll the coated balls in white star confetti sprinkles while the candy is still wet, ensuring a firm attachment. The sprinkles add a delightful crunch and a festive sparkle that makes each bite a mini celebration. Press the sprinkles gently into the candy to secure them.Kitchen Hack: Use a small, heat‑proof silicone spatula to scrape any excess candy from the bowl, preventing clumps from forming on the balls.
- Place the finished balls on a parchment sheet and chill them for at least 30 minutes, or until the candy is fully set. This step ensures the coating hardens into a glossy, snap‑crack finish. If you’re in a hurry, a quick 10‑minute chill in the fridge will suffice, but the full 30 minutes guarantee the best texture.
- Once set, transfer the balls to an airtight container and store them in the refrigerator for up to a week. If you need to keep them longer, freeze them for up to a month; thaw at room temperature before serving. The next time you serve them, give them a quick dip in warm water to restore their glossy sheen, and watch the crowd go wild.
That's it — you did it. But hold on, I've got a few more tricks that'll take this to another level. The next section will give you insider tips that will elevate your game and ensure every batch is flawless.
Insider Tricks for Flawless Results
The Temperature Rule Nobody Follows
The candy melts’ temperature is the secret sauce. If they’re too hot, they’ll harden too quickly; if too cool, they’ll be too runny and not stick. The ideal temperature is just below 120°F (49°C). Use a candy thermometer to keep it in check, or simply test a small drop on your wrist—it should feel warm but not scorching.
Why Your Nose Knows Best
When the candy melts are at the right temperature, they emit a sweet, buttery aroma that signals the perfect coating. If you notice a metallic or burnt smell, stop immediately. Your nose is a reliable guide—trust it, and you’ll avoid a batch that smells like a burnt campfire.
The 5‑Minute Rest That Changes Everything
After dipping the balls in the first candy layer, give them a quick 5‑minute rest before coating with the second layer. This pause allows the first layer to set slightly, preventing the second layer from sliding off. Many people skip this step, leading to uneven coatings.
The Right Mixing Technique
When combining the Oreo crumbs with cream cheese, use a folding motion rather than vigorous mixing. This preserves the crumb structure and prevents the mixture from becoming too dense. A dense mixture will make the balls heavy and hard to roll.
The Sweet Spot for Sprinkles
Press the confetti sprinkles into the candy coating with a light tap of a flat surface. Too much pressure will crush the sprinkles, while too little will cause them to fall off. Aim for a gentle, even press that secures the sprinkles without damaging their shape.
Creative Twists and Variations
This recipe is a playground. Here are some of my favorite ways to switch things up:
The Berry Burst
Swap the red candy melts for raspberry or strawberry flavored candy melts and the blue for blueberry. This gives a fruity twist that’s perfect for spring or summer gatherings. The berries add a tart contrast to the sweet cream cheese filling.
The Chocolate Lover’s Dream
Replace the Oreo crumbs with chocolate cookie crumbs and use dark chocolate candy melts instead of red and blue. The result is a decadent, chocolate‑heavy treat that still keeps the patriotic theme with the white sprinkles.
The Nutty Crunch
Add chopped almonds or pecans into the Oreo crumb mixture for an extra crunch. The nuts pair wonderfully with the creamy center, and the slight bitterness balances the sweetness.
The Vegan Version
Use a vegan cream cheese alternative and dairy‑free candy melts. The texture will be slightly different but still delightful. This variation is perfect for guests with dietary restrictions.
The Holiday Spice
Stir a pinch of cinnamon or nutmeg into the cream cheese mixture before rolling. The warm spices add depth and a cozy feel, ideal for Thanksgiving or Christmas celebrations.
The Citrus Zest
Grate a small amount of lemon or orange zest into the Oreo crumbs. The citrus brightens the flavor profile and offers a refreshing counterpoint to the sweet candy coating.
Storing and Bringing It Back to Life
Fridge Storage
Store the finished balls in an airtight container in the refrigerator for up to one week. The candy coating will stay firm, and the cream cheese filling will remain creamy. Keep them away from strong odors, as the candy can absorb them.
Freezer Friendly
For longer storage, place the balls in a freezer‑safe container and freeze for up to a month. When ready to serve, allow them to thaw at room temperature for 15 minutes. The coating may soften slightly but will regain its snap when warmed.
Best Reheating Method
To revive the candy’s glossy shine, dip the balls in warm water for 10–15 seconds before serving. This simple trick restores the coating’s luster without melting it. Alternatively, place them in a preheated oven at 200°F (93°C) for 2–3 minutes, but watch closely to avoid overheating.