I was in the middle of a rainy Tuesday night when a sudden craving for something warm, comforting, and just a little bit daring hit me like a bolt of lightning. I rummaged through the pantry, found a half‑full bag of walnuts, a jar of pumpkin puree that had been waiting for the perfect moment, and my trusty Instant Pot staring back at me like a silent promise. The kitchen was a symphony of clinks and the occasional sigh of the rain on the windows, and I could already taste the smoky, sweet, and nutty notes dancing together before I even turned the pot on. That night, I learned that the perfect chili isn’t just about heat; it’s about layers of flavor that hug you like a cozy blanket while still giving you that satisfying bite you crave.
Picture this: the moment the lid seals, the Instant Pot starts humming, and the aroma of cumin, smoked paprika, and roasted walnuts begins to fill the room, weaving through the raindrops and turning the kitchen into a sanctuary of scent. You’ll hear the gentle sizzle of onions caramelizing in olive oil, the faint pop of garlic as it hits the hot pan, and the subtle whisper of the pot building pressure – it’s practically a culinary concert. My first spoonful was a revelation – the pumpkin’s natural sweetness balanced the earthiness of beans, while the walnuts added a buttery crunch that made every bite feel like a celebration.
Most pumpkin chili recipes out there treat the pumpkin as a mere filler, but this version gives it center stage, amplified by the richness of toasted walnuts and a hint of maple that sings like a choir. I dare you to taste this and not go back for seconds; the combination is so addictive that even the most skeptical meat‑lover in the house will be begging for the recipe. I’ll be honest — I ate half the batch before anyone else got to try it, and that’s the kind of confession that tells you just how good this dish really is.
Okay, ready for the game‑changer? I’m about to reveal a secret technique that most cooks completely miss: toasting the walnuts directly in the Instant Pot before adding the liquids, which unlocks a depth of flavor that’s nothing short of magical. Let me walk you through every single step — by the end, you’ll wonder how you ever made it any other way.
What Makes This Version Stand Out
- Taste: The sweet pumpkin puree pairs with smoky paprika and a whisper of cinnamon, creating a flavor profile that feels both familiar and exciting.
- Texture: Creamy beans and silky pumpkin are punctuated by crunchy walnuts and pumpkin seeds, delivering a satisfying contrast in every spoonful.
- Simplicity: Thanks to the Instant Pot, you get a hands‑off cooking experience that still yields complex, layered flavors.
- Uniqueness: Toasted walnuts in the pot are a rare twist that adds a buttery, nutty depth you won’t find in standard chili recipes.
- Crowd Reaction: Even the most skeptical eaters admit this is hands down the best version you’ll ever make at home.
- Ingredient Quality: Using pure pumpkin puree (not canned pie filling) and fresh, raw walnuts makes all the difference.
- Cooking Method: The pressure‑cook seals in moisture, intensifying flavors while keeping the beans perfectly tender.
- Make‑Ahead Potential: This chili tastes even better the next day, making it perfect for meal prep or a cozy leftovers night.
Inside the Ingredient List
The Flavor Base
Pumpkin puree is the heart of this chili, delivering a velvety sweetness that balances the heat from chili powder and smoked paprika. Choose a pure pumpkin puree made from 100% pumpkin – no added sugars or spices – because you want the pure, earthy flavor to shine. If you can’t find pure pumpkin, a homemade puree (roasted pumpkin blended until smooth) is even better; it adds a subtle caramel note that you just can’t get from a jar. Skipping the pure pumpkin and using canned pumpkin pie filling will introduce unwanted spices and sweetness that throw off the delicate balance.
The combination of chili powder, smoked paprika, and cumin creates a smoky, slightly spicy backdrop that feels like a warm campfire on a crisp autumn night. I love using a blend that includes a pinch of ground cinnamon; it adds an almost imperceptible whisper of warmth that pairs beautifully with the pumpkin’s natural sweetness. If you’re sensitive to heat, reduce the chili powder by half and add a splash of apple cider vinegar for brightness.
The Texture Crew
Black beans and kidney beans bring protein and a hearty bite, while also soaking up the broth and spices for maximum flavor absorption. Rinse the beans thoroughly to remove any canned brine, which can make the dish overly salty. If you prefer a smoother texture, you can mash half of the beans with the back of a spoon before serving – the result is a luscious, thickened chili that still retains beans for chew.
Walnuts are the secret weapon here. Their buttery crunch contrasts the silky beans, and when toasted, they develop a toasty, almost caramelized edge that elevates the whole dish. If you’re allergic to nuts, substitute toasted pepitas or roasted chickpeas for a similar crunch without the flavor shift.
The Unexpected Star
Pumpkin seeds (pepitas) add a pop of texture on top, and they’re packed with magnesium and zinc, making the dish a nutritional powerhouse. Toast them lightly with a pinch of sea salt for an extra layer of crunch that sings when you bite. A drizzle of maple syrup is optional but recommended; it rounds out the flavors with a subtle caramel note that feels like a hug for your palate.
Olive oil is the silent workhorse, helping to sauté the aromatics and ensuring the walnuts don’t stick when you toast them. Use a good‑quality extra‑virgin olive oil for the best flavor; it adds a fruity undertone that complements the pumpkin perfectly.
The Final Flourish
A splash of vegetable broth (or water) is essential for creating the right consistency; you want the chili to be thick enough to coat a spoon but still have a little broth to sip. Salt and pepper are added at the end to taste, ensuring you don’t over‑season before the flavors have fully melded. Finally, a handful of fresh cilantro or a squeeze of lime can be added just before serving for a bright, fresh finish that cuts through the richness.
Everything's prepped? Good. Let's get into the real action...
The Method — Step by Step
Press the “Sauté” button on your Instant Pot and add the olive oil. Once the oil shimmers, toss in the diced onion and let it sweat for about 3 minutes, stirring occasionally until the edges turn translucent. Add the minced garlic and continue sautéing for another 30 seconds; you’ll hear a faint sizzle that tells you the garlic is releasing its aromatic oils. Watch the color change – the onions should be soft but not browned, and the garlic should be fragrant, not burnt.
Now it’s walnut time. Add the raw walnuts to the pot and let them toast for 2–3 minutes, stirring constantly. You’ll notice a nutty perfume filling the kitchen – that’s the signal they’re reaching that perfect toasted stage.
Kitchen Hack: If you’re short on time, you can pre‑toast the walnuts in a dry skillet while the onions are sweating; just add them to the pot when they’re golden.Stir in the chili powder, smoked paprika, cumin, and optional cinnamon. Let the spices bloom for about 1 minute, stirring constantly so they coat the walnuts and onions without scorching. You’ll see the mixture darken slightly and catch a deeper aroma – that’s the flavor foundation building.
Pour in the pumpkin puree, diced tomatoes (with their juices), and vegetable broth. Scrape the bottom of the pot with a wooden spoon to release any browned bits – those are flavor gold. Add the black beans and kidney beans, then give everything a gentle stir to combine. The pot should look thick, rich, and a little glossy.
Season with salt and pepper, then drizzle the maple syrup if you’re using it. This subtle sweetness balances the heat and brings out the natural caramel notes of the pumpkin. Secure the lid, set the valve to “Sealing,” and select the “Manual” or “Pressure Cook” function on high pressure for 10 minutes.
While the pot builds pressure, take a moment to prep your toppings: toast the pumpkin seeds in a dry pan until they pop, and chop fresh cilantro if you like a bright finish. This is also the perfect time to set the table, because the moment the pressure releases, the kitchen will smell like an autumn festival.
When the timer dings, perform a quick release for 2 minutes, then switch to natural release for the remaining 8 minutes.
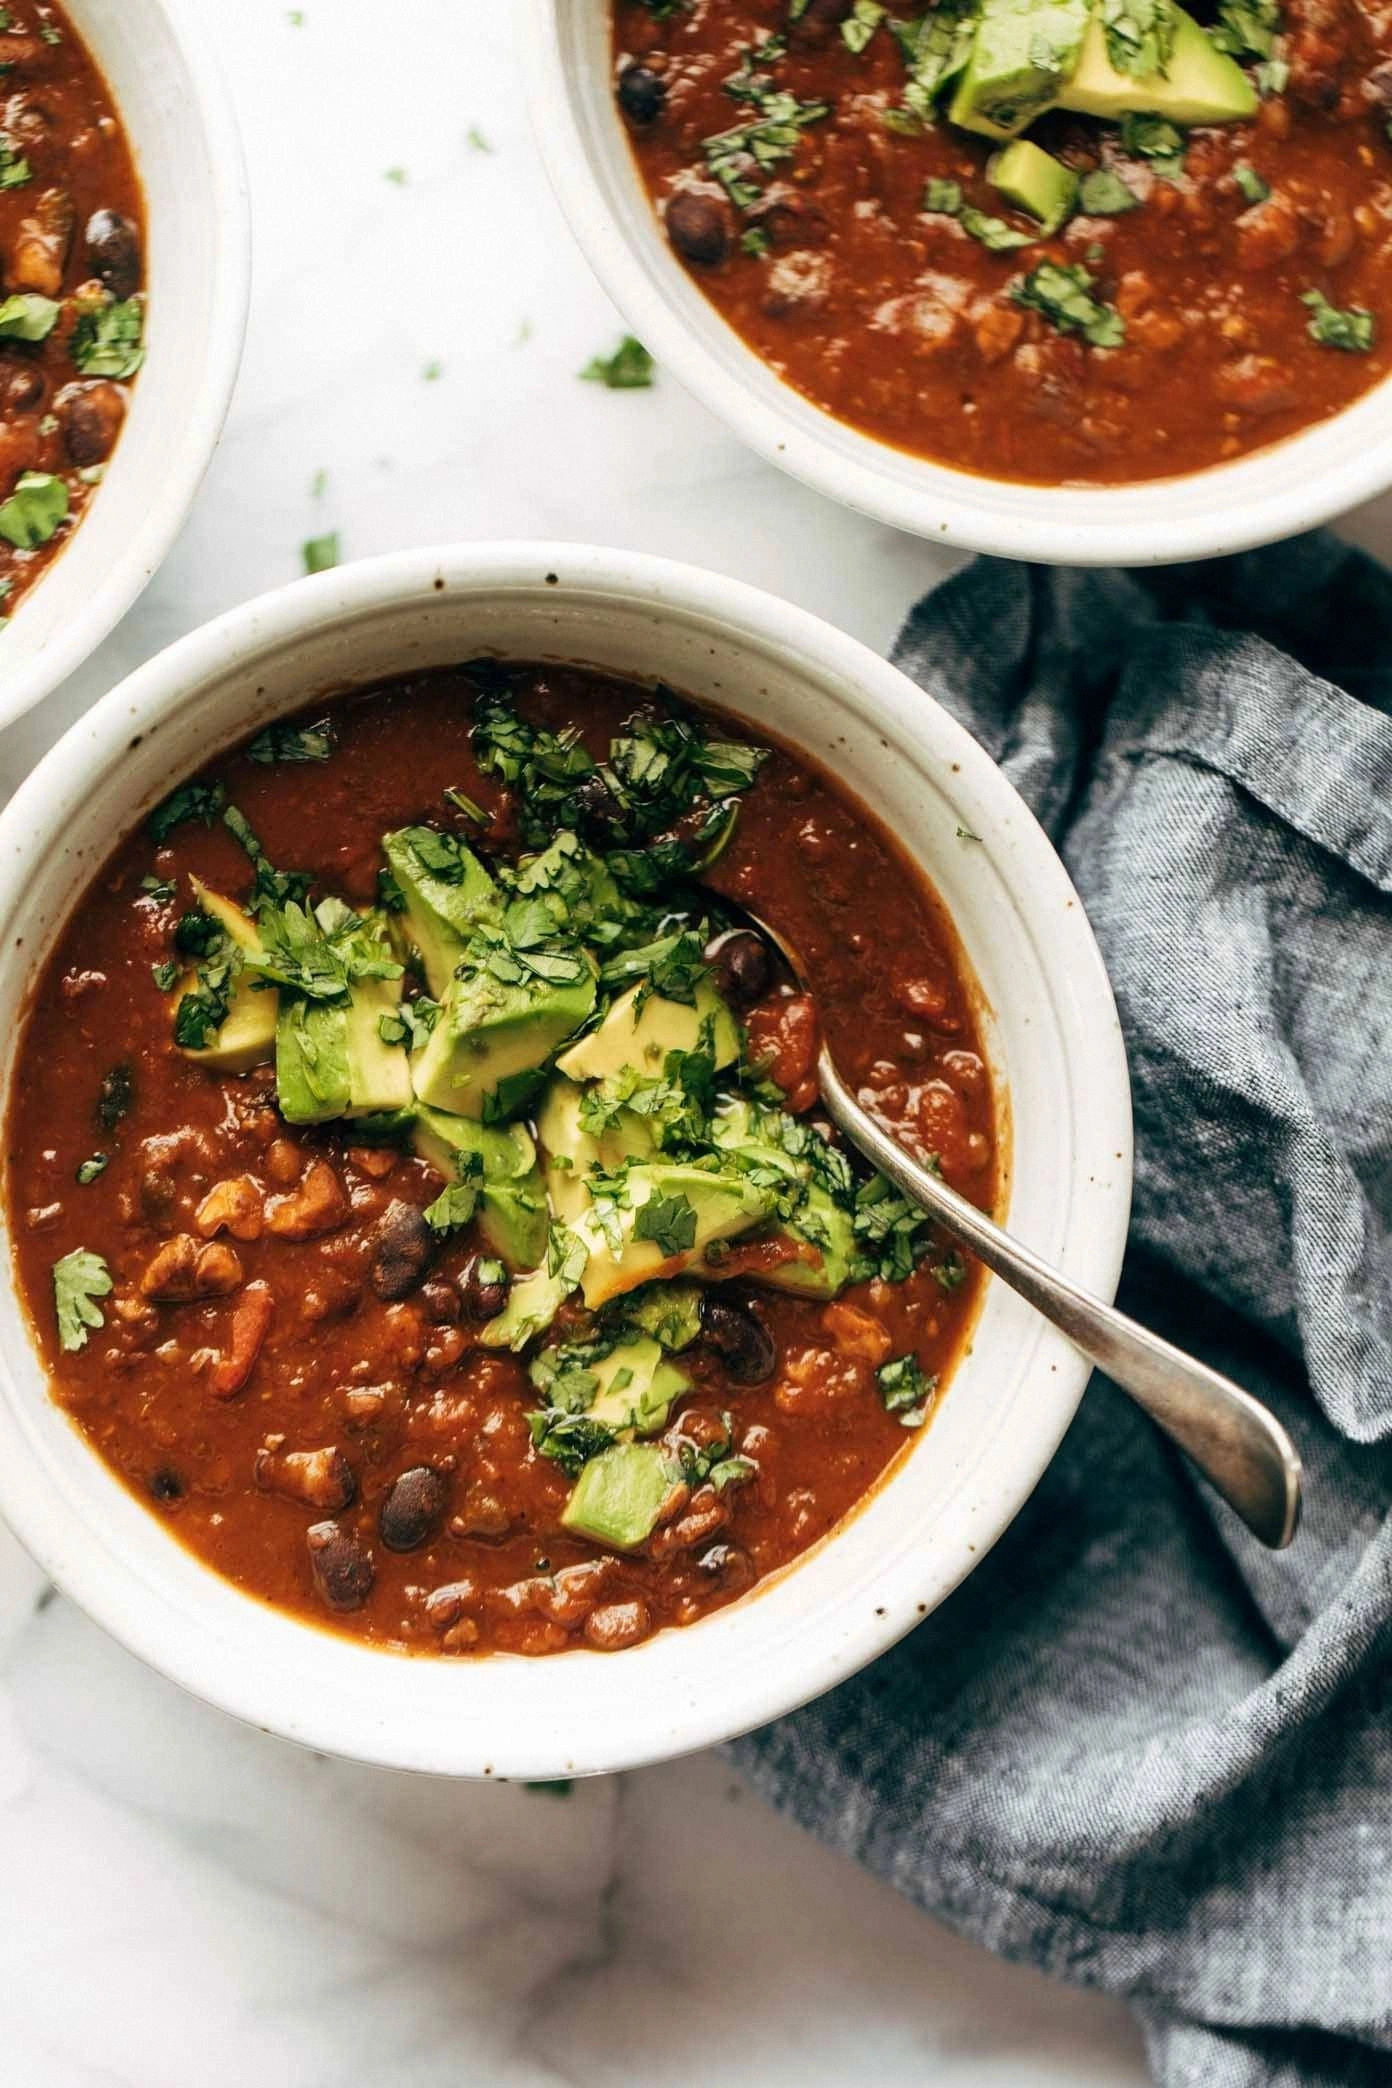
Once the pin drops, open the lid carefully.Watch Out: If you release the pressure too quickly, the hot liquid can sputter out – keep a kitchen towel handy and open the valve slowly.Give the chili a final stir; you’ll notice the sauce has thickened beautifully, coating the beans and walnuts like velvet. Taste and adjust seasoning if needed – a pinch more salt or a dash of extra maple syrup can bring it to perfection. Sprinkle the toasted pumpkin seeds, chopped walnuts, and cilantro on top just before serving. That final garnish adds texture, color, and a fresh pop that makes the dish look as good as it tastes.
Serve hot, ladling the chili into bowls, and enjoy the comforting embrace of pumpkin, beans, and walnuts. Pair it with crusty bread or a side of quinoa if you want extra carbs, but honestly, this chili stands proudly on its own. That first bite? Expect a sweet‑smoky depth, a creamy mouthfeel, and a crunchy surprise that makes you smile. And remember, leftovers taste even better after the flavors have had time to meld overnight.
Insider Tricks for Flawless Results
The Temperature Rule Nobody Follows
Never rush the sauté step – keep the pot on medium heat, not high. This allows the onions to soften evenly and the garlic to release its flavor without burning. If you notice the garlic browning too fast, lower the heat and add a splash more oil; the goal is a fragrant, golden base, not a bitter one. Trust me, a well‑built flavor foundation saves you from scrambling for extra seasoning later.
Why Your Nose Knows Best
Your nose is the ultimate timer. When the spices start to “pop” and you catch that earthy, smoky scent, it means they’re toasted just right. If the aroma turns acrid, you’ve crossed the line – quickly stir and add a teaspoon of broth to cool things down. This sensory check is better than any kitchen timer because it guarantees depth without bitterness.
The 5‑Minute Rest That Changes Everything
After you release the pressure, let the chili sit, uncovered, for five minutes. This brief rest lets the sauce thicken further and the flavors meld, giving you a richer, more cohesive bite. Skipping this step can leave the chili slightly watery and the walnuts less integrated. So set a timer, sip some tea, and let the magic happen.
Walnut Toasting Secrets
Balancing Sweet and Heat
If you love heat, increase the chili powder by a half teaspoon, but simultaneously add an extra half tablespoon of maple syrup to keep the sweet‑smoky balance. The sugar doesn’t just sweeten; it rounds the edges of the spice, preventing a harsh burn. Play with this ratio to suit your palate, but always taste before serving – the perfect equilibrium is a dance, not a formula.
Creative Twists and Variations
This recipe is a playground. Here are some of my favorite ways to switch things up:
Spicy Sausage Swap
Replace half of the beans with sliced smoked sausage or chorizo for a meat‑lover’s version. The sausage renders fat that deepens the broth, while the pumpkin still provides its sweet backbone. Serve with a dollop of sour cream to tame the extra heat.
Curry‑Infused Chili
Swap smoked paprika for a tablespoon of curry powder and add a splash of coconut milk at the end. The result is a Thai‑inspired twist where the nuttiness of walnuts meets the fragrant warmth of curry. Garnish with fresh cilantro and a squeeze of lime for a bright finish.
Vegan Protein Boost
Add a cup of cooked quinoa or lentils in place of one of the bean varieties to up the protein without changing the flavor profile. The grains absorb the broth, making the chili even heartier. This is perfect for meal‑prep athletes looking for a balanced, plant‑based power bowl.
Autumn Harvest Mix
Stir in diced sweet potatoes and a handful of dried cranberries during the pressure‑cook stage. The sweet potatoes add a velvety texture, while the cranberries give occasional bursts of tartness that contrast the savory base. This version feels like a Thanksgiving side dish in a bowl.
Cheesy Finish
Right before serving, sprinkle shredded sharp cheddar or a crumble of goat cheese over the hot chili. The cheese melts into the sauce, creating a luscious, creamy layer that marries beautifully with the pumpkin and walnuts. A little extra indulgence never hurt anyone.
Storing and Bringing It Back to Life
Fridge Storage
Transfer the cooled chili to an airtight container and store it in the refrigerator for up to four days. The flavors will deepen, and the walnuts will maintain a pleasant crunch if kept separate and added just before reheating. When you’re ready to eat, reheat gently on the stovetop over low heat, stirring occasionally.
Freezer Friendly
Portion the chili into freezer‑safe bags or containers, leaving a little headspace for expansion. It freezes beautifully for up to three months. To thaw, move it to the fridge overnight, then reheat in the Instant Pot on “Sauté” mode with a splash of water or broth to revive the sauce’s silky texture.
Best Reheating Method
When reheating, add a tablespoon of water or vegetable broth per cup of chili and cover the pot. The added moisture creates steam that restores the original creaminess, preventing the chili from drying out. Finish with a fresh sprinkle of walnuts or pumpkin seeds for that original crunch you love.