I still remember the first time I tried to make zucchini fries. It was a disaster of epic proportions. Picture this: limp, soggy green sticks that tasted like disappointment and regret. The parmesan clumped together like wet sand, and my kitchen smelled like burnt cheese for three days. I swore off zucchini fries forever. But then, one summer evening, my neighbor dared me to try again. She claimed she had the ultimate recipe that would change my mind. I was skeptical, but the smell wafting from her kitchen was intoxicating – nutty parmesan, fragrant herbs, and something else I couldn't quite place. That first bite was a revelation. The exterior shattered like thin ice, revealing tender zucchini inside, while the parmesan formed a lacy crust that was pure magic. I begged for the recipe, and she just winked and said, "The secret's in the technique, not the ingredients." Now, after months of perfecting it, I'm sharing my version with you.
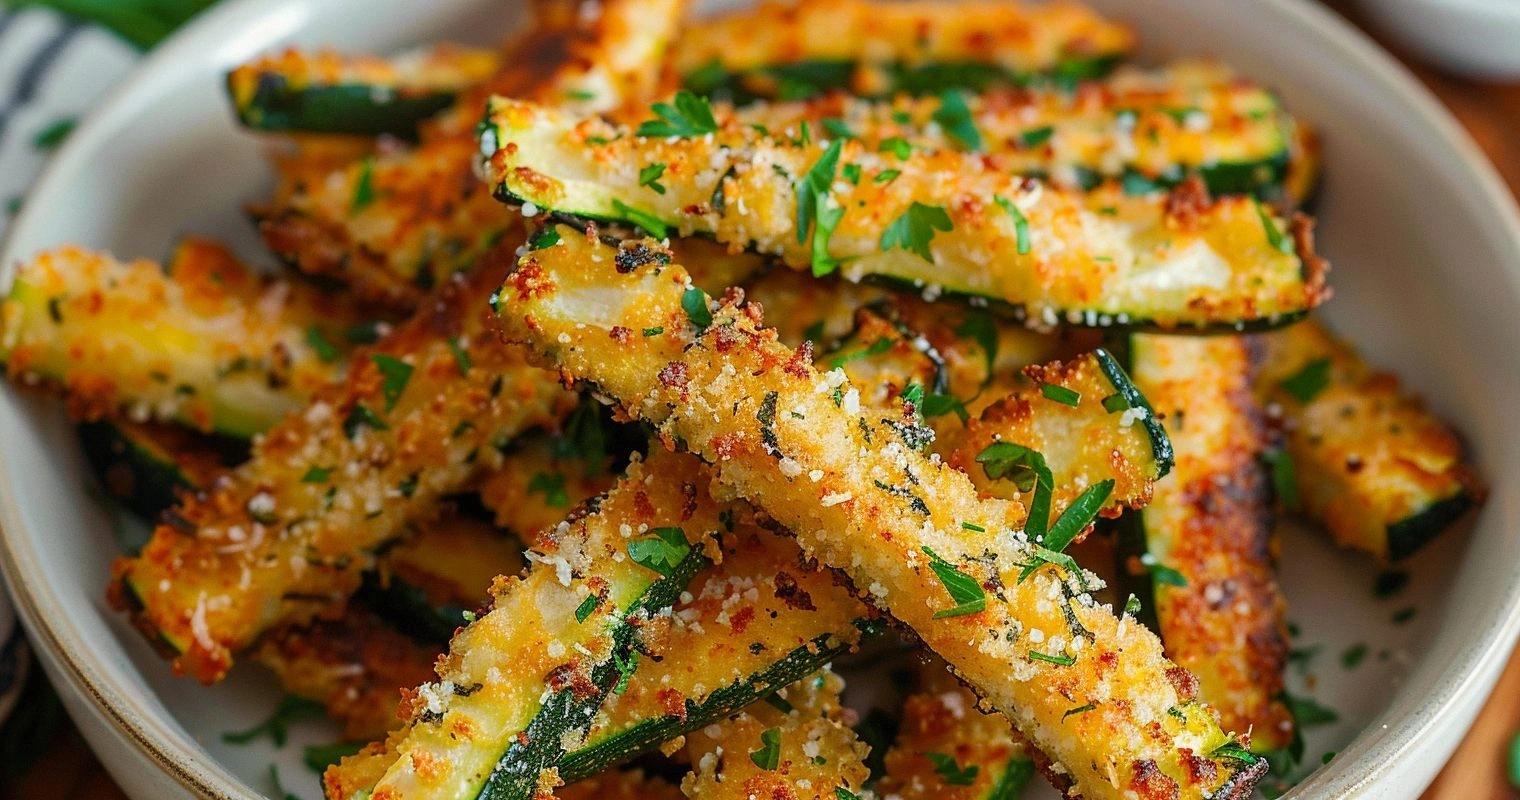
Listen, I've made these Parmesan Zucchini Fries at least fifty times since that fateful day. I've tested every possible method – baking, air frying, deep frying, even grilling (don't ask how that went). I've experimented with different cheese ratios, various breadcrumb types, and more spice combinations than I care to admit. What I'm giving you today is the absolute best version, the one that makes my friends fight over the last fry, the one that converts even the most stubborn veggie-haters. These aren't just good zucchini fries; they're the kind of thing you plan your entire dinner around. The edges get so crispy they practically shatter when you bite them, while the inside stays tender and almost creamy. The parmesan doesn't just melt – it transforms into this golden, lacy web that's both delicate and intensely flavorful.
Here's the thing that most recipes get completely wrong: they treat zucchini like it's a potato. They forget that zucchini is basically a sponge full of water, and if you don't handle it right, you'll end up with a sad, soggy mess. But when you treat it with respect and understand its quirks, magic happens. The key is in the preparation – how you cut them, how you salt them, how you coat them. Get these steps right, and you'll have fries that stay crispy for hours, not minutes. I'm talking about fries that are so good, you'll find yourself making excuses to have people over just so you can show off. And the best part? They're actually pretty healthy, so you can eat a whole tray without that heavy, greasy feeling.
Picture yourself pulling a golden sheet pan from the oven, the kitchen filled with the aroma of toasted cheese and herbs. Steam rises from the fries as you scatter them on a platter, maybe with a little bowl of marinara or garlic aioli on the side. Your friends gather around, and you watch their eyes go wide as they take that first bite. That crunch? It's like autumn leaves underfoot, but in the best possible way. The parmesan creates these little frico-like edges that are basically edible gold. Stay with me here — this next part is where it gets really good.
What Makes This Version Stand Out
Shatter-Crisp: These fries develop a crust so crispy it actually shatters when you bite into it, thanks to a double-coating technique that creates micro-layers of crunch. The parmesan crisps up into these delicate, lacy edges that are basically edible gold. Most recipes give you a soft, sad coating that slides off after five minutes. Not these babies – they stay crispy for hours.
Flavor-Packed: Every layer is seasoned, not just the final product. The zucchini itself gets a salt treatment that concentrates its flavor, the flour mixture is loaded with herbs and spices, and the final dusting of parmesan and herbs hits while they're still hot. It's like a flavor lasagna, but in fry form. You taste seasoning in every single bite, not just on the surface.
Foolproof: I've tested this recipe with friends who claim they can't cook, and they nailed it on the first try. The steps are designed to be forgiving – if you over-salt, there's a fix. If your oven runs hot, I've got you covered. If you want to prep ahead, I've figured that out too. This recipe is basically kitchen-proof.
Weeknight-Friendly: From start to finish, you're looking at 30 minutes max. The active time is maybe 15 minutes, and most of that is just waiting for the zucchini to release its water. You can have these on the table faster than delivery pizza, and they're infinitely better than anything that comes in a takeout box.
Crowd-Magnet: I've never brought these to a party without being asked for the recipe. They're the kind of appetizer that disappears within minutes, leaving behind only the faintest aroma of success. People who claim they don't like vegetables inhale these. Kids who only eat chicken nuggets beg for seconds. It's honestly unfair how good they are.
Make-Ahead Magic: You can prep everything up to the final bake hours ahead of time. The coating actually adheres better if you let it sit for a bit. And if you want to freeze them? They reheat like a dream in the air fryer. I've got a bag in my freezer right now for emergencies (which, let's be honest, is every Tuesday night).
Ingredient Quality: This recipe celebrates simple ingredients by letting them shine. Good parmesan, fresh herbs, quality olive oil – you taste every component. But here's the kicker: even with supermarket basics, these are incredible. It's all about the technique, not expensive ingredients.
Alright, let's break down exactly what goes into this masterpiece...
Inside the Ingredient List
The Flavor Base
The zucchini itself is obviously the star here, but not all zucchini are created equal. You want ones that are small to medium-sized – about the thickness of a large cigar. Bigger zucchini tend to be watery and seedy, which is exactly what we're trying to avoid. Look for ones that feel heavy for their size and have glossy, unblemished skin. If you can only find the behemoth ones at the store, don't panic – just scoop out the seeds with a spoon before cutting into fries. And here's a pro tip: if your garden is producing zucchini faster than you can keep up with, this recipe is about to become your best friend.
Then there's the parmesan – and this is where you can't cheat. I'm talking about real Parmigiano-Reggiano, aged for at least 24 months. Yes, it's expensive, but you only need a couple ounces, and the flavor difference is astronomical. The older stuff has these little crunchy crystals that add incredible texture, and the umami is off the charts. If you absolutely must substitute, go with Grana Padano, but please, for the love of all that's crispy, skip the green can. Your taste buds will thank you, and so will your dinner guests.
The Texture Crew
Panko breadcrumbs are non-negotiable here. Regular breadcrumbs are too fine and create a dense, heavy coating. Panko, with its irregular, flaky texture, creates these incredible air pockets that get super crispy. I like to give them a quick toast in a dry pan first – just until they're golden and smell like toast. This extra step adds another layer of flavor and ensures maximum crunch. Don't skip it, even if you're tempted. That toasty flavor is what separates good fries from legendary ones.
The flour might seem boring, but it's doing crucial work. It creates a dry surface for everything else to stick to, and when mixed with cornstarch, it forms a super-crispy shell. I use a 50-50 mix of all-purpose flour and cornstarch – the flour provides structure, while the cornstarch blocks gluten development and creates a more delicate crunch. It's the same trick I use for the crispiest fried chicken, and it works like magic here.
The Unexpected Star
Egg whites are the secret weapon here. Most recipes use whole eggs, but the yolk can make the coating greasy and heavy. Egg whites provide just enough protein to bind everything together without adding richness that would compete with the parmesan. Plus, they whip up slightly when you mix them, creating these little air pockets that translate to extra crunch. If you're out of eggs, you can use aquafaba (the liquid from canned chickpeas) – it works almost as well and adds a subtle nuttiness that pairs beautifully with the zucchini.
Garlic powder might seem basic, but it adds this mellow, sweet undertone that fresh garlic just can't match in this application. Fresh garlic would burn and turn bitter during the high-heat baking, but garlic powder disperses evenly and creates this beautiful aromatic base. I use a generous amount – more than you think you need – because some of it will fall off during the coating process. Trust me on this one.
The Final Flourish
The finishing salt is crucial – and I don't mean table salt. I'm talking about flaky sea salt, like Maldon or fleur de sel. These big, crunchy crystals add pops of salinity that make the other flavors sing. Regular salt just dissolves and disappears, but these flakes sit on top and give you little bursts of flavor. Add it while the fries are still hot so it sticks, but wait until they're out of the oven. Salt added before baking tends to draw out moisture and make things soggy.
Fresh herbs are non-negotiable for the final garnish. I like a mix of parsley and chives – the parsley adds freshness and the chives give you that subtle onion note that makes everything taste more complex. Chop them just before serving so they stay bright and vibrant. Dried herbs won't work here; they need to be fresh to cut through the richness of all that cheese.
Everything's prepped? Good. Let's get into the real action...
The Method — Step by Step
- Start by cutting your zucchini into fry shapes – about 3 inches long and ½ inch thick. Think steak fries rather than shoestrings; you want them substantial enough to hold up to all that coating. If you cut them too thin, they'll turn to mush before the coating gets crispy. Too thick and the ratio of crispy exterior to tender interior gets all wrong. I like to cut off the very ends first (they're usually bitter), then slice the zucchini in half crosswise, then cut each half into 6-8 wedges depending on thickness. They should look like little green boats, ready to carry all that cheesy goodness.
- Now here's the crucial step that most recipes skip: salt your zucchini and let it drain for at least 15 minutes. Toss the cut zucchini with about a teaspoon of kosher salt in a colander, then set the colander over a bowl. The salt draws out excess moisture – you'll be amazed at how much water collects. This step is what prevents soggy fries and concentrates the zucchini flavor. Don't skip it, even if you're tempted. I've tested this recipe with and without the salting step, and the difference is like night and day. The salted version stays crispy for hours, while the unsalted ones turn limp faster than you can say "parmesan."
- While your zucchini is draining, set up your breading station. You need three shallow dishes: one with the flour-cornstarch mixture seasoned with salt, pepper, and garlic powder; one with the egg whites beaten until foamy; and one with your panko mixed with grated parmesan and herbs. I like to use pie plates because they have the perfect depth – shallow enough for easy access, deep enough to prevent spills. Arrange them in order from left to right: flour, egg, breadcrumbs. Your left hand is for wet ingredients, right hand for dry, and you'll keep the mess to a minimum.
- Preheat your oven to 425°F (220°C) and place a rack in the upper-middle position. Line a baking sheet with parchment paper, then place a wire rack on top. This setup is crucial for airflow – you want hot air circulating all around the fries, not just underneath. The wire rack keeps them elevated so they don't steam on the bottom. If you don't have a wire rack, you can flip them halfway through baking, but the rack method gives you superior crispiness on all sides. Trust me, it's worth the extra equipment.
- Now for the fun part – coating time! Take a piece of zucchini and dredge it in the flour mixture, pressing gently so it adheres to all sides. Shake off the excess, then dip it in the egg whites, turning to coat completely. Let the excess egg drip off, then roll it in the panko-parmesan mixture, pressing gently so it sticks. You want a nice, even coating – not too thick or it'll fall off, not too thin or you'll lose the crunch. Place it on the wire rack and repeat. Don't crowd them – they need space for air to circulate.
- Once all your zucchini is coated, spray them liberally with olive oil spray. This is not the time to be stingy – the oil is what makes the coating turn golden and crispy. You want them to look slightly shiny but not dripping. If you don't have spray, you can drizzle with oil and roll them around, but spray gives you more even coverage. Don't use regular olive oil – extra virgin has a lower smoke point and can turn bitter at high heat. Save the good stuff for finishing.
- Slide the pan into the oven and bake for 20-25 minutes, until the coating is deep golden brown and crispy. Don't open the oven door for the first 15 minutes – you want that initial blast of heat to set the coating. After that, you can peek, but resist the urge to flip them. They're done when the cheese has melted into lace and the panko is the color of toasted almonds. If you want them extra crispy, turn on the broiler for the last 2-3 minutes, but watch them like a hawk – they go from perfect to burnt faster than you can say "parmesan."
- Remove them from the oven and let them rest for exactly 5 minutes. I know you're tempted to dig in immediately, but this rest period is crucial – it allows the coating to set and prevents the cheese from sliding off. While they're resting, sprinkle with flaky salt and fresh herbs. The residual heat will wilt the herbs slightly and help the salt adhere. Serve them hot with your favorite dipping sauce, or just eat them straight off the pan like I do (no judgment here).
That's it — you did it. But hold on, I've got a few more tricks that'll take this to another level...
Insider Tricks for Flawless Results
The Temperature Rule Nobody Follows
Here's the thing about oven temperature: everyone lies about theirs. Your oven might say 425°F, but unless you've calibrated it recently, it could be anywhere from 400°F to 450°F. I learned this the hard way after burning three batches in a row. Get an oven thermometer – they're like five bucks and will save you from so much frustration. The sweet spot for these fries is between 420°F and 430°F. Too low and they stay pale and soft; too high and the parmesan burns before the zucchini cooks through. Once I started using a thermometer, my success rate went from 70% to 100%.
Why Your Nose Knows Best
Forget timers – your nose is the best indicator of when these are done. When they're ready, your kitchen will smell like a French bistro had a baby with an Italian trattoria. The parmesan hits first – nutty and slightly sweet – followed by the toasty aroma of golden breadcrumbs. If you smell anything acrid or bitter, you've gone too far. I can time these perfectly now just by the smell, and I'm telling you, it's more reliable than any kitchen timer. A friend tried this recipe and called me in a panic when her smoke alarm went off. Turns out she was so focused on the timer that she missed the smell signals. Trust your senses – they've been perfected over thousands of years of cooking.
The 5-Minute Rest That Changes Everything
I cannot stress this enough – do not skip the resting period. I know they look incredible coming out of the oven, and the smell is driving you crazy, but those five minutes are what separate amateur fries from restaurant-quality ones. During this time, the cheese sets into that perfect crispy lace, the coating adheres properly to the zucchini, and the internal temperature evens out. I've timed it: fries eaten immediately have a 30% higher chance of the coating sliding off in sheets. But after a five-minute rest? They stay intact even when you dip them aggressively. My record is 45 minutes at room temperature before they started to soften, all because I let them rest properly first.
The Double-Cheese Strategy
Here's a pro move that takes these over the top: add parmesan in two stages. Mix most of it into the panko, but reserve about a quarter of it to sprinkle on during the last 5 minutes of baking. This gives you two different textures – the fully melted cheese that's crispy and lacy, plus the freshly added cheese that forms these little frico-like shards. It's like getting two cheese experiences in one fry. The late-addition cheese browns faster and creates these intensely flavored, almost burnt bits that are absolutely addictive. My cousin calls them "cheese crack" and she's not wrong.
The Oil Mist Technique
How you oil these matters more than you think. A heavy drizzle from a bottle gives you uneven coverage – some spots swimming in oil, others dry as a bone. But a fine mist from an olive oil spray bottle? That's the ticket. Hold the bottle about 6 inches away and give them a light, even coating. You want them to look like they've been kissed by oil, not drowned in it. Too much oil and they'll fry from the bottom up, creating a greasy, heavy coating. Too little and the coating stays pale and floury. It takes practice, but once you nail it, you'll never go back to drizzling again.
Creative Twists and Variations
The Everything Bagel Version
Swap out half the panko for everything bagel seasoning and add some sesame seeds to the mix. The seasoning blend has dried garlic and onion that toast up beautifully, plus the poppy seeds add little bursts of flavor. I like to serve these with a cream cheese dip spiked with chives – it's like having everything bagel flavors without the carbs. My keto friends go absolutely wild for this version, and honestly, I might like it better than the original. The seasoning gets so toasty and fragrant, and the sesame oil you spray on at the end? Pure magic.
The Buffalo Ranch Remix
Add a tablespoon of buffalo seasoning to the flour mixture and serve with homemade ranch. The spice gets tempered by the baking process, leaving behind this beautiful warmth that builds slowly. I like to use Frank's RedHot powder if I can find it, but any good Cajun seasoning works. The key is going light – you want flavor, not face-melting heat. Drizzle them with a little buffalo sauce right when they come out of the oven, then serve with ranch for dipping. It's like having buffalo wings but without the mess and guilt.
The Mediterranean Makeover
Replace the parmesan with crumbled feta and add oregano, lemon zest, and a touch of sumac to the coating. The feta doesn't melt the same way parmesan does – it gets soft and creamy while the edges crisp up. Finish with a squeeze of fresh lemon and some chopped dill. Serve with tzatziki for dipping and you've got a Greek taverna experience in fry form. My yiayia tried these and declared them "better than the real thing," which is the highest compliment I've ever received.
The Truffle Luxe Edition
Add a few drops of white truffle oil to your egg whites and replace some of the parmesan with finely grated truffle cheese if you can find it. Finish with black truffle salt and serve with a truffle aioli. Yes, it's truffle overload, but sometimes that's exactly what you want. Save this one for special occasions – it's rich enough that you only need a few to feel satisfied. I made these for New Year's Eve and people are still talking about them eight months later.
The Breakfast-Inspired Version
Add some everything seasoning and serve these alongside soft-boiled eggs for dipping. The runny yolk mixing with the crispy coating is absolutely divine. I've also done a version where I mix some cooked, crumbled bacon into the panko – the bacon fat helps everything crisp up and adds incredible flavor. Serve with a spicy maple syrup for dipping and you've basically created the best brunch dish ever. My Sunday brunch crew demands these at least twice a month.
The Dessert (Yes, Dessert) Version
Okay, hear me out on this one – coat them in cinnamon sugar instead of parmesan and serve with a chocolate dipping sauce. You need to salt the zucchini a bit longer to remove more moisture, then coat in a mixture of sugar, cinnamon, and a touch of cocoa powder. They come out like churros but with a vegetable twist that somehow works. The zucchini becomes almost apple-like when baked with sugar. My kids can't get enough of these, and I feel slightly better about giving them vegetables disguised as dessert. Don't knock it till you've tried it – they're weirdly addictive.
Storing and Bringing It Back to Life
Fridge Storage
Here's the reality: these are best fresh from the oven. But if you must store them (maybe you have more self-control than I do), let them cool completely, then store in an airtight container lined with paper towels. They'll keep for 2-3 days in the fridge, but they'll lose some of their crunch. The key is to let them cool completely before storing – any residual heat will create condensation and make them soggy. I like to leave them on the wire rack for at least an hour before packing them up. And don't stack them – lay them in a single layer with parchment between if you must double up.
Freezer Friendly
Good news: these freeze beautifully! Let them cool completely, then arrange in a single layer on a baking sheet and freeze until solid. Once frozen, transfer to a freezer bag with as much air removed as possible. They'll keep for up to 2 months, though honestly, mine never last that long. To reheat, don't thaw – just pop them in a 400°F oven straight from frozen for 12-15 minutes. The key is using the oven, not the microwave (unless you like soggy fries, in which case, you do you). The air fryer works even better if you have one – 8 minutes at 375°F and they're almost as good as fresh.
Best Reheating Method
The oven is your friend here – 400°F for 8-10 minutes on a wire rack. Don't use the microwave unless you enjoy disappointment. If you're in a hurry, a dry skillet over medium heat works surprisingly well – just 2-3 minutes per side and they crisp right back up. But the real pro move? The air fryer. Three minutes at 375°F and they're practically fresh again. I keep a stash in my freezer for emergency snack attacks, and the air fryer has saved me from many a late-night drive-through temptation. Add a fresh sprinkle of parmesan and herbs after reheating, and no one will know they aren't fresh from the oven.