Picture this: I’m standing in a cramped kitchen, the oven timer beeping like a nervous drummer, and the scent of chocolate melting in the air. I had just finished a disastrous batch of classic chocolate chip cookies that turned out more like chewy bricks than heavenly morsels. I stared at the tray, wondering if I could salvage anything. That night, a friend dared me to turn a handful of peanut butter cups into something that would make even my picky sister swoon. I grabbed the ingredients, and the kitchen became a laboratory of flavor explosions.
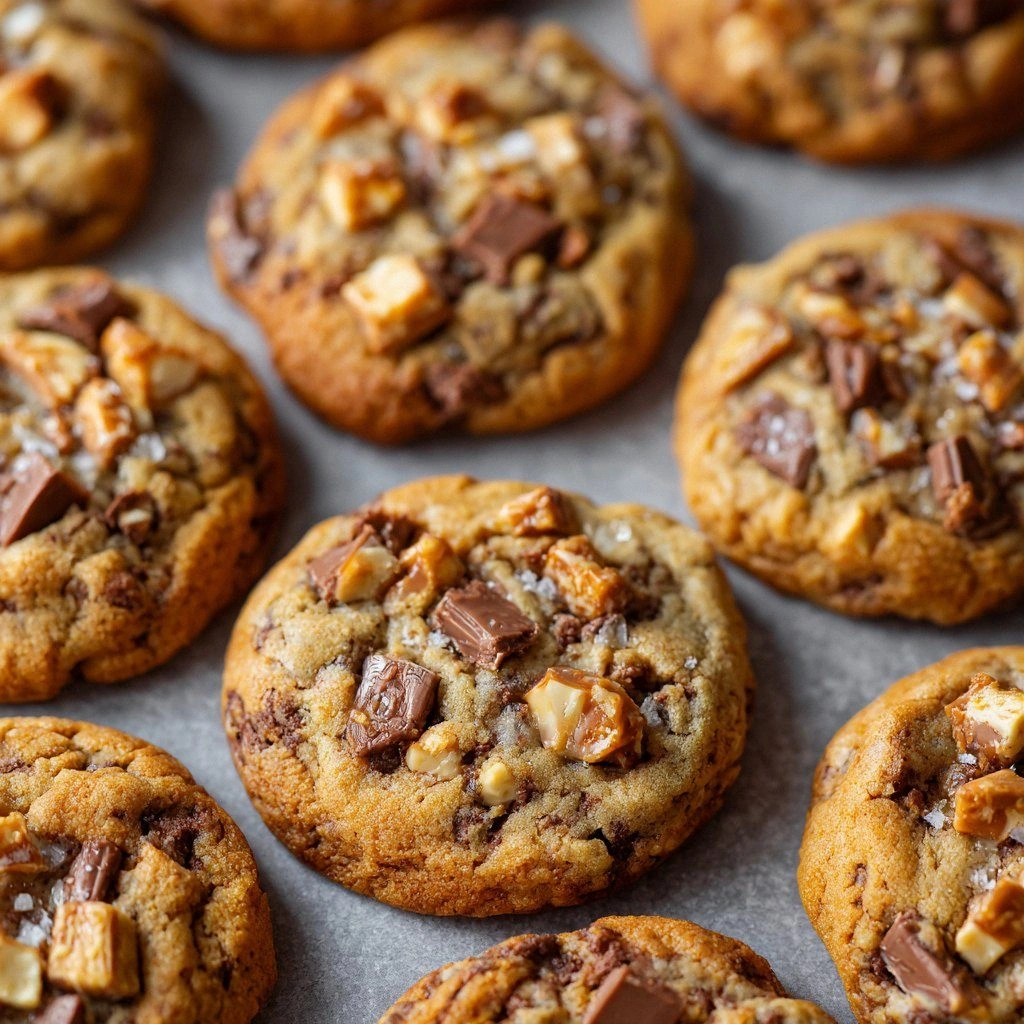
The first thing you notice is the deep, glossy sheen of the melted chocolate, a promise of crunch hidden beneath a silky, peanut butter‑laden surface. When you bite into a cookie, the initial crackle of the crisp edge gives way to a molten peanut butter core that oozes like honey. The aroma is a comforting blend of roasted peanuts and dark chocolate, a smell that lingers on your spoon long after the last bite. The texture is a paradox: a firm exterior that snaps with a satisfying bite, yet a soft, gooey center that clings to the back of your teeth. It’s the kind of cookie that makes you pause, savor, and then, inevitably, go back for seconds. I dare you to taste this and not go back for seconds.
What makes this version stand out? It’s not just the recipe—it’s the philosophy. I’ve stripped away the fluff that often plagues cookie recipes: no unnecessary leavening, no over‑mixing, and a deliberate use of real peanut butter cups instead of a bland chocolate filling. The result is a cookie that balances sweet, salty, and nutty in a single bite. It’s the kind of treat that feels both indulgent and comforting, like a hug in cookie form. By the end of this post, you’ll wonder how you ever made peanut butter cup cookies any other way.
What Makes This Version Stand Out
- Flavor: The combination of creamy peanut butter and dark chocolate creates a depth that regular chocolate chips can’t match. The subtle bitterness of the chocolate balances the sweetness of the peanut butter, leaving a lingering finish.
- Texture: The cookies are crisp on the outside yet melt-in-your-mouth on the inside. This contrast is achieved by a precise bake time and the use of peanut butter cups that soften just enough.
- Simplicity: With only a handful of pantry staples, you can whip up a batch in 45 minutes. No fancy equipment or exotic ingredients required.
- Uniqueness: Using actual peanut butter cups as the filling rather than a homemade filling gives each cookie a distinct bite of chocolate that’s hard to replicate.
- Crowd Reaction: Friends and family rave about the “wow” factor. The cookies become the center of any gathering, sparking conversation and delight.
- Ingredient Quality: A high‑quality peanut butter and premium chocolate elevate the flavor profile, making each bite feel indulgent.
- Cooking Method: The technique of folding in melted peanut butter cups before chilling the dough creates pockets of goo that melt perfectly when baked.
- Make‑Ahead Potential: The dough can be prepared a day ahead and baked when needed, saving time on busy evenings.
Alright, let’s break down exactly what goes into this masterpiece…
Inside the Ingredient List
The Flavor Base
All‑purpose flour is the backbone of the cookie, giving it structure without overpowering the peanut butter. A light hand with the flour—no more than 2 cups—ensures the cookies remain tender. If you’re looking for a gluten‑free version, swap in a 1:1 gluten‑free blend that contains xanthan gum; this will mimic the binding properties of regular flour.
The Sweetener Crew
White sugar and brown sugar each contribute distinct notes. White sugar offers a clean sweetness that balances the richness, while brown sugar adds moisture and a hint of molasses flavor. Skipping either will change the cookie’s bite; for instance, using only brown sugar will result in a denser, more caramel‑like cookie. A quick swap: replace brown sugar with honey or maple syrup for a natural sweetener, but adjust the liquid content accordingly.
The Unexpected Star
Peanut butter cups are the secret weapon. Their chocolate shell provides a crunchy contrast, while the peanut butter filling delivers that signature goo. If you’re allergic to peanuts or simply want a different flavor, try chocolate‑covered almonds or hazelnut cups. The key is to let the cups melt just enough to create pockets of chocolatey peanut butter that burst with each bite.
The Final Flourish
Vanilla extract is the subtle whisper that ties everything together. A teaspoon is enough to lift the sweetness without drowning the peanut butter’s nutty aroma. For a deeper flavor, use a vanilla bean or vanilla almond extract. A pinch of sea salt on top before baking enhances the chocolate’s bitterness and the peanut butter’s richness, creating a balanced flavor profile.
Everything’s prepped? Good. Let’s get into the real action…
The Method — Step by Step
- Preheat and Prep: Set your oven to 350°F (175°C) and line two baking sheets with parchment paper. This creates a non‑stick surface and ensures even baking. The moment the oven heats up, you’ll hear that faint crackle of the metal—an early sign that everything is on track.
- Combine Dry Ingredients: In a medium bowl, whisk together 2 cups of flour, 1 tsp baking soda, and ½ tsp salt. Keeping the mixture dry prevents clumping and ensures a light crumb. If you’re using a gluten‑free blend, add ½ tsp xanthan gum for structure.
- Cream Butter and Sugars: In a separate large bowl, beat 1 cup softened butter with ¾ cup white sugar and ¾ cup brown sugar until light and fluffy—about 3 minutes. The mixture should be pale and airy, a sign that the butter is properly incorporated.
- Incorporate Vanilla: Add 1 tsp vanilla extract to the creamed butter and stir until combined. This step is crucial for flavor depth; skip it and the cookies will taste flat.
- Fold in Peanut Butter Cups: Melt 1 cup of peanut butter cups in a microwave or double boiler until they’re liquid but not fully melted into chocolate. Let them cool slightly, then fold them into the butter mixture. This creates pockets of chocolate‑peanut butter that will melt beautifully during baking.
- Combine Wet and Dry: Gradually add the dry mixture to the wet, beating after each addition until just combined. Overmixing will lead to tough cookies; stop as soon as the flour disappears.
- Chill the Dough: Wrap the dough in plastic wrap and refrigerate for 30 minutes to 1 hour. This step is the secret to crisp edges and chewy centers. The dough firms up, making it easier to roll and shape.
- Shape the Cookies: Roll the chilled dough into 1‑inch balls and place them 2 inches apart on the prepared sheets. For an extra touch, press a mini peanut butter cup into the center of each ball before baking; this creates a dramatic chocolate splash.
- Bake: Bake for 12–15 minutes, or until the edges are golden and the centers are set but still soft. Keep an eye on the cookies; they will continue to cook slightly on the sheet after removal.
- Cool: Allow the cookies to cool on the sheet for 5 minutes before transferring to a wire rack. This short rest lets the interior finish setting and prevents the cookies from breaking.
That’s it— you did it. But hold on, I’ve got a few more tricks that will take this to another level. Stay with me here—this is worth it.
Insider Tricks for Flawless Results
The Temperature Rule Nobody Follows
Many bakers bake at 375°F, but that temperature can cause the peanut butter to spread too quickly, flattening the cookie. Baking at 350°F keeps the chocolate from melting too fast, preserving the pockets of goo. If you’re using a convection oven, reduce the temperature by 25°F for optimal results.
Why Your Nose Knows Best
Trust the aroma: when the cookies start to emit a toasted, nutty scent, they’re ready. The smell is a reliable indicator that the sugars have caramelized and the peanut butter has set. A quick sniff can save you from overbaking.
The 5-Minute Rest That Changes Everything
After removing the cookies from the oven, let them rest on the sheet for 5 minutes. This brief pause allows the centers to firm up without drying out. A common mistake is transferring them too early, which leads to soft, doughy cookies.
Use a Silicone Baking Mat
A silicone mat offers an even heat distribution and eliminates the need for parchment paper, saving you time and reducing waste. It also makes cleanup a breeze—just wipe it with a damp cloth.
Add a Splash of Water Before Reheating
When reheating leftover cookies, add a tiny splash of water to the baking sheet. The steam will restore moisture, making the cookies feel fresh again. This trick is especially useful for cookies stored in the refrigerator.
Creative Twists and Variations
This recipe is a playground. Here are some of my favorite ways to switch things up:
Salted Caramel Peanut Butter Cups
Swap the standard peanut butter cups for salted caramel peanut butter cups. The caramel’s sweetness balances the chocolate, and the sea salt accentuates the peanut butter’s depth. Perfect for a sweet‑and‑salty indulgence.
Mint Chocolate Peanut Butter
Add ½ tsp mint extract to the wet mixture and use mint‑flavored chocolate chips instead of peanut butter cups. The mint gives a refreshing bite, ideal for summer gatherings.
Coconut‑Infused Cookies
Stir ½ cup shredded coconut into the dough before chilling. Coconut adds a tropical aroma and a chewy texture that pairs well with the peanut butter’s creaminess.
Almond Butter Variation
Replace peanut butter with almond butter for a nutty twist. Use chocolate chips instead of peanut butter cups to keep the chocolate flavor dominant. This variation caters to those who prefer a different nut profile.
Dark Chocolate & Sea Salt
Use dark chocolate chips and sprinkle a pinch of flaky sea salt on top before baking. The bitterness of dark chocolate is amplified by the salt, creating a sophisticated flavor experience.
Chocolate‑Covered Marshmallow Peanut Butter Cups
Replace the peanut butter cups with chocolate‑covered marshmallow peanut butter cups for a fluffy, marshmallowy center. The marshmallow adds a light, airy texture that contrasts with the cookie’s crunch.
Storing and Bringing It Back to Life
Fridge Storage
Store cookies in an airtight container at room temperature for up to 5 days. The sealed environment keeps the cookies fresh and prevents them from drying out. For extra freshness, add a slice of bread to the container; it absorbs excess moisture.
Freezer Friendly
Freeze the dough in a sealed bag for up to 3 months. When ready to bake, simply take out a portion, let it thaw slightly, and bake as directed. Freezing preserves the cookie’s texture and flavor.
Best Reheating Method
Reheat in a preheated 350°F oven for 5 minutes, or microwave on medium for 20 seconds. Adding a splash of water to the baking sheet before reheating creates steam that restores moisture, making the cookies feel fresh again. Avoid over‑microwaving, which can make them chewy.