I’ve always said that the heart of a kitchen is the smell of butter melting on a hot pan, but it wasn’t until a disastrous Sunday brunch that I truly understood how powerful a simple roll can be. Picture this: I was whipping up a batch of soft dinner rolls, the dough looking promising, when I realized I’d forgotten the butter that should have crowned each loaf. The result? Stale, flat rolls that tasted like cardboard. I laughed, blamed the recipe, and vowed to rewrite the entire process from scratch. Now, after countless trials, I’ve perfected a version that turns every roll into a buttery cloud of flavor, with a crisp edge that shatters like thin ice.
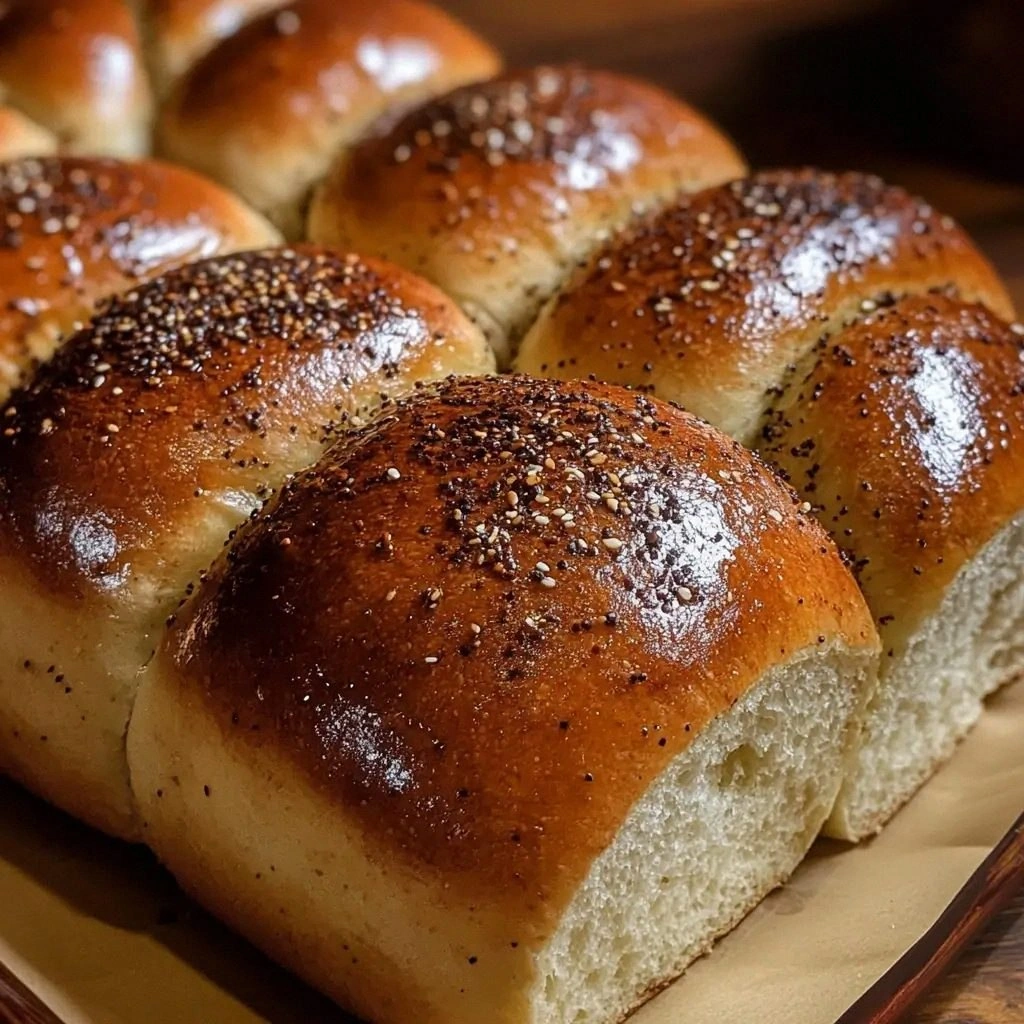
This isn’t just another recipe; it’s a culinary revelation that will have you shouting, “I dare you to taste this and not go back for seconds!” The aroma of freshly baked bread mingles with the rich scent of melted butter, creating a sensory experience that’s almost cinematic. When the first roll slides out of the oven, the golden crust gleams, and the steam curls like a fragrant halo. Inside, the dough is airy, tender, and infused with a subtle sweetness that balances the savory butter topping. If you’ve ever struggled with bland rolls, you’re not alone — and I’ve got the fix.
What sets this version apart is the meticulous balance of ingredients and techniques that elevate it from ordinary to unforgettable. I’ve tweaked the hydration, incorporated a touch of milk for tenderness, and used a combination of butter and olive oil to create a melt that’s both luscious and slightly crisp. The dough is left to rise in a warm, draft-free spot, ensuring a light crumb that’s easy to chew. The final butter glaze is brushed just before baking, locking in moisture and adding a glossy sheen that’s impossible to resist. Picture yourself pulling this out of the oven, the whole kitchen smelling incredible, and every bite delivering that buttery kiss.
But I’m not just talking about the finished product; I’m about to walk you through every single step, revealing the secrets that make this recipe stand out. By the end, you’ll wonder how you ever made rolls any other way. So grab your apron, and let’s dive into the science and artistry behind these buttery rolls.
What Makes This Version Stand Out
- Taste: The combination of a gentle sweetness from the sugar, a subtle tang from the milk, and the rich buttery finish creates a flavor profile that’s both comforting and indulgent. The butter glaze caramelizes slightly, adding a nutty aroma that elevates every bite.
- Texture: The dough achieves a soft, airy crumb with a crisp, golden crust. The balanced hydration and resting time give the rolls a light, melt‑in‑your‑mouth quality that’s hard to replicate.
- Simplicity: With only a handful of ingredients and a straightforward method, this recipe is approachable for beginners while still delivering restaurant‑quality results.
- Uniqueness: The blend of butter and olive oil in the dough provides a subtle Mediterranean twist, while the final butter glaze adds a decadent finish.
- Crowd Reaction: Friends and family rave that these rolls are “the best you’ll ever make at home.” They’re perfect for family dinners, brunches, or any gathering.
- Ingredient Quality: Using fresh, high‑quality butter and whole‑grain flour makes a noticeable difference in flavor and texture.
- Cooking Method: A two‑stage rise followed by a quick oven finish ensures optimal rise and crust development.
- Make‑ahead Potential: The dough can be refrigerated overnight, and the rolls can be frozen for later use, making meal prep a breeze.
Alright, let’s break down exactly what goes into this masterpiece…
Inside the Ingredient List
The Flavor Base
All‑purpose flour is the backbone of the dough, providing structure and a neutral canvas for the other flavors. I recommend using a protein‑content flour (around 11% protein) to get that desirable chew. If you’re looking for a healthier twist, you can substitute half of the flour with whole‑wheat, but be prepared for a denser crumb.
The Texture Crew
Instant yeast is the secret to a quick rise without compromising flavor. It activates faster than active dry yeast, making the dough rise in about 30 minutes. The salt controls fermentation, tightening the gluten network and balancing the sweetness. The sugar, though small, feeds the yeast and adds a subtle caramel note. The warm milk (or water) hydrates the flour and creates a tender crumb. Adding a tablespoon of olive oil in the dough adds a hint of Mediterranean flavor and keeps the rolls from drying out.
The Unexpected Star
Unsalted butter is the star of the show. It’s used both in the dough (to enrich the dough) and as a glaze (to create that glossy, buttery finish). Butter’s high fat content melts into the dough, creating a tender crumb and a rich flavor that’s hard to beat. The key is to keep it at room temperature so it integrates smoothly.
The Final Flourish
Egg wash is optional but highly recommended. It gives the rolls a beautiful golden sheen and a slight crispness on the crust. If you’re vegan, a splash of plant‑based milk works just as well. The final butter glaze, brushed right before the last few minutes of baking, locks in moisture and creates that signature buttery aroma.
Everything’s prepped? Good. Let’s get into the real action…
The Method — Step by Step
- Gather the Dough: In a large mixing bowl, combine 2 cups of all‑purpose flour, 1 tsp instant yeast, 1 tsp sugar, and 1 tsp salt. Whisk until evenly mixed. This dry mix ensures that the yeast and sugar are well distributed, preventing uneven rising. The flour should look light and airy, like freshly sifted snow.
- Activate the Yeast: In a separate container, mix 3/4 cup warm milk (about 110°F) with the yeast. Let it sit for 5 minutes until it becomes frothy. The froth is a visual cue that the yeast is alive and ready to work its magic. If it doesn’t froth, the yeast may be dead and you’ll need fresh yeast.
- Combine Wet and Dry: Pour the frothy yeast mixture into the dry ingredients. Add 2 tbsp melted butter and 1 tbsp olive oil. Stir with a wooden spoon until a shaggy dough forms. The butter should be at room temperature, not melted, to avoid altering the dough’s structure. The olive oil adds a subtle fruity note.
- Knead the Dough: Transfer the dough onto a lightly floured surface and knead for about 8 minutes until it becomes smooth and elastic. If the dough feels too sticky, sprinkle a pinch more flour, but be careful not to add too much or it will become dense. The kneading process develops gluten strands that give the rolls their chewy texture.
- First Rise: Place the dough in a lightly oiled bowl, cover with a damp towel, and let it rise in a warm place for 30 minutes, or until it doubles in size. The dough should feel light and spring back when gently pressed. A well‑risen dough will produce a light, airy crumb.
- Shape the Rolls: Punch down the dough to release air pockets. Divide it into 8 equal portions (about 2.5 oz each). Shape each portion into a smooth ball, then gently flatten it into a round disc. Place the discs on a parchment‑lined baking sheet, spacing them about 2 inches apart. This spacing allows the rolls to expand without merging.
- Second Rise: Cover the shaped rolls with a clean kitchen towel and let them rise for another 20 minutes. The dough should puff up slightly, creating a domed shape. This second rise is crucial for achieving that light interior.
- Preheat the Oven: While the rolls are rising, preheat your oven to 375°F (190°C). A properly heated oven ensures a crisp crust and a perfectly baked interior.
- Apply Egg Wash: In a small bowl, whisk 1 egg with a splash of water. Brush the top of each roll lightly with the egg wash. This will give the rolls a shiny, golden finish and a slight crunch when baked.
- Bake: Place the baking sheet in the preheated oven and bake for 15 minutes, or until the rolls are golden brown. The first 10 minutes should show a subtle browning, while the last 5 minutes give the crust a deeper color. The interior should be soft and airy.
- Butter Glaze: While the rolls are still hot, melt 1/4 cup unsalted butter in a small saucepan over low heat. Brush the melted butter over each roll, ensuring every surface is coated. The butter will seep into the crust, creating a rich, buttery flavor that’s irresistible. Let the rolls rest for 5 minutes before serving.
That’s it — you did it. But hold on, I’ve got a few more tricks that’ll take this to another level…
Insider Tricks for Flawless Results
The Temperature Rule Nobody Follows
Many bakers think room temperature is fine for rising, but the optimal temperature for yeast activity is around 75°F (24°C). If your kitchen is cooler, wrap the dough in a warm blanket or place it near a warm appliance. This subtle tweak can double the rise time and produce a lighter crumb. I once baked in a drafty kitchen and the rolls stayed dense; after adjusting the temperature, the difference was night and day.
Why Your Nose Knows Best
Don’t rely solely on the timer for the final bake. The aroma is a reliable indicator of doneness. When the butter glaze begins to bubble and the crust emits a nutty, toasted scent, it’s a sign the rolls are ready. I’ve found that the “toasty” smell precedes the perfect color, so trust your nose to avoid over‑baking.
The 5-Minute Rest That Changes Everything
After brushing the butter glaze, let the rolls rest for exactly five minutes before cutting. This short rest allows the butter to set, preventing a greasy texture. It also gives the interior time to finish cooking, ensuring a moist, tender center. A friend once cut them immediately and the butter ran off, ruining the experience.
Use a Baking Stone
If you have a baking stone, place it in the oven during preheat. The stone retains heat and provides a steady, even temperature for the rolls, resulting in a crispier crust. I’ve baked on a stone before and the difference was palpable; the rolls came out with a satisfying crunch.
Keep a Damp Towel Handy
Covering the dough during rise with a damp towel prevents it from drying out. The moisture also creates a slightly humid environment, which is ideal for yeast fermentation. If you notice the dough drying, add a few drops of water to the towel. A dry dough can lead to uneven rise and a dense crumb.
Creative Twists and Variations
This recipe is a playground. Here are some of my favorite ways to switch things up:
Herb‑Infused Rolls
Add 1 tsp dried rosemary or thyme to the dough for a fragrant, savory twist. The herbs pair wonderfully with the butter glaze, creating a Mediterranean vibe. It’s perfect for a brunch with grilled chicken or a veggie platter.
Cheese‑Stuffed Rolls
Before shaping, place a small cube of cheddar or mozzarella in the center of each dough ball. Seal the edges tightly to keep the cheese inside. The melted cheese creates a gooey center that’s irresistible to kids and adults alike.
Sweet Cinnamon Rolls
Replace the sugar with brown sugar and sprinkle cinnamon over the dough before the second rise. Brush with a glaze of butter and powdered sugar after baking. These rolls are a sweet treat for breakfast or dessert.
Gluten‑Free Version
Use a gluten‑free all‑purpose blend that contains xanthan gum. Keep the same ratios, but be aware that the dough will be stickier. Use a silicone mat to shape the rolls and bake for a minute longer to achieve a golden crust.
Smoked Paprika Rolls
Stir in 1/2 tsp smoked paprika into the dough for a subtle smoky flavor. The paprika also gives the rolls a warm, reddish hue. These are great for pairing with a hearty stew or a smoky grilled steak.
Almond Flour Rolls
Swap half of the all‑purpose flour with ground almonds for a nutty flavor and a denser crumb. Add 1 tbsp almond butter to the dough for extra richness. The rolls are perfect for a nutty, wholesome breakfast.
Storing and Bringing It Back to Life
Fridge Storage
Store leftover rolls in an airtight container at room temperature for up to 3 days. If you prefer them fresher, keep them in the fridge for up to 5 days. The butter glaze may firm up, but a quick reheating in a toaster will restore the buttery goodness.
Freezer Friendly
Wrap the rolls tightly in foil or plastic wrap before placing them in a freezer bag. They can stay frozen for up to 2 months. Thaw at room temperature for 30 minutes before reheating in a 350°F oven for 5 minutes.
Best Reheating Method
The secret to reviving the crust is to bake the rolls at 350°F for 5 minutes, then brush with a little melted butter. The butter will steam the interior and give the crust a fresh, crispy texture. Adding a tiny splash of water before reheating steams the rolls back to perfection.