Picture this: I’m standing in my kitchen at 2 a.m., half‑asleep, staring at a lonely jar of sourdough discard that’s been growing louder than my alarm clock for days. I’d promised myself I’d finally put it to good use, but every “quick” recipe I found turned out flatter than a pancake on a diet. I tried a “no‑knead” biscuit, a “lazy” pizza crust, even a “fast” pancake, and each one left me yearning for that airy, buttery lift that only a true croissant can deliver. I was about to give up, when a daring friend dared me: “Make crescent rolls that could fool a French bakery. If you can’t, I’ll eat the whole batch myself.” I laughed, I accepted, and I dove headfirst into a kitchen experiment that would become the most glorious, flaky, cloud‑like roll I’ve ever tasted.
The moment I mixed the first batch, the kitchen transformed into a symphony of senses. The flour puffed up like fresh snow, the butter melted into a glossy sheen, and the sourdough discard gave off a faint tang that reminded me of a sunrise over a wheat field. As the dough rested, the faint scent of yeast rose, promising a rise that would be nothing short of theatrical. When I finally rolled the dough, the layers separated with a buttery snap that sounded like applause. The oven’s heat turned those layers into a golden‑brown crown, and the first bite? A melt‑in‑your‑mouth experience that whispered, “You’ve just unlocked the secret to bakery‑level bliss.”
Now, I’m not just bragging because I managed to turn a kitchen mishap into a triumph. This version of sourdough discard crescent rolls stands apart because it balances the tang of discard with a sweet, buttery richness, all while staying unbelievably simple. Most recipes either drown the delicate flavor in too much sugar or demand a marathon of folds that would make a pastry chef weep. I’ve cracked the code: a modest amount of active‑dry yeast gives the dough that reliable lift, while the discard adds depth without overwhelming. And the secret weapon? A brief, chilled rest that lets the gluten relax, creating that feather‑light crumb we all crave. I dare you to taste this and not go back for seconds.
Let me walk you through every single step — by the end, you’ll wonder how you ever made it any other way. Okay, ready for the game‑changer? This next part? Pure magic. Stay with me here — this is worth it.
What Makes This Version Stand Out
- Tangy Depth: The sourdough discard injects a subtle sour note that elevates the flavor profile, making each bite more complex than a plain butter roll.
- Fluffy Texture: A combination of active‑dry yeast and a short, cool rest creates an airy crumb that feels like a cloud hugging your palate.
- Butter Bliss: Incorporating real unsalted butter both in the dough and as a glaze ensures a rich, melt‑in‑your‑mouth mouthfeel.
- Simplicity: Only nine ingredients, no fancy equipment, and a straightforward folding technique keep the process accessible.
- Crowd‑Pleaser: Even the pickiest eaters (yes, even the teen who claims “nothing’s good”) are instantly won over by the golden crust and soft interior.
- Make‑Ahead Friendly: You can shape, freeze, and bake on demand, turning a weekday snack into a weekend treat without extra effort.
- Versatile Base: The neutral flavor invites endless sweet or savory twists, from chocolate drizzles to herb‑infused butter.
- Cost‑Effective: Using discard means you’re rescuing what would otherwise be waste, saving money while creating gourmet‑level pastries.
Inside the Ingredient List
The Flavor Base
1 cup sourdough discard is the heart of this recipe. It brings a mild acidity that balances the richness of butter and sugar, creating a flavor that’s both comforting and intriguing. If you skip it, you’ll lose that signature tang that makes these crescents feel like they belong in a Parisian bakery. As a swap, you can use an equal amount of plain yogurt or buttermilk, but expect a slightly different aroma.
The Texture Crew
4 cups all‑purpose flour provides the structure. Choose a high‑protein flour for a bit more chew, or stick with standard for a softer bite. ½ cup unsalted butter folded into the dough creates those flaky layers; using margarine will compromise both flavor and texture. ½ cup milk adds moisture and a touch of sweetness; whole milk works best, but any dairy or even oat milk will do, just watch the dough’s consistency.
The Unexpected Star
2 teaspoons active‑dry yeast might seem redundant next to discard, but it guarantees a reliable rise, especially if your discard is a bit sluggish. If you’re out of yeast, a pinch of baking soda plus a splash of lemon juice can mimic the lift, though the texture will be less airy. 1 tablespoon sugar feeds the yeast and adds a whisper of sweetness without stealing the spotlight.
The Final Flourish
1 large egg acts as a binder and adds richness, while also giving the rolls a glossy finish after baking. 1 teaspoon salt amplifies every flavor note, preventing the butter from feeling flat. Finally, 1 tablespoon butter brushed on top right before baking creates that irresistible, caramelized sheen that makes the rolls look as good as they taste.
Everything's prepped? Good. Let’s get into the real action…
The Method — Step by Step
In a large mixing bowl, whisk together the flour, active‑dry yeast, sugar, and salt. This dry blend is your canvas; make sure it’s evenly combined so the yeast can distribute uniformly. I like to sift the flour first—this aerates it and prevents any clumps that could sabotage the rise. Once mixed, set the bowl aside and let the aromas mingle for a minute.
In a saucepan over low heat, melt the ½ cup unsalted butter, then stir in the milk and sourdough discard. The mixture should be warm, not hot—about 105°F (40°C) is ideal. If it’s too hot, you’ll kill the yeast; too cold and the dough will stay sluggish. Add the egg and whisk until the liquid is smooth, then let it cool slightly before combining with the dry ingredients.
Make a well in the center of the dry ingredients and pour in the liquid mixture. Using a wooden spoon or a stand‑mixer's dough hook on low speed, combine until a shaggy dough forms. It will look a bit sticky—that’s normal. At this point, I turn the dough out onto a lightly floured surface and begin the kneading process.
Knead the dough until it becomes smooth and elastic, about 8‑10 minutes. You’ll know it’s ready when a small piece stretches thin enough to become translucent without tearing—a sign of well‑developed gluten. Form the dough into a ball, place it in a lightly oiled bowl, and cover with plastic wrap. Let it rise in a warm spot until doubled in size, roughly 1 hour. This is the moment of truth: the dough should feel puffy and slightly tacky.
Once risen, gently deflate the dough and turn it onto a floured surface. Using a rolling pin, roll it into a rectangle about ¼ inch thick. Here’s where the magic happens: fold the rectangle into thirds like a letter, then rotate 90 degrees and fold again. This simple “letter‑fold” creates the layers that will puff up into crescents. Cover the folded dough and chill for 20 minutes—this rest relaxes the gluten and firms the butter, preventing shrinkage during baking.
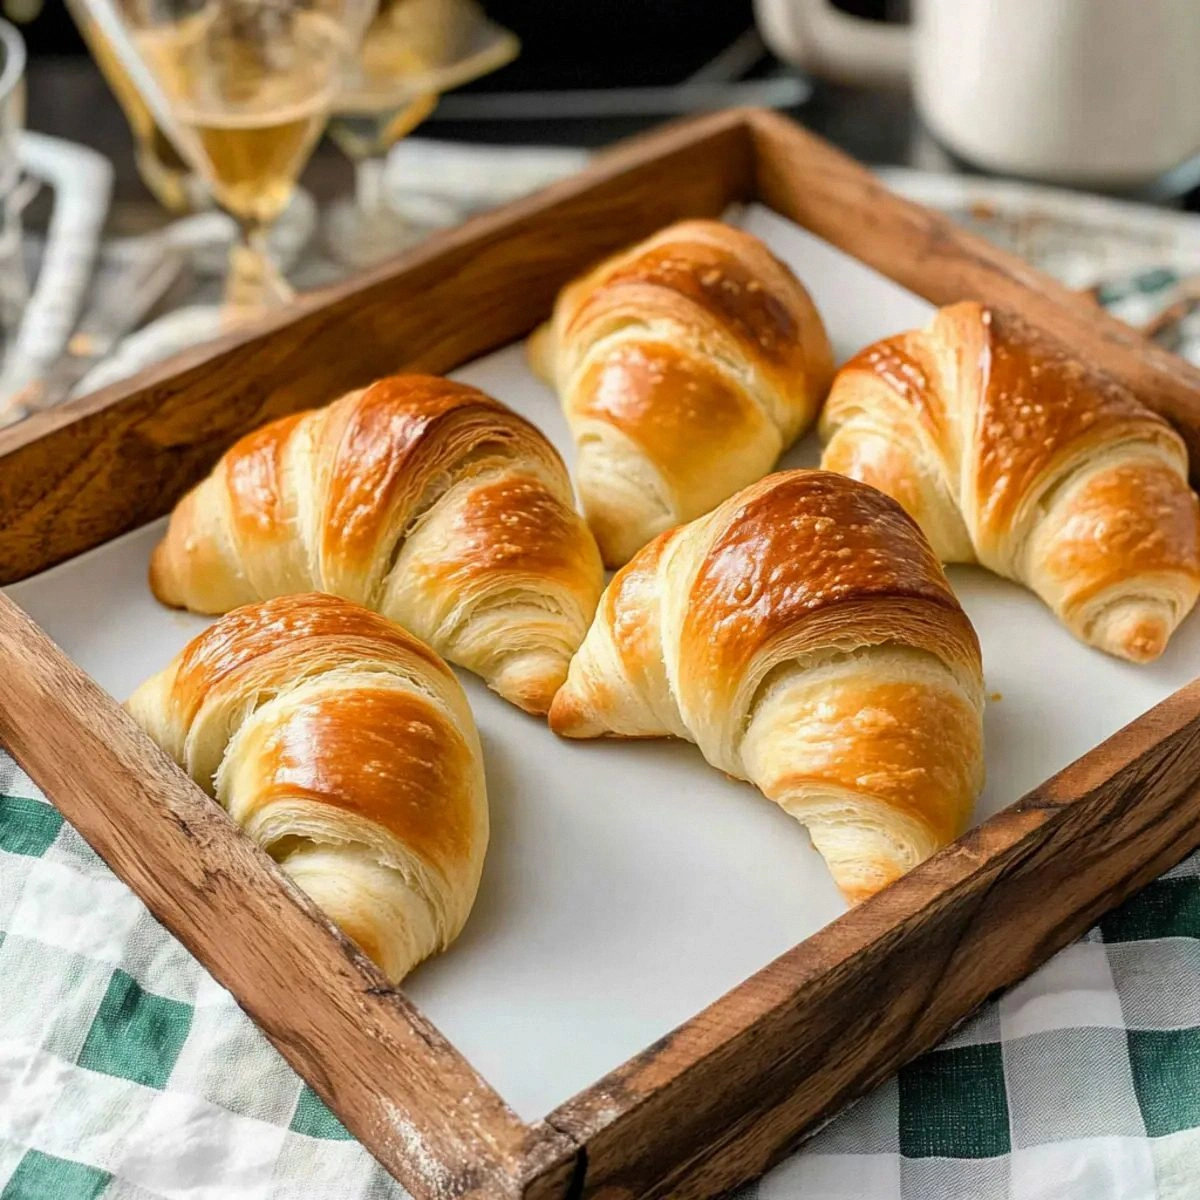
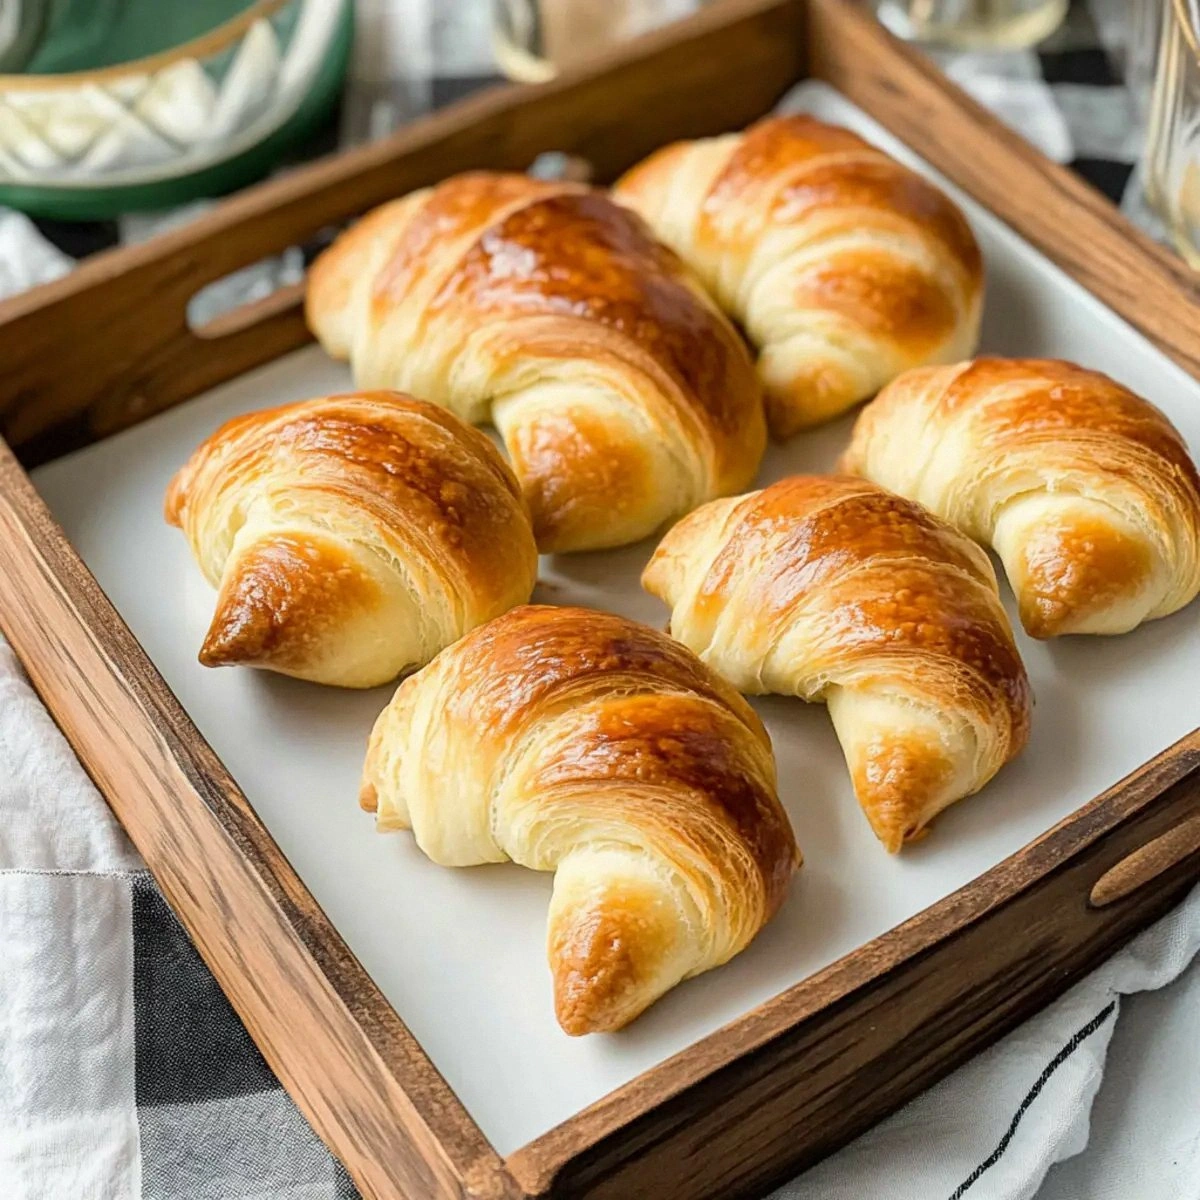
Roll the chilled dough into a large triangle, about 12 inches on the base. Starting at the wide end, roll tightly toward the tip, creating a classic crescent shape. Place each roll on a parchment‑lined baking sheet, spacing them 2 inches apart. For that bakery‑level look, curve the ends slightly upward, forming a gentle “C”.
Brush each crescent lightly with the melted 1 tablespoon butter. This glaze not only adds flavor but also encourages a golden, glossy finish. Let the rolls proof for another 30 minutes; they should puff up noticeably, almost like tiny balloons ready to burst.
Preheat your oven to 375°F (190°C). Slide the baking sheet into the oven and bake for 18‑22 minutes, or until the crescents are a deep golden‑brown and emit a fragrant, buttery aroma that fills the entire kitchen. The edges should be crisp, while the interior remains feather‑light. Remove from the oven, let cool for a few minutes, then serve warm.
That’s it — you did it. But hold on, I’ve got a few more tricks that'll take this to another level…
Insider Tricks for Flawless Results
The Temperature Rule Nobody Follows
Never let your dough sit in a drafty kitchen. A consistent, warm environment (around 75°F/24°C) gives the yeast a happy home, ensuring a uniform rise. I keep a small bowl of hot water on the counter and cover the dough with a damp towel; the gentle humidity prevents the surface from forming a skin.
Why Your Nose Knows Best
During the first rise, trust the scent. When the dough begins to emit a faint, yeasty perfume, it’s a sign that fermentation is progressing nicely. If you’re unsure, give it a gentle poke—if the indentation springs back slowly, you’re golden. Over‑proofing will give you a sour, almost alcoholic smell, and the rolls will collapse.
The 5‑Minute Rest That Changes Everything
After shaping the crescents, let them rest for exactly five minutes before the final proof. This tiny pause lets the gluten relax just enough to prevent the rolls from snapping back when you bake them, resulting in a more tender crumb. Skipping this step is a common mistake that leads to a dense, chewy texture.
Butter Brush Secrets
For an extra‑shiny crust, melt the butter with a pinch of honey or maple syrup. The sugar caramelizes in the oven, giving the tops a subtle sparkle and a hint of caramel flavor that pairs beautifully with the sourdough tang.
Freezing for Future Feasts
Shape the rolls, give them a quick 10‑minute proof, then flash‑freeze on a tray. Once solid, transfer to a zip‑top bag. When you’re ready to bake, pop them straight into a preheated oven—add an extra 3‑5 minutes to the bake time, and you’ll have fresh‑out‑the‑oven crescents in minutes.
Creative Twists and Variations
This recipe is a playground. Here are some of my favorite ways to switch things up:
Chocolate Hazelnut Dream
After brushing with butter, drizzle a thin line of Nutella across each crescent before the final bake. The heat melts the spread, creating a gooey, nutty ribbon that pairs perfectly with the tangy base.
Savory Herb Burst
Mix 1 tablespoon each of chopped rosemary, thyme, and grated Parmesan into the dough during the initial knead. Brush with garlic‑infused butter before baking for a fragrant, savory snack that’s great with soups.
Maple Bacon Bliss
Before rolling, sprinkle crispy bacon bits and a drizzle of pure maple syrup over the dough. The salty‑sweet combo adds a breakfast‑brunch vibe that’s hard to resist.
Cinnamon Sugar Swirl
Spread a mixture of 2 tablespoons sugar, 1 teaspoon cinnamon, and a dab of softened butter over the rolled‑out dough before shaping. The result is a sweet, caramelized swirl that makes these crescents perfect for coffee companions.
Lemon Zest & Poppy Seed
Fold in the zest of one lemon and 1 tablespoon poppy seeds into the dough for a bright, aromatic twist. Finish with a light lemon glaze after baking for a refreshing finish.
Cheese‑Stuffed Surprise
Place a small cube of mozzarella or cheddar at the wide end of each triangle before rolling. As the crescent bakes, the cheese melts into a gooey core, delivering a delightful surprise with every bite.
Storing and Bringing It Back to Life
Fridge Storage
Cool the rolls completely, then store them in an airtight container in the refrigerator for up to 3 days. To reheat, preheat the oven to 350°F (175°C), add a tiny splash of water to the pan, and bake for 5‑7 minutes. The steam revives the flaky exterior while keeping the interior soft.
Freezer Friendly
After the initial proof, place the unbaked crescents on a parchment sheet and freeze until solid (about 2 hours). Transfer them to a zip‑top freezer bag; they’ll keep for up to 2 months. When you’re ready, bake straight from frozen at 375°F (190°C) for 22‑25 minutes, adding a minute or two if needed.
Best Reheating Method
The secret to resurrecting leftover crescents is a quick steam‑boost. Lightly mist the rolls with water, wrap them loosely in foil, and heat in a 300°F (150°C) oven for 8‑10 minutes. The foil traps moisture, while the low heat prevents over‑browning, delivering that just‑baked feel.