It started with a kitchen mishap that would have you rolling your eyes at the very thought of making chicken pakoras again. I had been whipping up a quick snack for a surprise house‑party, but the batter had turned into a dense, rubbery mess that clung to the pan like a bad mood. The next day I was still haunted by the memory of that soggy disappointment, and I swore to myself that I would never settle for anything less than crispy, golden perfection again. That promise became my mission statement and the foundation of the recipe that follows.
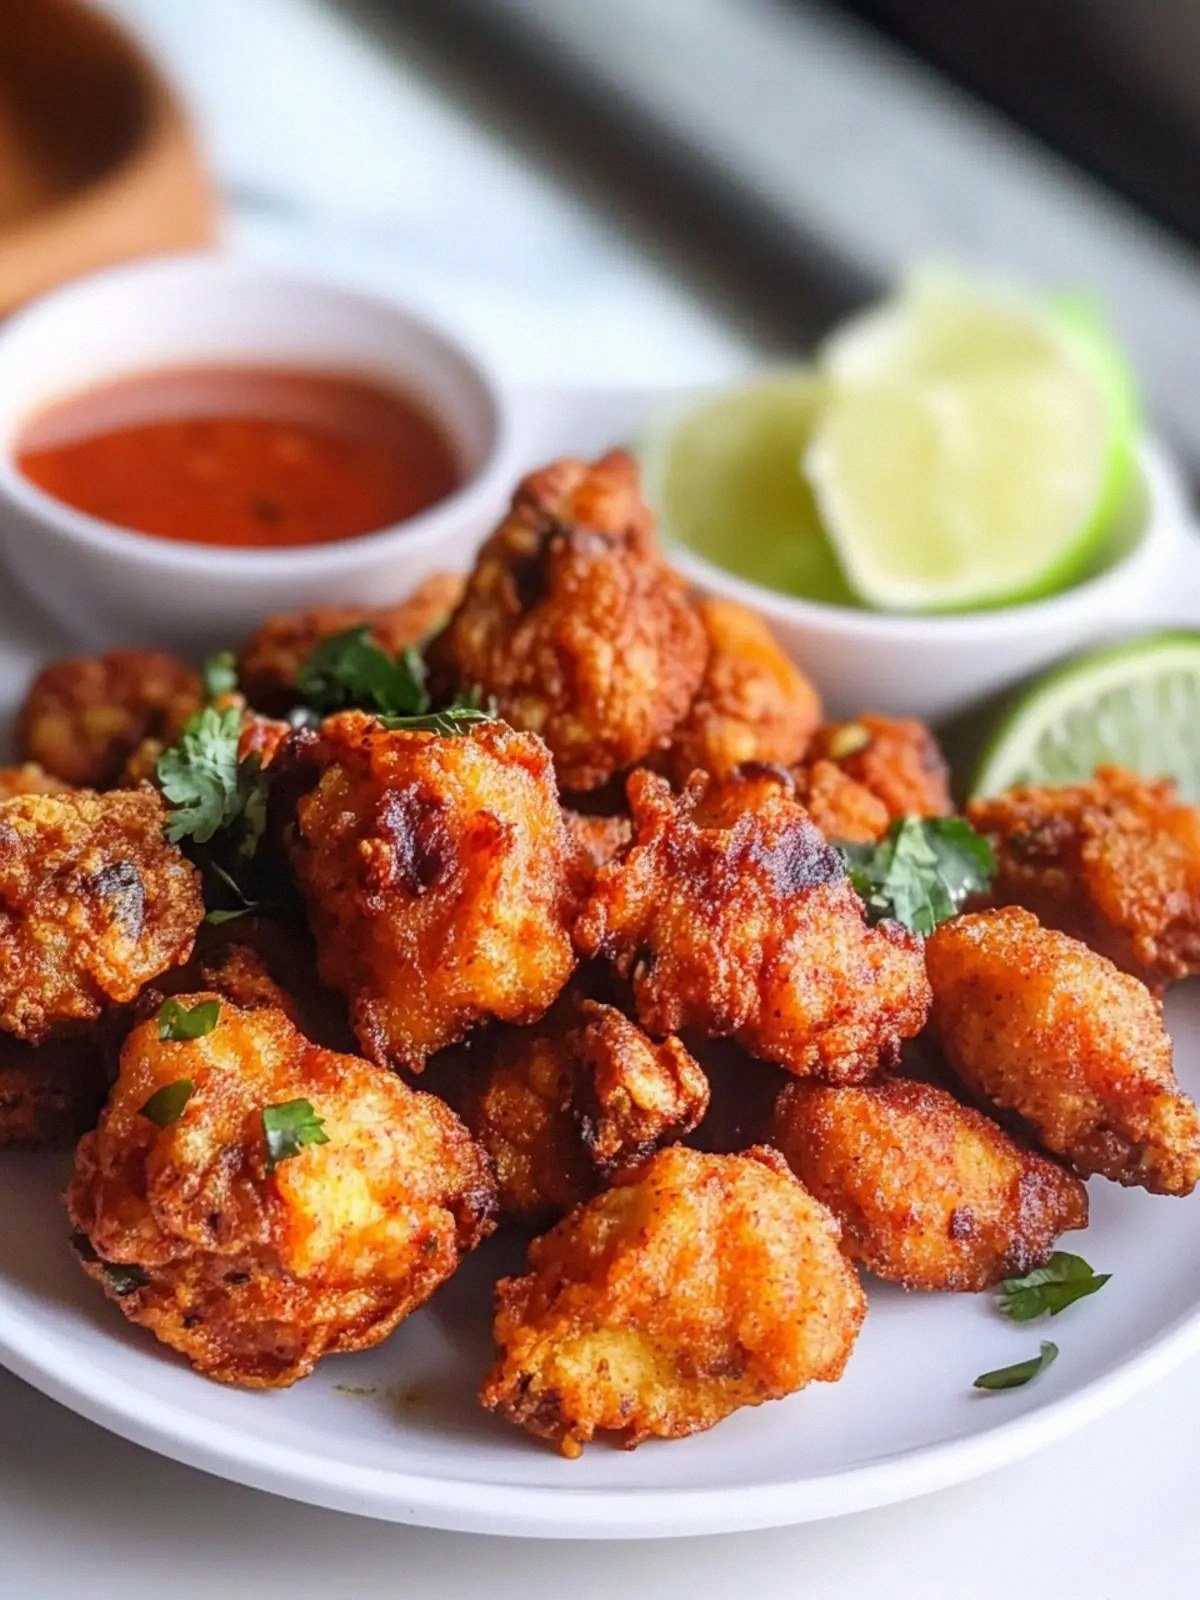
Picture this: the air is thick with the scent of sizzling oil, the sound of a crackling pan, and the bright, sharp aroma of freshly chopped coriander. The chicken pieces are glistening with a glossy coating of spice‑laden batter, and as they hit the hot oil, a satisfying pop announces the start of a symphony. You can almost taste the burst of heat from the chili flakes, the subtle smokiness from the cumin seeds, and the sweet tang of lemon juice dancing on your tongue. The texture is a delightful contrast—each bite delivers a crackle that gives way to a tender, juicy interior that melts in your mouth.
What sets this version apart from the countless other pakora recipes you’ll find online is the meticulous balance of flavor and texture, the use of a dual‑flour batter that creates an airy, crisp shell, and the subtle infusion of aromatics that elevate the dish from simple snack to a culinary experience. The secret is a harmony of ingredients that work together: the rice flour adds lightness, the besan gives a nutty crunch, and the baking soda introduces a subtle lift. I’ve stripped away any unnecessary steps, making the process straightforward for even the most novice cook, yet the result is a dish that feels like a gourmet creation.
Now, before we dive into the step‑by‑step instructions, let me tease you with a little secret: a splash of lemon juice right before frying creates a tangy lift that keeps the batter from sticking, and a pinch of kasuri methi adds an earthy aroma that turns ordinary chicken into a crowd‑pleaser. I dare you to taste this and not go back for seconds, because once you try it, you’ll wonder how you ever made it any other way. Let me walk you through every single step—by the end, you’ll wonder how you ever made it any other way.
What Makes This Version Stand Out
- Taste: The blend of soy sauce, garlic paste, and fresh herbs creates a savory depth that lingers on the palate. The subtle heat from chili flakes and powder is balanced by the cooling citrus, making each bite a harmonious explosion of flavors.
- Texture: The combination of rice flour and besan results in a batter that is light, airy, and crisply golden. The edges crackle like thin ice before giving way to a tender, juicy chicken center.
- Simplicity: With only fifteen ingredients, the recipe keeps the process streamlined while still delivering maximum flavor. No elaborate marinades or complicated steps—just a few quick tosses and a single deep‑fry.
- Uniqueness: The use of baking soda as a leavening agent gives the pakoras an extra lift that you rarely find in traditional recipes. The subtle hint of kasuri methi adds an unexpected, fragrant twist.
- Crowd Reaction: Friends who’ve tried this version rave that the pakoras stay crispy even after a few minutes, making them perfect for parties where you need to serve a steady stream of snacks.
- Ingredient Quality: The recipe calls for fresh, high‑quality spices and aromatics. Choosing the right quality of chicken—boneless, skinless, and cut into bite‑size pieces—makes a noticeable difference.
- Cooking Method: The deep‑frying technique is straightforward, yet the precise oil temperature and timing guarantee a crisp exterior without over‑cooking the chicken inside.
- Make‑Ahead Potential: The marinated chicken can be prepared up to an hour ahead, saving you time on the day of your event. The batter can also be pre‑mixed and stored in the fridge for up to 24 hours.
Inside the Ingredient List
The Flavor Base
At the heart of the pakora batter lies a simple yet powerful mix of aromatics. The garlic paste, soy sauce, and a splash of lemon juice form a quick, flavorful coating that adheres to the chicken like a second skin. The garlic paste is the backbone of the savory profile; it delivers a robust, slightly sweet flavor that balances the heat from the chili flakes. If you skip the garlic paste, the batter loses its depth, and the pakoras end up tasting flat.
The Texture Crew
The combination of rice flour and besan (chickpea flour) is what gives the pakoras their signature crunch. Rice flour contributes a lightness that prevents the batter from becoming heavy, while besan adds a nutty undertone and a golden hue. The baking soda is the secret leavening agent that creates tiny bubbles, making the coating airy and crisp. If you omit the baking soda, the batter will become dense and chewy, which defeats the purpose of a crunchy snack.
The Unexpected Star
Kasuri methi (dried fenugreek leaves) is an ingredient that many people overlook, yet it brings a subtle, bittersweet aroma that elevates the entire dish. This herb is often used in North Indian curries, but when incorporated into a pakora batter it adds an earthy note that balances the sharpness of the chili. A pinch of kasuri methi can transform ordinary chicken pakoras into a gourmet experience. If you’re not a fan of fenugreek, you can replace it with a small amount of dried thyme for a slightly different herbal profile.
The Final Flourish
Fresh coriander and a minced green chili are the final touches that add brightness and a pop of color to the dish. The cilantro’s citrusy undertones cut through the richness of the batter, while the green chili provides a lingering heat that lingers on the palate. The addition of cumin seeds and ajwain (carom seeds) gives the batter a subtle nutty and slightly bitter edge that rounds out the flavor profile. If you skip these spices, the pakoras will taste one‑dimensional.
Everything's prepped? Good. Let's get into the real action...
The Method — Step by Step
- Marinate the chicken. In a large bowl, combine the diced chicken, garlic paste, soy sauce, lemon juice, chili flakes, chili powder, cumin seeds, ajwain, and a pinch of salt. Toss until every piece is evenly coated. Cover the bowl, cover the surface with plastic wrap, and refrigerate for at least 30 minutes—or up to an hour if you’re feeling extra patient. The longer the marination, the more the flavors penetrate the meat.
- Prepare the batter. In a separate mixing bowl, whisk together rice flour, besan, baking soda, and a pinch of salt until the mixture is smooth and free of lumps. Slowly add water, a tablespoon at a time, until you reach a thick, pourable consistency—think of the batter as a thick pancake batter. The batter should be thick enough to cling to the chicken but still pourable. If it’s too thick, add a splash of water; if it’s too thin, add a bit more flour.
- Heat the oil. Pour enough oil into a deep frying pan or a heavy‑bottomed pot to allow the pakoras to float freely. Heat the oil over medium heat until it reaches 350°F (175°C). A good test is to drop a small spoonful of batter into the oil; if it sizzles and rises to the surface within a few seconds, the oil is ready.
- Coat the chicken. Take each marinated chicken piece and dip it into the batter, letting excess drip off. The coating should be even, with no bare spots. For a thicker crust, you can double‑dip the chicken—first in the batter, then back into the flour mixture.
- Fry the pakoras. Carefully place the coated chicken pieces into the hot oil, working in batches to avoid overcrowding. Fry for 4–5 minutes per side, or until the coating turns a deep golden brown and the chicken is cooked through. The sizzling sound is your cue that the pakoras are crisping up beautifully.
- Drain and rest. Use a slotted spoon to remove the pakoras from the oil and place them on a paper‑towel‑lined plate to absorb excess oil. Let them rest for 2–3 minutes; this allows the coating to set and prevents the chicken from becoming soggy.
- Finish with fresh herbs. While the pakoras are still warm, sprinkle them with chopped coriander, a squeeze of fresh lemon juice, and a pinch of kasuri methi. The fresh herbs add a burst of color and brightness that cuts through the richness.
- Serve immediately. Present the pakoras on a platter with a side of tamarind chutney or your favorite sauce. The best part? They stay crispy for up to 20 minutes if you keep them on a wire rack; otherwise, they’ll soften quickly.
That's it — you did it. But hold on, I've got a few more tricks that'll take this to another level...
Insider Tricks for Flawless Results
The Temperature Rule Nobody Follows
Maintaining the correct oil temperature is the single most critical factor for perfect pakoras. If the oil is too cold, the coating will absorb oil and become soggy; if it's too hot, the exterior will burn before the interior cooks. Use a kitchen thermometer to keep the temperature steady at 350°F (175°C). If you don’t have a thermometer, use the small batter test: a drop of batter should sizzle and rise to the surface within a few seconds.
Why Your Nose Knows Best
When the oil is at the right temperature, you’ll notice a faint, nutty aroma that signals the batter is crisping properly. Trust that scent; it’s the secret indicator that your pakoras are about to reach that golden, crunchy perfection. If the smell feels off, adjust the heat or let the oil cool slightly.
The 5‑Minute Rest That Changes Everything
After frying, let the pakoras rest on a wire rack for five minutes. This brief pause allows excess oil to drain and the coating to set, preventing the chicken from becoming greasy. A wire rack also keeps the bottom from steaming, which would otherwise soften the crispness.
Use a Slotted Spoon for Even Frying
When removing the pakoras from the oil, use a slotted spoon to allow excess oil to drain quickly. This simple tool ensures each piece is evenly coated and reduces the chance of soggy spots. A regular spoon can leave a layer of oil on the surface, ruining the crunch.
Keep Your Oil Fresh
If you plan to fry multiple batches, change the oil after the first batch. Reusing oil can impart a burnt flavor and affect the texture of the pakoras. Fresh oil keeps the batter crisp and the flavor clean.
Creative Twists and Variations
This recipe is a playground. Here are some of my favorite ways to switch things up:
Veggie Pakoras
Swap the chicken for thinly sliced zucchini, bell pepper, or paneer cubes. The batter remains the same, but the veggies add a fresh, crunchy contrast. Great for a vegetarian spread.
Spicy Garlic Pakoras
Double the amount of garlic paste and add a dash of garam masala for an extra punch. The garlic takes center stage, creating a bold, savory experience that pairs well with a cool yogurt dip.
Herbal Pakoras
Increase the amount of chopped coriander and add fresh mint for a bright, herbaceous flavor. The herbs bring a refreshing note that balances the richness of the fried batter.
Sweet Pakoras
For a dessert twist, coat small pieces of banana or apple in the batter, and sprinkle with a pinch of sugar before frying. The batter crisps up, and the fruit caramelizes into a sweet, crunchy treat.
Low‑Fat Pakoras
Use an air fryer instead of deep‑frying to reduce oil usage. The air fryer produces a similar crispness with a fraction of the grease, making the dish lighter without sacrificing flavor.
Gluten‑Free Pakoras
Replace the rice flour with almond flour and keep the besan. The batter will still be crisp, and the almond flour adds a subtle nutty undertone.
Seasonal Pakoras
During the winter months, add a pinch of ground cinnamon and nutmeg to the batter for a warming twist. The spices create a cozy aroma that pairs beautifully with a hot cup of tea.
Storing and Bringing It Back to Life
Fridge Storage
Store cooked pakoras in an airtight container in the refrigerator for up to 3 days. Keep them on a paper towel to absorb excess moisture, which helps maintain crispness. When ready to serve, reheat in a toaster oven at 350°F for 5 minutes.
Freezer Friendly
Freeze the pakoras in a single layer on a parchment‑lined tray before transferring them to a freezer bag. They’ll stay good for up to 2 weeks. To reheat, place them directly in a preheated oven at 400°F for 8–10 minutes.
Best Reheating Method
Reheat pakoras on a wire rack over a baking sheet to keep the bottom crisp. Add a tiny splash of water before reheating, then cover loosely with foil to create steam that brings back the original texture. This trick ensures the pakoras taste as good as fresh.