Love this? Pin it for later! 📌
Warm Winter Vegetable Casserole with Garlic & Rosemary for Families
There's something magical about the way a bubbling casserole can turn even the pickiest little eater into a vegetable enthusiast. I discovered this recipe during a particularly brutal February when the snow was piled so high against our back door that we couldn't open it. With three kids home from school and a pantry full of root vegetables, I set out to create something that would warm our bellies and use up the odds and ends lurking in my crisper drawer.
What emerged from my oven ninety minutes later was nothing short of transformative. The house filled with the intoxicating aroma of roasted garlic and woodsy rosemary, drawing my usually skeptical children to the kitchen like moths to a flame. My oldest, who had declared war on anything green since age five, actually asked for seconds. My middle child, normally a "separatist" who couldn't abide foods touching, happily mixed everything together. Even my husband, a self-proclaimed meat-and-potatoes man, declared it "surprisingly satisfying."
Now, this casserole has become our family's winter tradition. We make it every Sunday from November through March, and the kids actually get excited about which vegetables we'll include. It's become our cozy ritual – the kids help chop (age-appropriate tasks, of course), we put on some jazz, and together we create something nourishing that feeds both body and soul. The best part? It's completely adaptable to whatever vegetables are on sale or lurking in your fridge, making it as budget-friendly as it is delicious.
Why This Recipe Works
- One-Pan Wonder: Everything bakes together in a single dish, meaning minimal cleanup and maximum flavor as the vegetables share their juices
- Kid-Friendly Vegetables: The long roasting time caramelizes natural sugars, transforming humble veggies into sweet, tender morsels even picky eaters love
- Prep-Ahead Perfection: Assemble everything the night before and pop it in the oven when you get home from work
- Complete Nutrition: Packed with fiber, vitamins, and plant-based protein from beans and quinoa, it's a complete meal in one dish
- Budget Hero: Uses inexpensive seasonal vegetables and pantry staples to create a restaurant-worthy meal for under $10
- Freezer Friendly: Make a double batch and freeze half for those nights when you need comfort food fast
- Customizable: Swap vegetables based on preferences, dietary needs, or what's on sale at the market
Ingredients You'll Need
Before we dive into the cooking process, let's talk about each ingredient and why it matters. The beauty of this casserole lies in its flexibility, but understanding the role each component plays will help you make substitutions confidently.
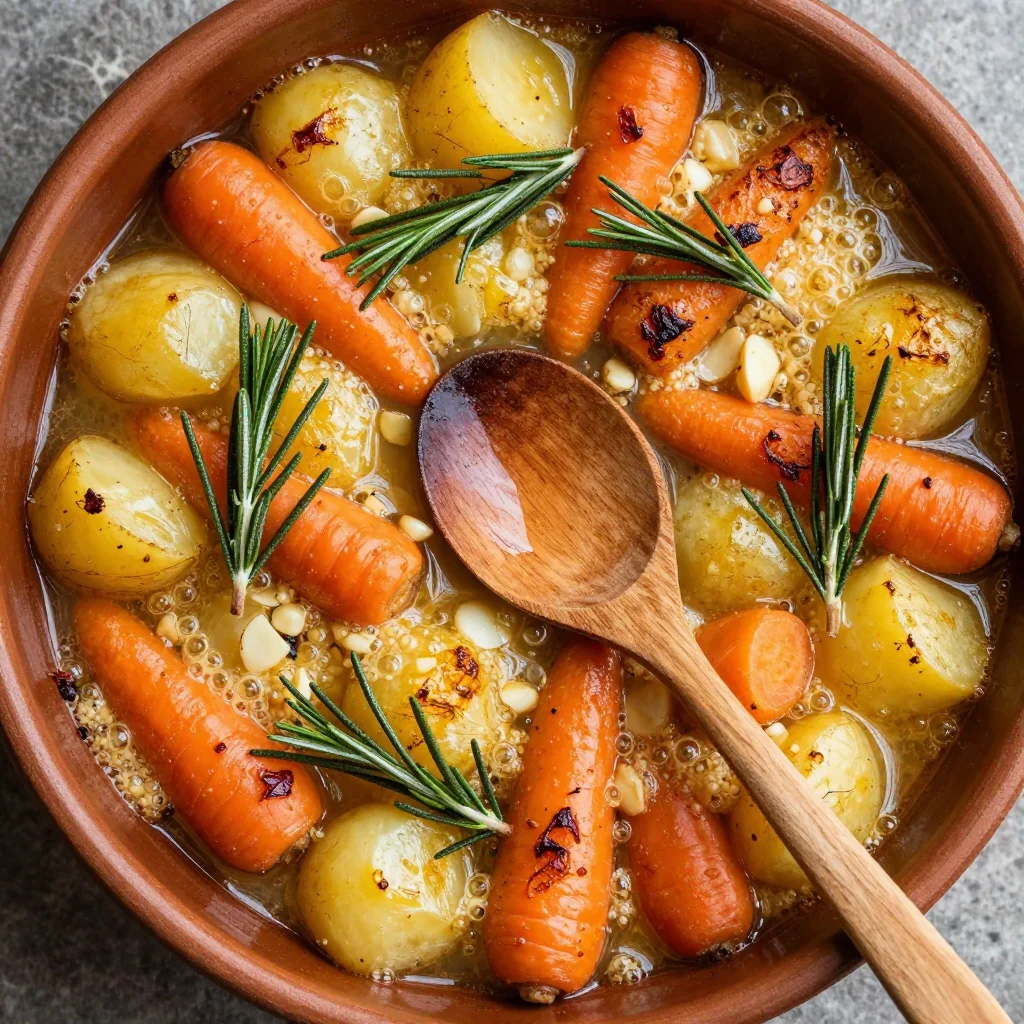
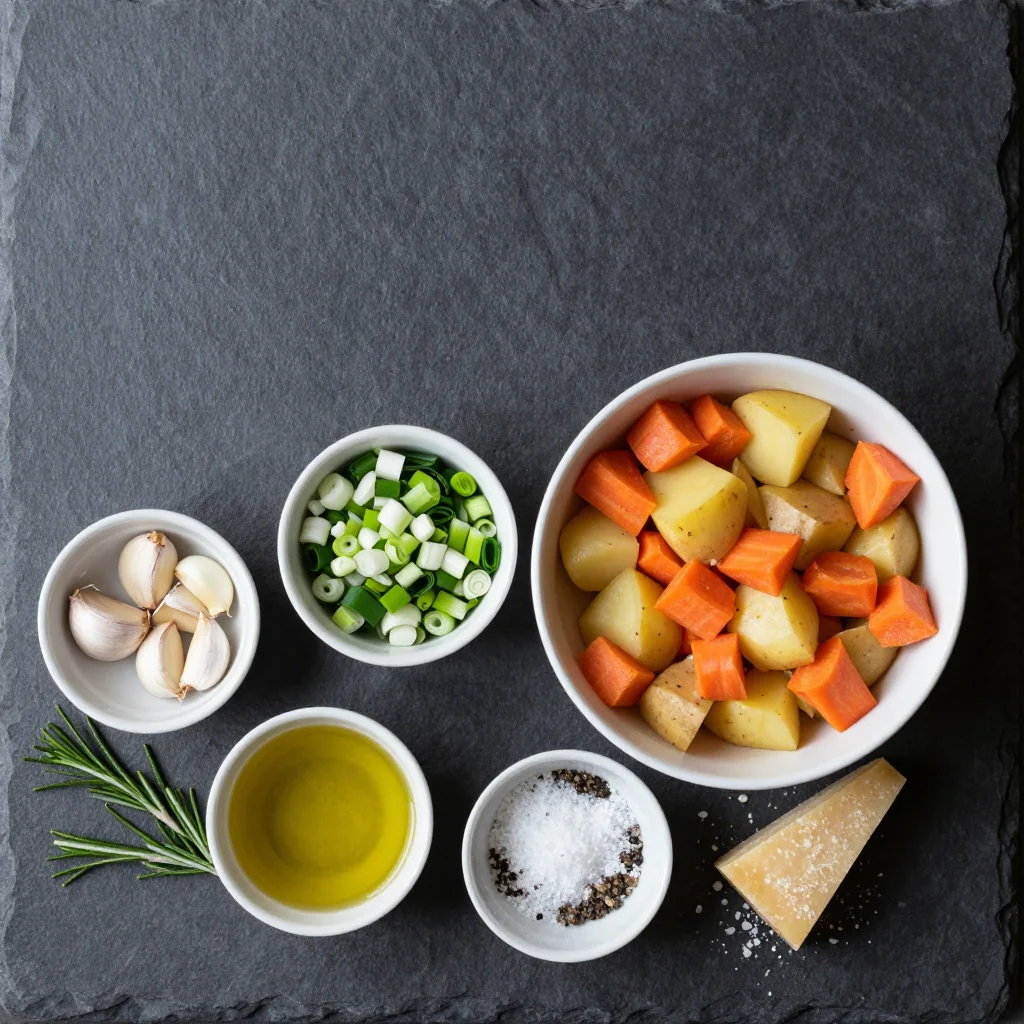
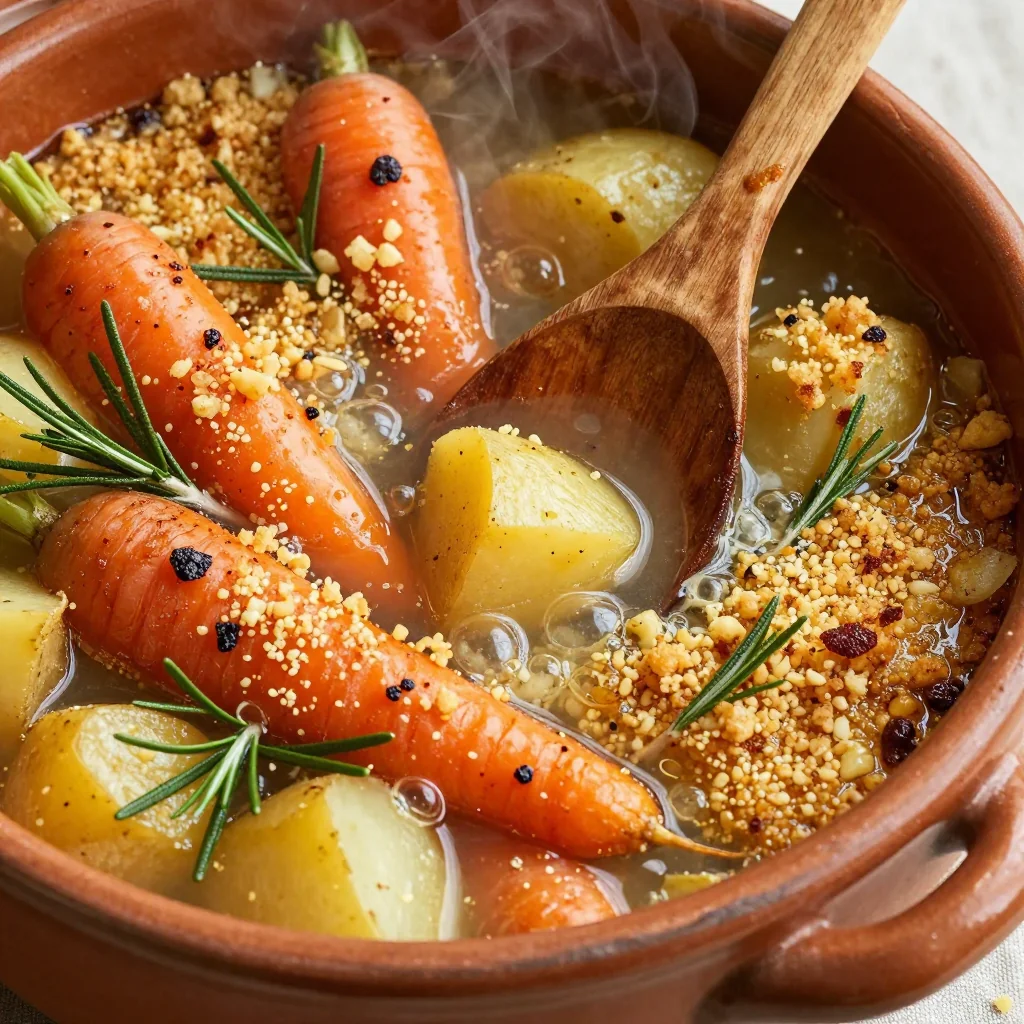
Root Vegetables (3-4 lbs total): I typically use a combination of sweet potatoes, regular potatoes, carrots, parsnips, and turnips. Sweet potatoes add natural sweetness that kids love, while parsnips bring a subtle spicy note. When selecting root vegetables, look for firm specimens without soft spots or wrinkles. If parsnips aren't available, swap in more carrots or try celery root for an earthy flavor.
Butternut Squash (2 lbs): This adds creamy texture and beautiful color. When choosing squash, look for ones that feel heavy for their size with matte (not shiny) skin. You can substitute pumpkin, acorn squash, or even sweet potatoes if squash isn't available. Pre-cut squash from the store is a great time-saver on busy weeknights.
Fresh Rosemary (3-4 sprigs): Fresh makes all the difference here – dried rosemary becomes woody and sharp. If you must substitute, use 1 tablespoon dried, but really try to find fresh. It keeps for weeks in the fridge wrapped in damp paper towels. Thyme makes a lovely alternative if rosemary isn't your thing.
Garlic (1 whole head): Don't be intimidated by the amount – roasting transforms harsh raw garlic into sweet, caramelized cloves that you can spread like butter. Look for firm heads with tight, unbroken skin. Avoid any that have started sprouting green shoots.
Cannellini Beans (2 cans): These creamy white beans add protein and make the casserole more filling. Great Northern or navy beans work equally well. If you're using dried beans, you'll need 1 cup dried, soaked overnight and cooked until tender.
Quinoa (1 cup): This ancient grain adds complete protein and helps bind everything together. It's also gluten-free, making this casserole celiac-friendly. If quinoa isn't available, farro or barley works, though they're not gluten-free.
Vegetable Broth (3 cups): Use good quality broth for the best flavor. I like to make my own and freeze it in 1-cup portions, but store-bought works fine. Look for low-sodium versions so you can control the salt level.
Olive Oil (1/4 cup): A good quality extra-virgin olive oil makes a difference here since it's not cooked at high heat. The fruity, peppery notes complement the vegetables beautifully.
How to Make Warm Winter Vegetable Casserole with Garlic & Rosemary for Families
Prep and Preheat
Begin by preheating your oven to 425°F (220°C). This high temperature is crucial for achieving that beautiful caramelization on the vegetables. While the oven heats, peel and cube all your vegetables into roughly 1-inch pieces. Try to keep them uniform in size so they cook evenly. My kids love helping with this step – we make it a game to see who can create the most perfect cube. Don't worry about being too precise; rustic is beautiful here.
Season Generously
In your largest bowl (or directly on a large rimmed baking sheet if you prefer), toss the cubed vegetables with olive oil, salt, and pepper. Be generous with the seasoning – vegetables need more salt than you think. I use about 1 tablespoon of kosher salt for this amount of vegetables. Add the fresh rosemary leaves, stripped from their stems. The easiest way to do this is to hold the tip of the sprig and run your fingers downward against the growth direction.
First Roast for Caramelization
Spread the seasoned vegetables in a single layer on two large rimmed baking sheets. Crowding will cause steaming instead of roasting, so give them space. If they don't fit comfortably, use three sheets. Roast for 25-30 minutes, stirring once halfway through. You're looking for golden edges and tender centers. The smell at this point will have everyone asking when dinner will be ready!
Prepare the Casserole Base
While the vegetables roast, prepare your casserole base. In a large bowl, combine the uncooked quinoa with 2 cups of vegetable broth. This allows the quinoa to start absorbing liquid before baking. Drain and rinse your cannellini beans – this removes excess sodium and the starchy liquid they're packed in. If you're using dried beans that you've cooked, you'll need about 3 cups total.
Create the Garlic Infusion
Take your whole head of garlic and slice off the top quarter to expose the individual cloves. Place it on a small piece of foil, drizzle with olive oil, and wrap it up like a little present. This roasted garlic will become sweet and spreadable, adding incredible depth to the casserole. You can do this step ahead – roasted garlic keeps for a week in the fridge.
Assemble the Casserole
Reduce oven temperature to 375°F (190°C). In a large casserole dish (at least 9x13 inches), layer half of the roasted vegetables. Scatter the quinoa mixture and beans over this layer, then top with the remaining vegetables. Pour the remaining 1 cup of vegetable broth around the edges – this creates steam to cook the quinoa while keeping everything moist. Nestle the foil-wrapped garlic in one corner of the dish.
Bake to Perfection
Cover the casserole tightly with foil and bake for 45 minutes. This covered baking allows the quinoa to cook properly and prevents the top from drying out. After 45 minutes, remove the foil and continue baking for another 15-20 minutes. This final uncovered baking creates those delicious crispy edges that everyone fights over. The quinoa should be fluffy and the liquid absorbed.
Rest and Serve
Remove the casserole from the oven and let it rest for 10 minutes – this allows the quinoa to finish absorbing any remaining liquid and makes serving easier. Squeeze the roasted garlic cloves out of their skins and mash them with a fork. Stir the sweet, caramelized garlic throughout the casserole or serve it on the side for those who want extra. Garnish with fresh parsley if desired and serve hot.
Expert Tips
Temperature Matters
Don't skip the initial high-temperature roast. This step is crucial for developing those complex, caramelized flavors that make this casserole irresistible. The Maillard reaction (browning) happens best at 425°F, creating hundreds of flavor compounds.
Don't Overdo the Liquid
The quinoa will release moisture as it cooks, so resist the urge to add extra broth if it looks dry at first. Too much liquid creates a mushy casserole. If it seems too wet after baking, return it to the oven uncovered for 10 more minutes.
Size Consistency
Cut vegetables into similar-sized pieces so they cook evenly. If using vegetables with different cooking times (like carrots vs. potatoes), cut the slower-cooking ones smaller. This ensures everything is perfectly tender at the same time.
Make-Ahead Magic
This casserole tastes even better the next day as the flavors meld. Make it on Sunday and enjoy easy reheated meals throughout the week. It also freezes beautifully in individual portions for quick weeknight dinners.
Color Contrast
Aim for a variety of colors – orange sweet potatoes, yellow squash, purple carrots, green Brussels sprouts. Not only is it more visually appealing, but different colors indicate different nutrients, making your meal more nutritionally complete.
Crispiness Hack
For extra crispy edges, broil the casserole for 2-3 minutes at the end of cooking. Watch it closely – it goes from perfect to burnt quickly. Those caramelized edges are the best part, according to my kids!
Variations to Try
Mediterranean Version
Swap rosemary for oregano and add kalamata olives, sun-dried tomatoes, and crumbled feta cheese. Include zucchini and eggplant for authentic Mediterranean flavors. A drizzle of balsamic reduction when serving takes it over the top.
Tex-Mex Style
Replace rosemary with cilantro and cumin, add black beans instead of cannellini, and include corn kernels. Top with pepper jack cheese during the final 10 minutes of baking. Serve with avocado and salsa on the side.
Asian-Inspired
Use ginger and five-spice powder instead of rosemary, swap tamari for some of the broth, and include bok choy, water chestnuts, and shiitake mushrooms. Top with toasted sesame seeds and green onions.
Protein-Packed
Add cooked chicken sausage, cubed firm tofu, or even leftover holiday turkey. You can also stir in a can of chickpeas for extra protein while keeping it vegetarian. Greek yogurt stirred in at the end adds creaminess and protein.
Storage Tips
Refrigerator Storage: Cool the casserole completely before storing. Transfer to airtight containers and refrigerate for up to 5 days. The flavors actually improve after the first day as the herbs continue to infuse the vegetables. Reheat individual portions in the microwave for 2-3 minutes, or warm larger amounts in a 350°F oven for 15-20 minutes.
Freezer Instructions: This casserole freezes beautifully for up to 3 months. I recommend freezing in individual portions for easy weeknight meals. Wrap tightly in plastic wrap, then aluminum foil, or use freezer-safe containers. Thaw overnight in the refrigerator before reheating. The texture of the quinoa might be slightly softer after freezing, but the flavor remains excellent.
Make-Ahead Method: Assemble the entire casserole up to the point of baking, cover tightly, and refrigerate for up to 24 hours. When ready to bake, add 10-15 minutes to the covered baking time since you'll be starting with a cold dish. This is perfect for holiday meals or busy weeknight dinners.
Frequently Asked Questions
While you can adapt this for a slow cooker, you'll miss the crucial caramelization step that makes it special. If you must use a slow cooker, roast the vegetables first according to steps 1-3, then transfer to your slow cooker with the remaining ingredients. Cook on low for 4-5 hours. The texture will be softer, but the flavor will still be good.
The key is the caramelization – it transforms vegetables into sweet, tender morsels. Start with sweeter vegetables like sweet potatoes and carrots. Let them help choose and prepare the vegetables. Call it a "rainbow casserole" and make it exciting. You can also blend some of the vegetables into the broth before baking so they disappear but the nutrition remains.
Absolutely! Cooked sausage, cubed ham, or shredded chicken work well. Add cooked meat during the final assembly so it doesn't dry out. If using raw meat, cook it first and add with the beans. Italian sausage pairs particularly well with the rosemary and garlic.
Fresh rosemary is really worth seeking out for this recipe – it makes a huge difference. In a pinch, use 1 tablespoon dried rosemary, but add it during the initial roasting so it has time to soften. Thyme or sage are better fresh herb alternatives than dried rosemary.
Perfectly cooked quinoa will have a tiny spiral (the germ) separating from each grain, and it should be tender but still have a slight bite. If there's excess liquid in the casserole, let it bake uncovered for 10 more minutes. If the quinoa is still hard, add 1/4 cup more broth, cover, and bake 10 minutes longer.
Yes! This recipe doubles beautifully for potlucks or large families. You'll need two casserole dishes for even cooking. The initial roasting step might take 5-10 minutes longer with double the vegetables. Everything else stays the same. Leftovers freeze perfectly, so don't worry about making too much.
Warm Winter Vegetable Casserole with Garlic & Rosemary for Families
Ingredients
Instructions
- Prep vegetables: Preheat oven to 425°F. Peel and cube all vegetables into 1-inch pieces.
- Season and roast: Toss vegetables with olive oil, salt, pepper, and rosemary. Roast for 25-30 minutes until golden.
- Prepare base: Combine quinoa with 2 cups broth. Drain beans. Wrap garlic in foil with oil.
- Assemble: Layer half vegetables, quinoa mixture, and beans in casserole dish. Top with remaining vegetables and broth.
- Bake: Cover and bake at 375°F for 45 minutes, then uncover and bake 15-20 minutes more.
- Serve: Let rest 10 minutes, squeeze roasted garlic over top, and serve hot.
Recipe Notes
This casserole tastes even better the next day! Make a double batch and freeze half for busy weeknights. The roasted garlic can be prepared ahead and stored in the refrigerator for up to a week.