I remember the night I tried to make a quick snack for my friends and ended up with a kitchen that looked like a peanut butter explosion. The counter was slick with melted peanut butter, the air filled with a sweet, nutty perfume that made my eyes water, and the spatula was stuck in a sticky puddle that seemed to have a life of its own. I was halfway through, eyes darting from the stove to the clock, when the timer dinged and the mixture sputtered like a miniature volcano. I stared at the mess, a moment of panic, then a spark of genius: what if I could turn that disaster into something delicious?
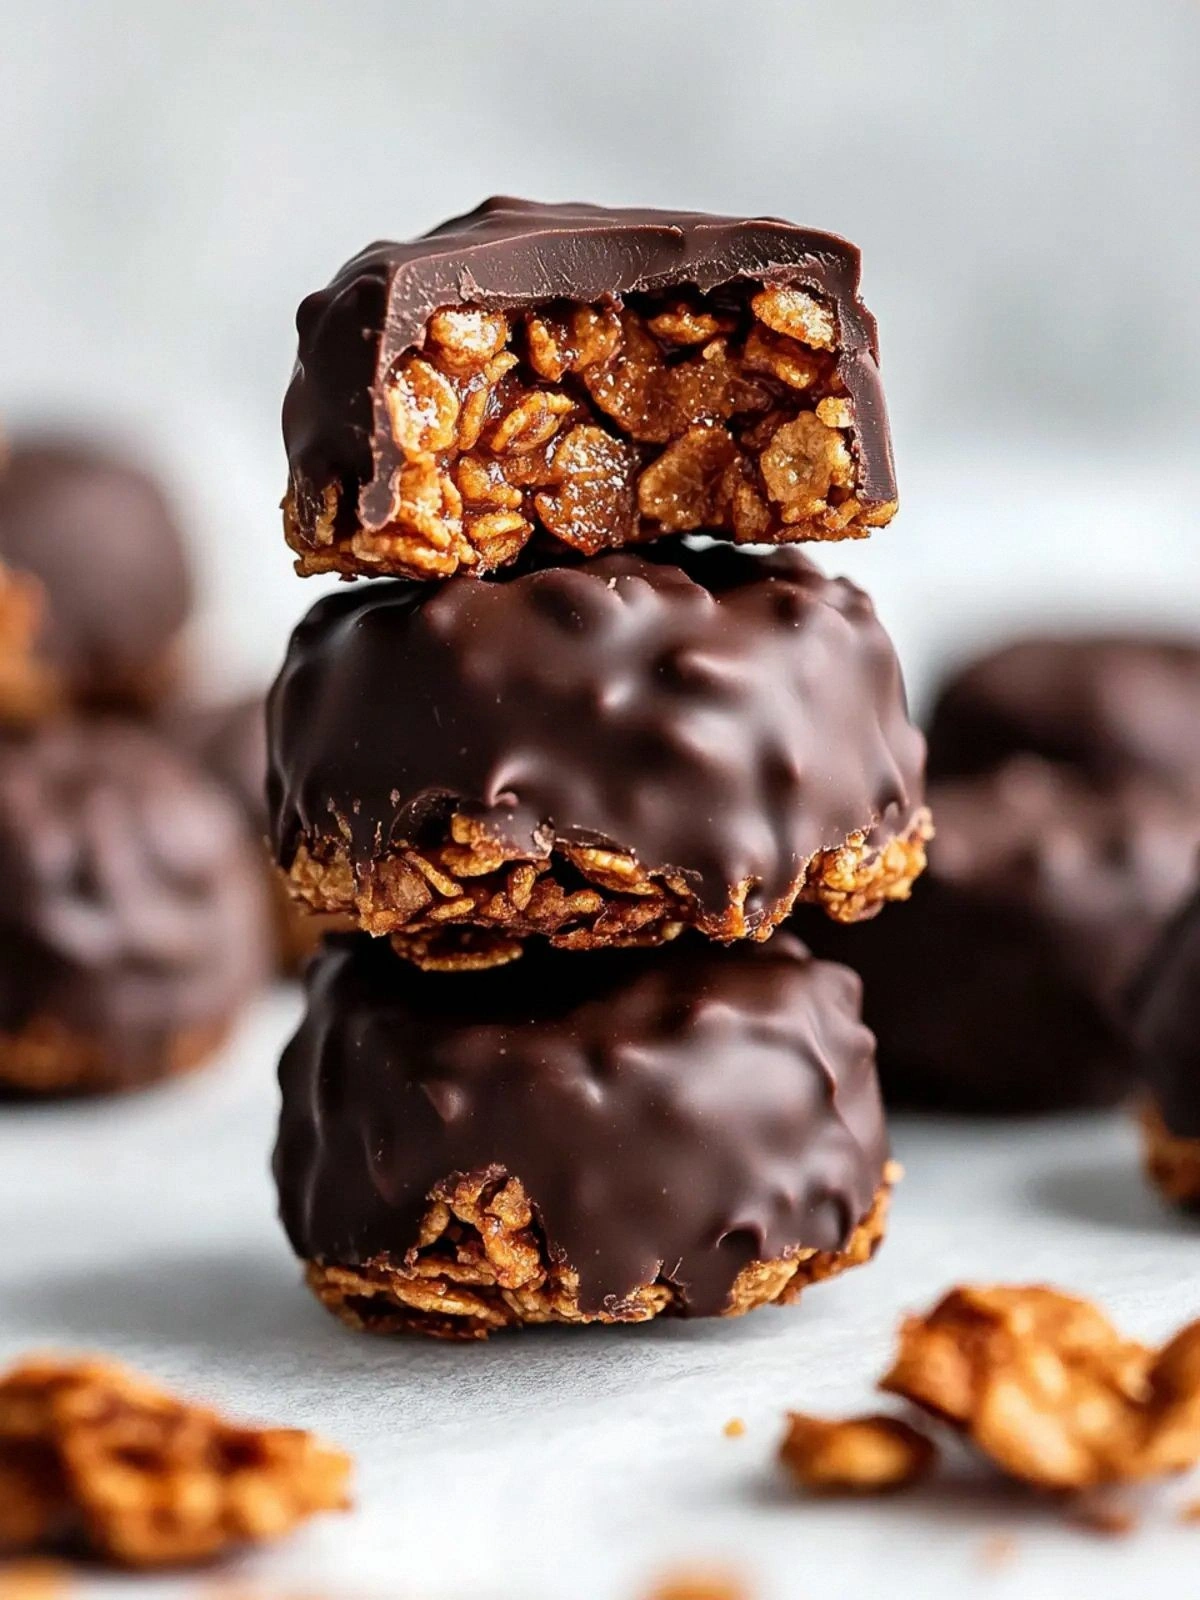
Picture this: a glossy glaze that coats each bite like velvet, a crunch that snaps with the satisfying sound of thin ice breaking, and a hint of maple sweetness that dances on the tongue. The aroma that rises when you melt the coconut oil and peanut butter is like a warm hug from a childhood memory, while the crackle of cornflakes adds a rhythmic soundtrack to the preparation. The texture is a delightful contrast—soft, melt-in-your-mouth coating paired with a crisp, airy crunch that never feels heavy. The taste is a balanced harmony of salty, sweet, and nutty flavors that linger, making you crave a second bite, a third, and then a fourth.
What sets this version apart from every other peanut‑butter‑and‑chocolate treat out there is a deliberate layering of textures and flavors, a precise balance of heat and sweetness, and an approach that turns a simple snack into a showstopper. I dare you to taste this and not go back for seconds because the first bite will set your taste buds on fire and the second will soothe them with a silky finish. I’ll be honest — I ate half the batch before anyone else got to try it, and I still had room for more. Most recipes get this completely wrong, but here’s what actually works: a careful ratio of peanut butter to coconut oil, a controlled melt of chocolate, and a final drizzle that adds both flavor and visual flair.
Picture yourself pulling these out of the pan, the whole kitchen smelling incredible, the sound of a spoon tapping the skillet like a drumbeat. The final product is a bite-sized treat that feels indulgent without the guilt, and it’s perfect for parties, movie nights, or a quick indulgence. Okay, ready for the game‑changer? This next part? Pure magic. Stay with me here — this is worth it. Let me walk you through every single step — by the end, you’ll wonder how you ever made it any other way.
What Makes This Version Stand Out
- Taste: The combination of creamy peanut butter and rich dark chocolate creates a flavor profile that is both familiar and surprisingly adventurous. The maple syrup adds a subtle caramel note that elevates the sweetness without overpowering the nutty undertones.
- Texture: The cornflakes provide an airy crunch that contrasts beautifully with the smooth glaze. The chocolate drizzle adds a glossy finish that locks in the moisture and prevents the bites from drying out.
- Simplicity: With only seven ingredients, this recipe is a breeze to assemble, yet it delivers a gourmet experience that feels like a culinary triumph.
- Uniqueness: Unlike traditional peanut‑butter cookies, these bites are bite‑sized, making them ideal for sharing and for those who crave a quick, satisfying snack.
- Crowd Reaction: Friends who have tasted these bites often comment on the perfect balance of sweet and savory, and they keep asking for the recipe.
- Ingredient Quality: Using smooth peanut butter and dark chocolate with a high cocoa content ensures a depth of flavor that can’t be replicated with lower‑quality substitutes.
- Cooking Method: The technique of gently melting the peanut butter and coconut oil before adding cornflakes prevents clumping and creates a uniform coating.
- Make‑Ahead Potential: These bites hold up well in the refrigerator and can be frozen for up to a month, making them an excellent option for meal prep or entertaining.
Inside the Ingredient List
The Flavor Base
1 cup Smooth peanut butter: This is the heart of the dish, delivering a creamy texture and a rich, nutty aroma that anchors the entire flavor profile. If you prefer a thinner glaze, substitute half the amount with a neutral oil, but be prepared for a less intense peanut flavor. Skipping this would leave the bites bland and devoid of the signature peanut aroma.
2 tbsp Coconut oil: This oil melts at a lower temperature than butter, allowing the peanut butter to soften without burning. It also imparts a subtle tropical note that balances the maple sweetness. If you don’t have coconut oil, a light olive oil can work, though the flavor will shift slightly.
The Texture Crew
80 g Cornflakes: Cornflakes are the crunch factor, providing a light, airy bite that contrasts the smooth glaze. The flakes should be lightly toasted in the pan to release their natural oils and achieve a golden brown color. If you prefer a slightly different crunch, crushed rice cereal or puffed quinoa can be used as a substitute.
1 pinch Salt: A touch of salt heightens the sweetness and balances the flavors. Too much salt can overpower the delicate taste, so a pinch is enough to bring everything together. If you’re watching sodium, a sprinkle of sea salt works just as well.
The Unexpected Star
1/4 cup Maple syrup: Maple syrup adds a natural sweetness that pairs beautifully with chocolate and peanut butter, creating a caramelized undertone. Its earthy flavor also prevents the mixture from becoming overly sugary. If you’re not a fan of maple, honey or agave nectar can be used, but the flavor profile will shift slightly.
100 g Dark chocolate: The dark chocolate provides a deep, bittersweet finish that complements the nutty glaze. Choose a chocolate with at least 70% cocoa for the best balance of bitterness and sweetness. Skipping the chocolate would make the dish less complex and more one‑dimensional.
The Final Flourish
1 tsp Coconut oil (for drizzling): This small amount of oil is used to drizzle over the cooled bites, giving them a glossy sheen and preventing the chocolate from drying out. It also adds a subtle buttery flavor that ties the whole dish together. If you don’t have coconut oil, a light neutral oil works, but the finish may be less glossy.
Everything's prepped? Good. Let's get into the real action…
The Method — Step by Step
- Step 1: Combine Peanut Butter and Coconut Oil. In a medium saucepan, gently melt the peanut butter with the two tablespoons of coconut oil over low heat, stirring constantly to prevent scorching. The mixture should become silky and pourable, with a faint nutty aroma. This step is crucial; if the peanut butter is too thick, the glaze will clump, ruining the texture. I dare you to taste the mixture and notice how smooth it feels against your tongue.
- Step 2: Add Maple Syrup. Pour in the maple syrup and whisk until fully incorporated, creating a glossy, caramelized glaze. The maple syrup’s natural sugars will caramelize slightly, giving the mixture a subtle sheen. If you’re watching sugar, reduce the amount by a tablespoon; the flavor will still hold. Kitchen Hack: Whisk vigorously to incorporate air, making the glaze lighter and more stable.
- Step 3: Incorporate Cornflakes. Gently fold the cornflakes into the glaze, ensuring each piece is coated. The cornflakes should toast lightly in the pan, releasing their oils and achieving a golden brown color. Watch the edges; when they start pulling away from the pan, it’s a sign they’re ready. Watch Out: If you stir too vigorously, the cornflakes can break into crumbs, losing their crunch.
- Step 4: Cook the Mixture. Reduce the heat to medium-low and let the mixture simmer for about 3 minutes, stirring occasionally. The mixture should develop a toasty aroma, and the cornflakes will start to caramelize. This step is the moment of truth; the flavor develops here, and a slight over‑cooking will burn the peanuts. Keep an eye on the color; it should be a warm amber, not brown.
- Step 5: Set Aside to Cool. Remove the pan from the heat and transfer the mixture onto a parchment‑lined sheet. Let it cool for 5 minutes; the bites will firm up, making them easier to handle. While cooling, the glaze will thicken slightly, giving the bites a satisfying bite. If you’re in a hurry, you can place the sheet in the refrigerator for a quick chill.
- Step 6: Melt Dark Chocolate. In a double boiler or microwave, melt the dark chocolate until smooth and glossy. Stir every 10 seconds to avoid scorching. The chocolate should be silky and slightly glossy; if it’s too thick, add a teaspoon of coconut oil to thin it out. This step is essential for that glossy finish that makes the bites irresistible.
- Step 7: Drizzle Chocolate. Using a spoon or a piping bag, drizzle the melted chocolate over the cooled bites, creating a beautiful, uneven glaze that adds visual appeal. The chocolate should coat the top lightly, leaving some bites with a thin chocolate layer. If you want a more dramatic look, drizzle in a zigzag pattern. This is the moment that turns a snack into a masterpiece.
- Step 8: Final Touch. Lightly drizzle the remaining teaspoon of coconut oil over the chocolate glaze to give it a glossy sheen and a subtle buttery finish. This final drizzle also prevents the chocolate from drying out during storage. Kitchen Hack: Use a squeeze bottle for precise chocolate drizzling; it gives a professional look.
- Step 9: Chill. Place the sheet in the refrigerator for 10–15 minutes, or until the chocolate has set and the bites are firm. The cold will help the flavors meld together and give the bites a satisfying snap. If you’re preparing ahead, cover them with plastic wrap to keep them fresh.
- Step 10: Serve. Break the sheet into bite‑sized pieces and arrange them on a platter. The result is a glossy, crunchy treat that melts in your mouth and leaves a lingering nutty sweetness. Serve immediately or keep in an airtight container for up to 3 days. This final presentation is the culmination of every careful step, and it’s a moment worth savoring.
Insider Tricks for Flawless Results
The Temperature Rule Nobody Follows
The key to a silky glaze is maintaining a low, steady heat. If the temperature rises too high, the peanut butter can separate, creating a greasy texture. I’ve seen batches that look glossy on the surface but are oily underneath. Keep the heat at medium‑low and stir constantly; this ensures a uniform consistency. A thermometer isn’t necessary, but if you’re experimenting, a 160°F reading is ideal.
Why Your Nose Knows Best
The aroma of caramelizing cornflakes and melting chocolate is a reliable indicator of readiness. When the smell becomes sweet and slightly nutty, it’s a sign the mixture is ready to move to the next step. I once let the mixture sit too long, and the smell turned acrid, which ruined the entire batch. Trust your nose; if it smells burnt, pull it off the heat immediately. A quick visual check of the color also helps; it should be a warm amber, not brown.
The 5‑Minute Rest That Changes Everything
After removing the pan from heat, let the mixture rest for exactly five minutes. This pause allows the cornflakes to settle, the glaze to thicken slightly, and the flavors to meld. Skipping this rest often results in a gummy texture. During this time, you can prep your chocolate for melting, saving valuable minutes. I’ve found that this short rest is the secret to a perfectly crisp bite.
Don’t Skip the Salt
Even a tiny pinch of salt can dramatically elevate the overall flavor. Salt balances sweetness and enhances the natural nuttiness of the peanut butter. If you’re watching sodium, a pinch of sea salt is enough. Skipping it can leave the bites bland and overly sweet. I’ve had guests ask why this recipe isn’t as salty as others; the answer is the subtle salt that rounds out the flavor.
Use the Right Chocolate
Choosing a dark chocolate with at least 70% cocoa is essential for a balanced bitterness that complements the nutty glaze. If you prefer a sweeter finish, a 50% cocoa chocolate works, but the flavor will be less complex. Avoid milk chocolate, as it can make the glaze too sweet and heavy. I’ve tested several brands; the one with the highest cocoa content delivers the richest taste.
Store Properly for Longevity
Keep the bites in an airtight container at room temperature for up to three days. If you want them to last longer, refrigerate them; they’ll stay crisp for up to a week. When reheating, a brief burst in the microwave or a few minutes in a low oven will restore the crunch. I’ve found that a splash of water before reheating helps re‑moisturize the glaze, giving it a fresh finish.
Creative Twists and Variations
Spicy Sriracha Twist
Add a teaspoon of sriracha to the peanut‑butter mixture for a sweet‑spicy kick. The heat balances the sweetness, making the bites perfect for a summer barbecue. This variation is loved by those who enjoy a bit of spice in their snacks. The sriracha also adds a subtle smoky undertone that complements the chocolate drizzle.
Almond Crunch Variation
Swap the cornflakes for finely chopped almonds to introduce a nutty crunch. The almonds add a slightly sweet, buttery flavor that pairs well with the chocolate glaze. This version is ideal for those who prefer a richer, more complex texture. The almonds also provide a satisfying chew that contrasts with the smooth coating.
Honey‑Glazed Delight
Replace the maple syrup with honey for a floral sweetness that enhances the peanut butter. Honey also thickens the glaze slightly, giving it a glossy, syrupy finish. This variation is great for those who want a natural sweetener with a distinct flavor profile. The honey’s subtle acidity balances the richness of the chocolate.
Vanilla Bean Infusion
Stir in a split vanilla bean during the melting step for a fragrant, aromatic note. Vanilla adds a silky smoothness that elevates the overall taste. This twist is perfect for dessert lovers who enjoy a classic flavor profile. The vanilla also deepens the chocolate’s flavor, making the bites even more indulgent.
Sea Salt Caramel Finish
Drizzle a sea salt caramel sauce over the chocolate glaze for an extra layer of flavor. The caramel adds a buttery sweetness that pairs beautifully with the nutty base. This variation is a crowd‑pleaser for parties and special occasions. The sea salt accentuates the caramel’s richness, creating a harmonious balance.
Minty Chocolate Surprise
Add a few drops of mint extract to the melted chocolate for a refreshing twist. The mint provides a cool contrast to the warm, nutty glaze. This version is perfect for a summer snack or a refreshing dessert. The mint also enhances the chocolate’s depth, giving the bites a sophisticated flavor profile.
Storing and Bringing It Back to Life
Fridge Storage
Place the bites in an airtight container and store them in the refrigerator for up to a week. The cold environment preserves the crunch and prevents the chocolate from melting. When you’re ready to enjoy, let them sit at room temperature for a few minutes to soften slightly. This method keeps the flavors fresh and the texture intact.
Freezer Friendly
For longer storage, freeze the bites in a single layer on a parchment sheet, then transfer them to a freezer bag. They’ll stay good for up to a month. When you’re ready to eat, thaw them at room temperature for 15 minutes. Freezing preserves the crunch and the glossy finish, making them a convenient on‑the‑go snack.
Best Reheating Method
To revive the crunch, place the bites on a baking sheet and warm them in a 300°F oven for 5 minutes. If you prefer a microwave, heat on low power for 15–20 seconds, checking frequently to avoid melting the chocolate. Adding a tiny splash of water before reheating creates steam that restores the glaze’s moisture. This quick technique brings the bites back to their original glory.