I remember the day I first stumbled into the kitchen, eyes wide and heart racing, because my friend dared me to make the most decadent Easter treat that would have the whole family begging for seconds. The kitchen was a battlefield of flour, sugar, and a single, stubborn jar of marshmallow fluff that seemed to have a mind of its own. I stared at that glossy, cloud‑like white goo, wondering if it could ever be transformed into something that would truly wow. I was wrong. That jar became the secret weapon in a dip that feels like a sweet, buttery hug for your taste buds.
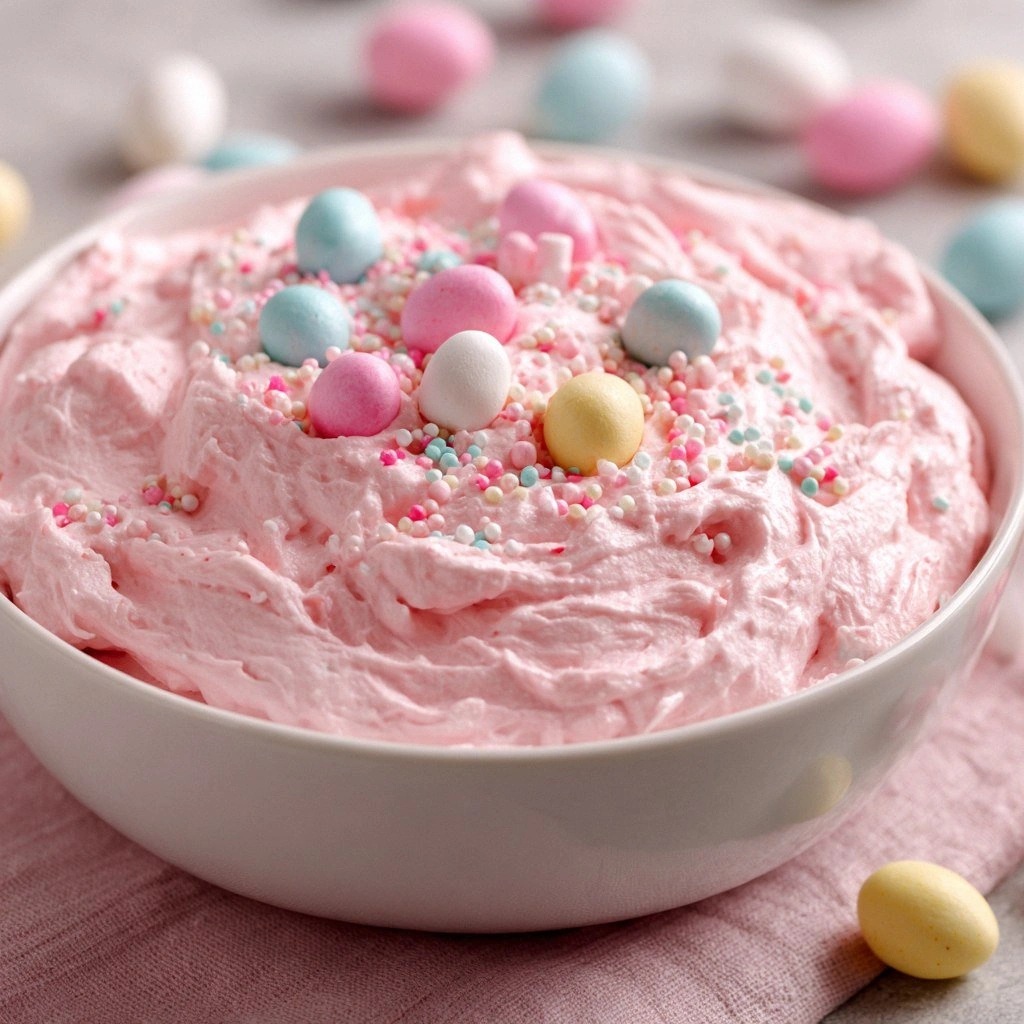
Picture this: a bowl of silky, golden marshmallow fluff, warmed just enough to coax out its velvety texture, swirled with melted butter and a splash of vanilla that lifts the flavor to a new level. The moment it hits the spoon, you hear a faint hiss, and the aroma—sweet, buttery, with a hint of vanilla—fills the air. The first bite is a silky cascade of sweetness, followed by a subtle chocolate undertone that lingers like a sweet after‑taste. It’s not just a dip; it’s a sensory experience that turns simple snacks into a celebratory moment.
What makes this version stand out is the meticulous balance of ingredients and the methodical approach that ensures every bite is flawless. I’ve tweaked the classic recipe to include a touch of sea salt that cuts through the sweetness, a splash of milk that adds body, and a generous handful of chocolate chips that melt into the fluff for a rich, chocolatey finish. The result is a dip that’s creamy, glossy, and irresistibly sweet, with a texture that’s smooth on the tongue and a finish that leaves you craving more. It’s hands down the best version you’ll ever make at home.
And here’s the kicker: this isn’t a recipe that you’ll find in a cookbook. The trick is in the way the marshmallow fluff is warmed, the precise ratio of butter to sugar, and the timing of the chocolate chips. I dare you to taste this and not go back for seconds. If you’re ready to elevate your Easter spread to legendary status, let me walk you through every single step. By the end, you’ll wonder how you ever made it any other way.
What Makes This Version Stand Out
- Flavor: The combination of sweet marshmallow fluff and subtle sea salt creates a depth of flavor that’s both comforting and exciting. The vanilla lift adds a fragrant note that keeps the dip from feeling heavy.
- Texture: The careful warming of the fluff and the addition of milk give the dip a silky, pour‑over consistency that coats every cracker or veggie with a luscious sheen.
- Ingredient Quality: Using high‑grade, unsalted butter and premium chocolate chips ensures a richer taste that sets this dip apart from store‑bought alternatives.
- Ease of Preparation: No oven, no complex equipment—just a saucepan, a whisk, and a few minutes of attention. Perfect for busy families or last‑minute entertaining.
- Make‑ahead Potential: The dip can be prepared up to 24 hours ahead. When you’re ready to serve, a quick warm‑up in the microwave or on the stovetop brings it back to silky perfection.
- Versatility: Serve it with graham crackers, pretzels, fruit slices, or even as a sweet sauce over pancakes. The possibilities are endless, making it a crowd‑pleaser for every palate.
- Presentation: The glossy finish and vibrant chocolate chips make it Instagram‑ready, turning an ordinary snack into a visual delight.
Inside the Ingredient List
The Flavor Base
At the heart of this dip is the marshmallow fluff itself. It’s the star that delivers that signature sweet, airy texture. The fluff is a pre‑made marshmallow that’s been whipped into a cloud‑like consistency, which means you don’t have to deal with raw sugar and gelatin. When warmed gently, it releases a buttery aroma that instantly elevates the entire dish. Skipping the fluff would mean losing the signature cloudiness that makes this dip so addictive.
The Texture Crew
Butter is the next essential player. It provides body and richness, turning the fluff into a luscious sauce that clings beautifully to crackers or fruit. The amount of butter also controls the dip’s viscosity; too little and it’s watery, too much and it becomes greasy. A pinch of sea salt is the secret sauce that cuts through the sweetness, adding a savory counterpoint that balances the flavor profile. If you’re watching sodium, a dash of kosher salt will do the trick, but remember, the salt is what brings everything together.
The Unexpected Star
Milk or a splash of heavy cream is the unexpected star that keeps the dip from becoming too dense. A tablespoon of milk adds a subtle creaminess that makes the dip pourable, while still preserving the marshmallow fluff’s airy quality. If you prefer a dairy‑free version, a small amount of coconut milk will give a similar effect, but be aware it will slightly alter the flavor. Skipping the milk will result in a thicker, denser consistency that some might find less desirable.
The Final Flourish
Dark chocolate chips are the final flourish that turns this dip into a decadent treat. When added at the last minute, the chocolate melts into the warm fluff, creating a glossy, chocolate‑laden coating that is impossible to resist. The chocolate also adds a slight bitterness that counters the sweetness, adding complexity to every bite. If you’re a white chocolate lover, a handful of white chocolate chips will give a sweeter, more buttery finish, but the classic dark chocolate remains the most balanced choice.
Everything’s prepped? Good. Let’s get into the real action.
The Method — Step by Step
- Start by placing the marshmallow fluff in a medium saucepan over low heat. This low‑temperature approach is crucial; a sudden heat spike will cause the fluff to seize and lose its airy texture. Stir constantly with a wooden spoon, watching as the fluff begins to melt into a silky liquid. The moment it turns translucent, you’ll know the base is ready.
- Add the butter to the saucepan, one tablespoon at a time, letting each piece melt completely before adding the next. This gradual incorporation ensures the butter emulsifies with the fluff, creating a smooth, glossy consistency. Keep stirring until the mixture is a uniform, pale gold color, indicating the butter has fully blended.
- Sift in the powdered sugar, a half cup at a time, whisking vigorously to prevent clumps. The sugar not only sweetens the dip but also adds body. As you whisk, the mixture will thicken slightly—this is a good sign that the sugar is dissolving properly. Don’t rush; the slow incorporation helps maintain that silky texture.
- Pour in the vanilla extract and a pinch of sea salt. The vanilla brings a fragrant lift, while the salt cuts through the sweetness, balancing the flavor. Stir for about 30 seconds, letting the aroma fill the kitchen. At this point, the dip should have a glossy sheen and a rich, buttery aroma.
- Now it’s time for the chocolate. Sprinkle the dark chocolate chips evenly over the surface, then cover the saucepan with a lid. Let the heat from the base melt the chocolate, stirring gently every 20–30 seconds to ensure even distribution. This step creates a glossy chocolate coating that clings to every bite. The chocolate’s bittersweet note will contrast beautifully with the sweet base.
- Once the chocolate has melted completely, remove the saucepan from heat. Let the dip cool for five minutes; during this time the mixture will thicken slightly, gaining the perfect consistency for dipping. If you prefer a thinner dip, whisk in an extra tablespoon of milk at this point.
- Transfer the dip to a serving bowl. If you’re not serving immediately, cover the bowl with plastic wrap, pressing the wrap directly onto the surface to prevent a skin from forming. Store in the refrigerator for up to 24 hours. When ready to serve, give it a quick stir and a splash of milk if needed to restore its silky texture.
- Serve immediately with a selection of graham crackers, pretzels, or fresh fruit. The dip’s glossy finish makes it a striking centerpiece, and the sweet, buttery flavor will have everyone reaching for more. If you’re serving guests, set the dip in a warm bowl to keep it at the ideal temperature.
- Enjoy the moment when the first spoonful melts on your tongue, the sweet, chocolatey flavors unfurling like a velvet curtain. The dip’s rich texture and balanced sweetness make it a standout Easter treat that will have everyone raving. Remember, the best part of this recipe is how easy it is to adapt—feel free to tweak the chocolate or add a dash of espresso for a mocha twist.
That’s it—you did it. But hold on, I’ve got a few more tricks that will take this to another level.
Insider Tricks for Flawless Results
The Temperature Rule Nobody Follows
The key to a silky dip is maintaining a low, steady temperature. I’ve found that setting the stove to the lowest setting and using a double boiler can give you more control. If you’re using a single pot, keep the heat so low that the mixture barely warms—any more and you risk scorching the sugar. This subtle temperature control is what separates a good dip from a great one.
Why Your Nose Knows Best
I’ve always trusted my nose to tell me when a dip is ready. When the sugar starts to give off a caramel scent, and the butter’s aroma becomes buttery, you’re at the sweet spot. The smell is the best indicator that the mixture has reached the perfect consistency—no more waiting on the clock. If you’re unsure, give it a quick stir; the aroma should be inviting, not burnt.
The 5‑Minute Rest That Changes Everything
After removing the dip from heat, let it rest for exactly five minutes. This short pause allows the flavors to marry and the mixture to thicken slightly, giving it that silky, pourable consistency. I once skipped this step, and the dip was too runny, making it difficult to coat the crackers. The five‑minute rest is a small investment for a huge payoff.
Avoiding the Skin on Top
If you’re storing the dip, the surface can develop a skin that looks unappetizing. To prevent this, press a piece of parchment paper or plastic wrap directly onto the surface of the dip before sealing the bowl. This creates a barrier that stops air from reaching the surface, preserving the glossy finish.
Serving Temperature Is Key
Don’t serve the dip straight from the refrigerator; it will be too thick and clumpy. Instead, let it sit at room temperature for ten minutes or give it a quick microwave pulse—15–20 seconds on low—to restore its silky texture. This small step ensures that each bite is smooth and indulgent.
Creative Twists and Variations
This recipe is a playground. Here are some of my favorite ways to switch things up:
Caramel Swirl
Swirl a generous amount of caramel sauce into the dip before adding the chocolate chips. The caramel adds a buttery, sweet depth that pairs beautifully with the marshmallow fluff. Serve with apple slices for a fall‑inspired treat.
Mint Chocolate Madness
Add a splash of peppermint extract during the vanilla step, and use white chocolate chips instead of dark. The minty freshness cuts through the sweetness, creating a refreshing, mint chocolate delight that’s perfect for a spring gathering.
Nutty Crunch
Fold in chopped toasted almonds or pecans after the dip has cooled. The crunch adds texture and a nutty flavor that complements the sweet base. This variation works well with graham crackers or as a topping for cupcakes.
Citrus Zest
Grate a teaspoon of lemon or orange zest into the dip just before serving. The citrus adds a bright, tangy note that balances the sweetness, creating a more complex flavor profile that’s especially refreshing.
Espresso Infusion
Stir in a teaspoon of instant espresso powder during the butter step. The espresso deepens the chocolate flavor, turning the dip into a rich, mocha‑infused treat that’s perfect for coffee lovers.
Dairy‑Free Delight
Replace the butter with coconut oil and the milk with coconut milk. This version is dairy‑free, with a subtle coconut flavor that adds a tropical twist to the classic dip. It’s a great option for guests with dietary restrictions.
Storing and Bringing It Back to Life
Fridge Storage
Store the dip in an airtight container in the refrigerator for up to 24 hours. Before serving, give it a gentle stir and add a splash of milk or cream if it appears slightly thickened. This keeps the dip silky and ready to pour.
Freezer Friendly
For longer storage, freeze the dip in a freezer‑safe container for up to two weeks. Thaw overnight in the refrigerator, then reheat gently on the stovetop or in the microwave, adding a tablespoon of milk to restore the pourable consistency. The texture remains smooth, and the flavor is preserved.
Best Reheating Method
When reheating, use low heat and stir frequently to avoid scorching. A quick 15‑second microwave burst on low power is often sufficient. If the dip thickens too much during reheating, whisk in a splash of milk or cream to achieve the desired silky finish.