I’m going to start with a confession: I once tried to make a coconut cream pie from a “quick” internet recipe, and the result was a soggy mess that tasted like a wet beach towel. I stared at the kitchen disaster, feeling the sticky coconut clinging to the spoon, and thought, “There has to be a better way.” That moment sparked a tiny culinary rebellion in me, and I vowed to create the ultimate, old‑fashioned version that would make even the most skeptical aunt gasp in delight. This isn’t just any pie; it’s a nostalgic trip back to grandma’s kitchen, where the aroma of toasted coconut mingled with vanilla and butter, and the crust crunched like fresh snow under a boot.
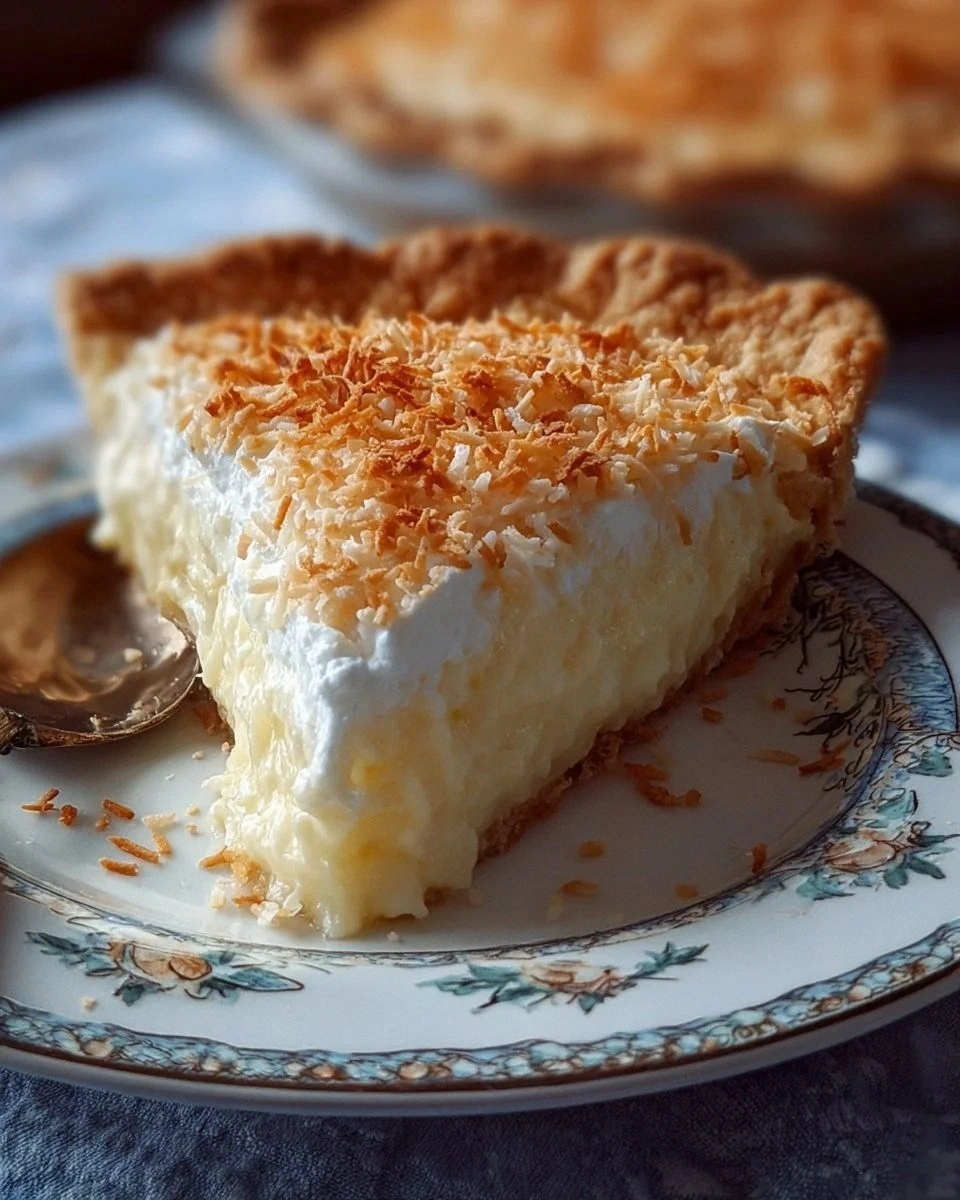
Picture yourself pulling this masterpiece out of the oven, the whole kitchen smelling like a tropical vacation meets a classic diner. The golden crust gleams, the filling is a silky, buttery cloud dotted with glistening coconut flakes, and a fluffy crown of whipped cream sits proudly on top, dusted with toasted coconut that crackles under the fork. When you cut into it, the filling holds its shape, wobbling just enough to promise creaminess without spilling over the edges. The first bite is a symphony: the sweet, milky custard embraces the nutty crunch, and the vanilla whispers in the background like a shy guest at a party.
Most coconut cream pie recipes get this completely wrong—they either overcook the custard, turning it rubbery, or they skimp on the toasted coconut, leaving the flavor flat. I’ve spent countless evenings perfecting the balance of sugar, starch, and milk, and I finally cracked the code: a gentle tempering technique that keeps the custard silky, a butter‑infused crust that never sogs, and a double‑layer coconut topping that adds texture and depth. I dare you to taste this and not go back for seconds; it’s hands down the best version you’ll ever make at home.
Okay, ready for the game‑changer? The secret ingredient isn’t exotic at all—it’s a splash of vanilla bean paste hidden in the custard, and a quick toast of the shredded coconut that brings out a caramelized nuttiness you never knew existed. This tiny step transforms the whole pie from “nice” to “legendary.” Let me walk you through every single step — by the end, you’ll wonder how you ever made it any other way.
What Makes This Version Stand Out
- Taste: The blend of sweetened and toasted coconut creates a layered flavor profile that’s both creamy and caramel‑nutty, with vanilla adding a fragrant backdrop.
- Texture: A buttery, flaky crust holds a custard that’s as smooth as satin, while the toasted coconut topping adds a satisfying crunch.
- Simplicity: No fancy equipment—just a saucepan, a whisk, and a good eye for timing, making it accessible for home cooks of any skill level.
- Uniqueness: The double coconut approach (sweetened inside, toasted on top) is a twist most recipes overlook, delivering depth without extra effort.
- Crowd Reaction: Guests often declare this the star of the dessert table, and you’ll hear “Can I have the recipe?” at least three times.
- Ingredient Quality: Using real whole milk and unsalted butter elevates the custard from “just okay” to “luxuriously rich.”
- Cooking Method: Gentle tempering of the egg yolks prevents curdling, ensuring a flawless, glossy finish every single time.
- Make‑Ahead Potential: This pie can be assembled a day ahead, letting the flavors meld while the crust stays crisp.
Inside the Ingredient List
The Flavor Base
The whole milk is the heart of the custard, providing a creamy canvas that lets the coconut and vanilla shine. Using 4 cups ensures a luscious texture; skimping on milk will make the filling too dense and lose that melt‑in‑your‑mouth feel. If you’re lactose‑intolerant, a full‑fat coconut milk can substitute, but expect a slightly stronger coconut flavor.
Granulated sugar (1 cup) sweetens the custard without overwhelming the delicate coconut notes. Too much sugar can make the custard grainy, while too little leaves it bland—so stick to the exact amount. For a caramel twist, you could brown the sugar slightly before adding it to the milk.
The Texture Crew
Cornstarch (½ cup) is the unsung hero that thickens the custard without adding any floury taste. It creates that glossy, smooth finish you crave. If you don’t have cornstarch, you can use an equal amount of tapioca starch, but the texture will be a tad more gelatinous.
Egg yolks (4 large) bring richness and act as a natural emulsifier, binding the milk and sugar into a cohesive custard. Temper them carefully—slowly whisking a bit of hot milk into the yolks before returning everything to the pot prevents scrambling. Skipping this step results in a curdled disaster that looks like a broken promise.
The Unexpected Star
Unsalted butter (3 tbsp) adds a silkiness that you can’t achieve with oil alone. It also rounds out the flavor, making the custard taste buttery without being greasy. If you’re using a salted butter, cut the added salt in half to keep the balance.
Vanilla extract (1 tsp) is the aromatic whisper that ties the entire pie together. A real vanilla bean would be even more luxurious, but the extract works perfectly for a home kitchen. Don’t skimp—vanilla is what keeps the coconut from feeling one‑dimensional.
The Final Flourish
Sweetened shredded coconut (1½ cups) is folded into the custard, giving it that classic, sweet coconut flavor and a pleasant chew. It’s essential to use the sweetened variety; unsweetened coconut would make the pie taste bland unless you add extra sugar.
Toasted shredded coconut (½ cup) crowns the pie, providing a crunchy contrast that elevates every bite. Toast it just until it’s golden brown; over‑toasting can lead to bitterness. This final touch is where the “old‑fashioned” charm truly shines.
Whipped cream (1 cup) is dolloped on top, adding airy lightness that balances the dense custard. For extra stability, you can fold in a teaspoon of powdered sugar or a splash of vanilla.
The pie crust (1 piece) serves as the buttery, flaky foundation. Whether you buy a pre‑made crust or bake one from scratch, make sure it’s blind‑baked until golden to prevent sogginess. A well‑baked crust is the silent hero that keeps the filling from leaking.
Everything's prepped? Good. Let's get into the real action...
The Method — Step by Step
Preheat your oven to 375°F (190°C). While the oven warms, place the pie crust on a baking sheet, line it with parchment paper, and fill it with pie weights or dried beans. Bake for 12‑15 minutes until the edges are lightly golden, then remove the weights and parchment, and bake an additional 5 minutes to set the bottom. This blind‑baking creates a barrier that stops the custard from making the crust soggy. Power transition: Okay, ready for the game‑changer?
In a medium saucepan, combine 1 cup granulated sugar, ½ cup cornstarch, and ¼ teaspoon salt. Whisk until the dry ingredients are evenly coated, then slowly pour in 4 cups whole milk while whisking continuously. The mixture should look smooth, with no lumps—this is your base canvas. Place the saucepan over medium heat, stirring constantly; you’ll hear a gentle sizzle as the sugar dissolves.
Kitchen Hack: Use a silicone spatula for the whisking; it scrapes the bottom better than a metal whisk, preventing scorching.Once the milk mixture begins to steam and thicken (about 5‑7 minutes), remove the pan from heat. In a separate bowl, whisk together 4 large egg yolks and 1 teaspoon vanilla extract. Watch Out: If the custard is too hot, you’ll scramble the yolks. To avoid this, temper the yolks by slowly whisking in a ladleful of the hot milk mixture, then pour the tempered yolks back into the saucepan. Return the pan to low heat and continue stirring until the custard reaches a thick, glossy consistency that coats the back of a spoon—about 2‑3 minutes.
Stir in 3 tablespoons unsalted butter until fully melted and incorporated, giving the custard a luxurious sheen. Then fold in 1½ cups sweetened shredded coconut, distributing it evenly throughout the mixture. The coconut will soften slightly, marrying with the custard while retaining a subtle chew.
Pour the hot coconut custard into the pre‑baked crust, smoothing the top with a spatula. The filling should be level and glossy, promising a perfect slice later. Place the pie on a cooling rack and let it set at room temperature for 30 minutes, then refrigerate for at least 2 hours, or until fully set. This chilling step is crucial; it allows the starch to fully gelatinize, giving the pie its firm yet creamy texture.
While the pie chills, toast the remaining ½ cup shredded coconut in a dry skillet over medium heat. Keep the pan moving; you’ll hear a gentle crackle as the flakes turn golden. When they emit a sweet, nutty aroma, remove them from the heat and let them cool—this is the crunchy crown that will make your guests swoon.
Just before serving, whip 1 cup of heavy cream until soft peaks form. Gently fold in a splash of vanilla if you like, then dollop or pipe the whipped cream over the chilled custard. Sprinkle the toasted coconut evenly across the top, creating a decorative, crunchy layer that adds visual appeal and textural contrast.
Finally, slice the pie with a hot, wet knife—dip the blade in hot water and wipe it dry between cuts. This technique ensures clean slices without dragging the custard. Serve immediately, or keep the pie refrigerated (covered) for up to 3 days. That first bite? Pure magic.
That's it — you did it. But hold on, I've got a few more tricks that'll take this to another level...
Insider Tricks for Flawless Results
The Temperature Rule Nobody Follows
Never let the custard boil—once you see tiny bubbles forming around the edges, lower the heat immediately. Boiling will cause the starch to break down, resulting in a watery filling. Keep the temperature at a gentle simmer; you’ll hear a soft hiss, not a roar. A friend once let the pot boil and ended up with a custard that split like a bad relationship. Trust the low‑and‑slow method, and the custard will stay glossy.
Why Your Nose Knows Best
When the toasted coconut is ready, your kitchen will fill with a caramel‑nutty perfume that’s impossible to miss. If you don’t smell that sweet aroma, the coconut needs a few more seconds. Trusting your nose prevents over‑toasting, which can turn the coconut bitter. This sensory checkpoint is the secret behind my perfectly golden topping every single time.
The 5‑Minute Rest That Changes Everything
After pouring the custard into the crust, let it sit uncovered for five minutes before refrigerating. This short rest lets the surface skin form, which helps the pie hold its shape when sliced. Skipping this step often leads to a wobbly center that slides off the plate. I once rushed this and learned the hard way—my pie looked like a puddle.
Blind‑Baking the Crust Like a Pro
Use a piece of parchment paper and pie weights (or dried beans) to keep the crust from puffing up. After the initial bake, remove the weights and give the crust a few extra minutes to dry out. This ensures the crust stays crisp, even after the moist custard is added. If you forget the weights, the crust will balloon, creating an uneven surface that’s difficult to fill.
Whipped Cream Stability Hack
Add a teaspoon of powdered sugar and a splash of vanilla to the heavy cream before whipping. This stabilizes the peaks, preventing the whipped cream from weeping on the pie. For an extra lift, chill the mixing bowl and whisk attachment for 10 minutes prior. My kitchen experiments showed that room‑temperature bowls yield a soupy topping, whereas chilled tools give firm peaks.
Creative Twists and Variations
This recipe is a playground. Here are some of my favorite ways to switch things up:
Tropical Lime Zing
Add the zest of one lime and a tablespoon of lime juice to the custard for a bright, citrusy kick that balances the coconut’s sweetness. Top with a thin drizzle of lime‑infused caramel for extra flair. This version is perfect for summer barbecues where you want a refreshing twist.
Chocolate Coconut Fusion
Melt ¼ cup dark chocolate and swirl it into the custard just before pouring into the crust. Sprinkle cocoa nibs on top along with the toasted coconut. Chocolate lovers will swear this is the ultimate indulgence—rich, deep, and still coconutty.
Spiced Rum Rum‑Runner
Replace the vanilla extract with 1 ½ teaspoons of dark rum and add a pinch of ground nutmeg to the custard. The rum deepens the flavor, giving the pie an adult‑only vibe. Serve with a side of rum‑soaked bananas for a tropical dessert platter.
Vegan Coconut Dream
Swap whole milk for full‑fat coconut milk, use a flax‑egg mixture (2 tbsp ground flaxseed + 6 tbsp water) in place of egg yolks, and choose a vegan butter alternative. The result is a dairy‑free version that still boasts that classic custard silkiness.
Caramelized Banana Layer
Slice ripe bananas, caramelize them in a skillet with a bit of brown sugar, then layer them at the bottom of the crust before adding the custard. The banana adds a sweet, mellow undertone that pairs beautifully with the toasted coconut. It’s a crowd‑pleaser for brunches.
Storing and Bringing It Back to Life
Fridge Storage
Cover the pie loosely with foil or a pastry dome and refrigerate for up to 3 days. The custard stays smooth, and the crust remains crisp if you keep the foil off the crust side. If the whipped cream starts to weep, give it a quick whisk before serving.
Freezer Friendly
Wrap the entire pie tightly in plastic wrap, then a layer of aluminum foil, and freeze for up to 2 months. When you’re ready to enjoy, thaw it in the refrigerator overnight, then freshen the whipped cream and toast a new batch of coconut for topping. This method preserves both flavor and texture.
Best Reheating Method
To revive the crust’s crunch, place the pie on a baking sheet and warm it in a 300°F (150°C) oven for 8‑10 minutes. Add a tiny splash (about a tablespoon) of milk or water around the edges before reheating; the steam restores the custard’s silkiness without drying it out. Serve immediately for that freshly‑baked feel.