I was standing in my kitchen at 2 a.m., half‑asleep, staring at a bowl of soggy oat clusters that had somehow turned into a texture I could only describe as “chewy brick.” I had just tried to copy a trendy granola‑bar recipe that promised “soft, chewy goodness,” but what I got was a dense, crumbly mess that stuck to the pan like old wallpaper. I swore I would never attempt a soft bar again—until a daring friend dared me to make one that would actually crumble in your mouth like a buttery cloud. I accepted the challenge, but not without a little skepticism, because most granola‑bar attempts end up either too hard or too sticky, leaving you with a sticky mess that clings to the pan and your fingers alike.
Fast forward a few frantic experiments, a couple of kitchen disasters involving melted butter that splattered like fireworks, and a sudden epiphany when I realized the secret wasn’t more sugar, but a precise balance of moisture and fat. I discovered that a combination of honey, almond butter, and a splash of melted butter creates a glossy, pliable matrix that holds the oats and nuts together without turning them into a rock. The moment I lifted the pan, the edges pulled away cleanly, and the aroma—sweet, nutty, with a whisper of toasted cinnamon—filled the entire apartment like a warm hug. I could already hear my coworkers whispering, “What’s that amazing smell?” as I walked into the office the next day.
Now, I’m about to share the ultimate version of soft granola bars that will make you question every other bar you’ve ever bought. This isn’t just a recipe; it’s a game‑changer that turns a humble snack into a luxurious treat. I dare you to taste this and not go back for seconds. The bars are soft enough to bite through with a gentle sigh, yet they have enough crunch from toasted nuts to keep you interested. The flavor profile is layered—honey’s floral sweetness, almond butter’s creamy depth, and a hint of sea salt that makes every bite sing.
What truly sets this version apart is a surprise ingredient that most people overlook: a modest spoonful of chia seeds. They absorb excess moisture, keeping the bars from getting soggy, while adding a subtle nutty note and a boost of nutrition. And the technique? We’ll press the mixture into the pan while it’s still warm, then let it set in the fridge for a short rest, allowing the flavors to meld like a perfect choir. Picture yourself pulling this out of the oven, the whole kitchen smelling incredible, the bars glistening with a golden sheen. Let me walk you through every single step — by the end, you’ll wonder how you ever made it any other way.
What Makes This Version Stand Out
- Texture: The bars hit that sweet spot between chewy and tender, thanks to the honey‑butter‑almond butter trio that creates a silk‑like binder without turning the interior gummy.
- Flavor Depth: A pinch of sea salt amplifies the honey, while toasted nuts add a roasted undertone that makes each bite feel like a mini celebration.
- Simplicity: Only ten pantry staples are needed, and most of them are ingredients you probably already have, meaning no last‑minute grocery runs.
- Uniqueness: The inclusion of chia seeds is the secret weapon; they lock in moisture and give the bars a subtle crunch that most soft bars lack.
- Crowd Reaction: Friends have called these “the best snack I’ve ever made at home,” and even the pickiest eaters can’t resist the sweet‑salty dance on their tongues.
- Ingredient Quality: Using raw, unsweetened rolled oats and high‑quality honey makes the flavor pure and lets the natural nutty notes shine.
- Cooking Method: A quick bake followed by a brief fridge rest sets the bars perfectly—no over‑baking, no soggy centers.
- Make‑Ahead Potential: These bars keep their softness for up to a week in the fridge, and they freeze beautifully for longer storage.
Inside the Ingredient List
The Flavor Base
Honey is the star of the show here, providing that golden sweetness and a glossy sheen that makes the bars look as good as they taste. If you swap honey for maple syrup, you’ll get a deeper, caramel‑like flavor, but you’ll also lose a bit of the bright floral notes that make these bars so distinctive. Choose a light, unprocessed honey for the purest taste; dark honey can overwhelm the delicate nut flavors. Pro tip: Warm the honey slightly before mixing so it blends seamlessly with the butter and almond butter.
The Texture Crew
Rolled oats form the structural backbone, offering chewiness without the chewiness of instant oats. If you replace them with quick‑cooking oats, the bars become mushier and lose that satisfying bite. The combo of butter and almond butter adds richness; butter brings a classic buttery melt, while almond butter contributes a nutty creaminess that keeps the bars soft. Skipping the almond butter will make the texture too dry, and you’ll miss that subtle depth.
The Unexpected Star
Chia seeds are the unsung heroes. They absorb excess moisture, preventing sogginess, and release a gentle gel that helps bind the mixture without adding extra sweetness. If you’re allergic to chia, you can replace them with an equal amount of ground flaxseed, though the binding power is slightly less. A quick tip for buying chia: look for seeds that are dark and glossy; any dullness may indicate old stock that won’t hydrate properly.
The Final Flourish
A pinch of sea salt and a dash of cinnamon elevate the sweet elements, creating a balanced flavor profile that feels both comforting and sophisticated. If you’re a fan of spice, a pinch of nutmeg or ginger can add an extra layer of warmth, but be careful not to overpower the honey. Finally, the optional chocolate chips melt just enough during baking to create pockets of molten richness that surprise the palate. Skipping the chocolate chips will give you a purer oat‑nut experience, which some purists prefer.
Everything's prepped? Good. Let's get into the real action...
The Method — Step by Step
Preheat your oven to 350°F (175°C). While the oven warms, line a 9×13‑inch baking pan with parchment paper, allowing the edges to overhang for easy removal later. This step might seem trivial, but a well‑lined pan ensures the bars lift cleanly without sticking—trust me, you don’t want a sticky situation.
In a large saucepan, melt 2 tablespoons of butter over low heat. Once melted, stir in 2 tablespoons of almond butter until you have a smooth, glossy mixture. Add ¼ cup honey and ¼ cup brown sugar, whisking until the sugar dissolves completely. The scent should be intoxicating, a sweet, buttery perfume that tells you you’re on the right track.
Remove the saucepan from heat and whisk in 1 tsp vanilla extract, ½ tsp ground cinnamon, and ½ tsp sea salt. This is where the flavor layers start to build; the cinnamon adds a warm undertone, while the salt sharpens the sweetness. Let the mixture cool for about 2 minutes so it’s warm but not hot—this prevents the oats from cooking prematurely.
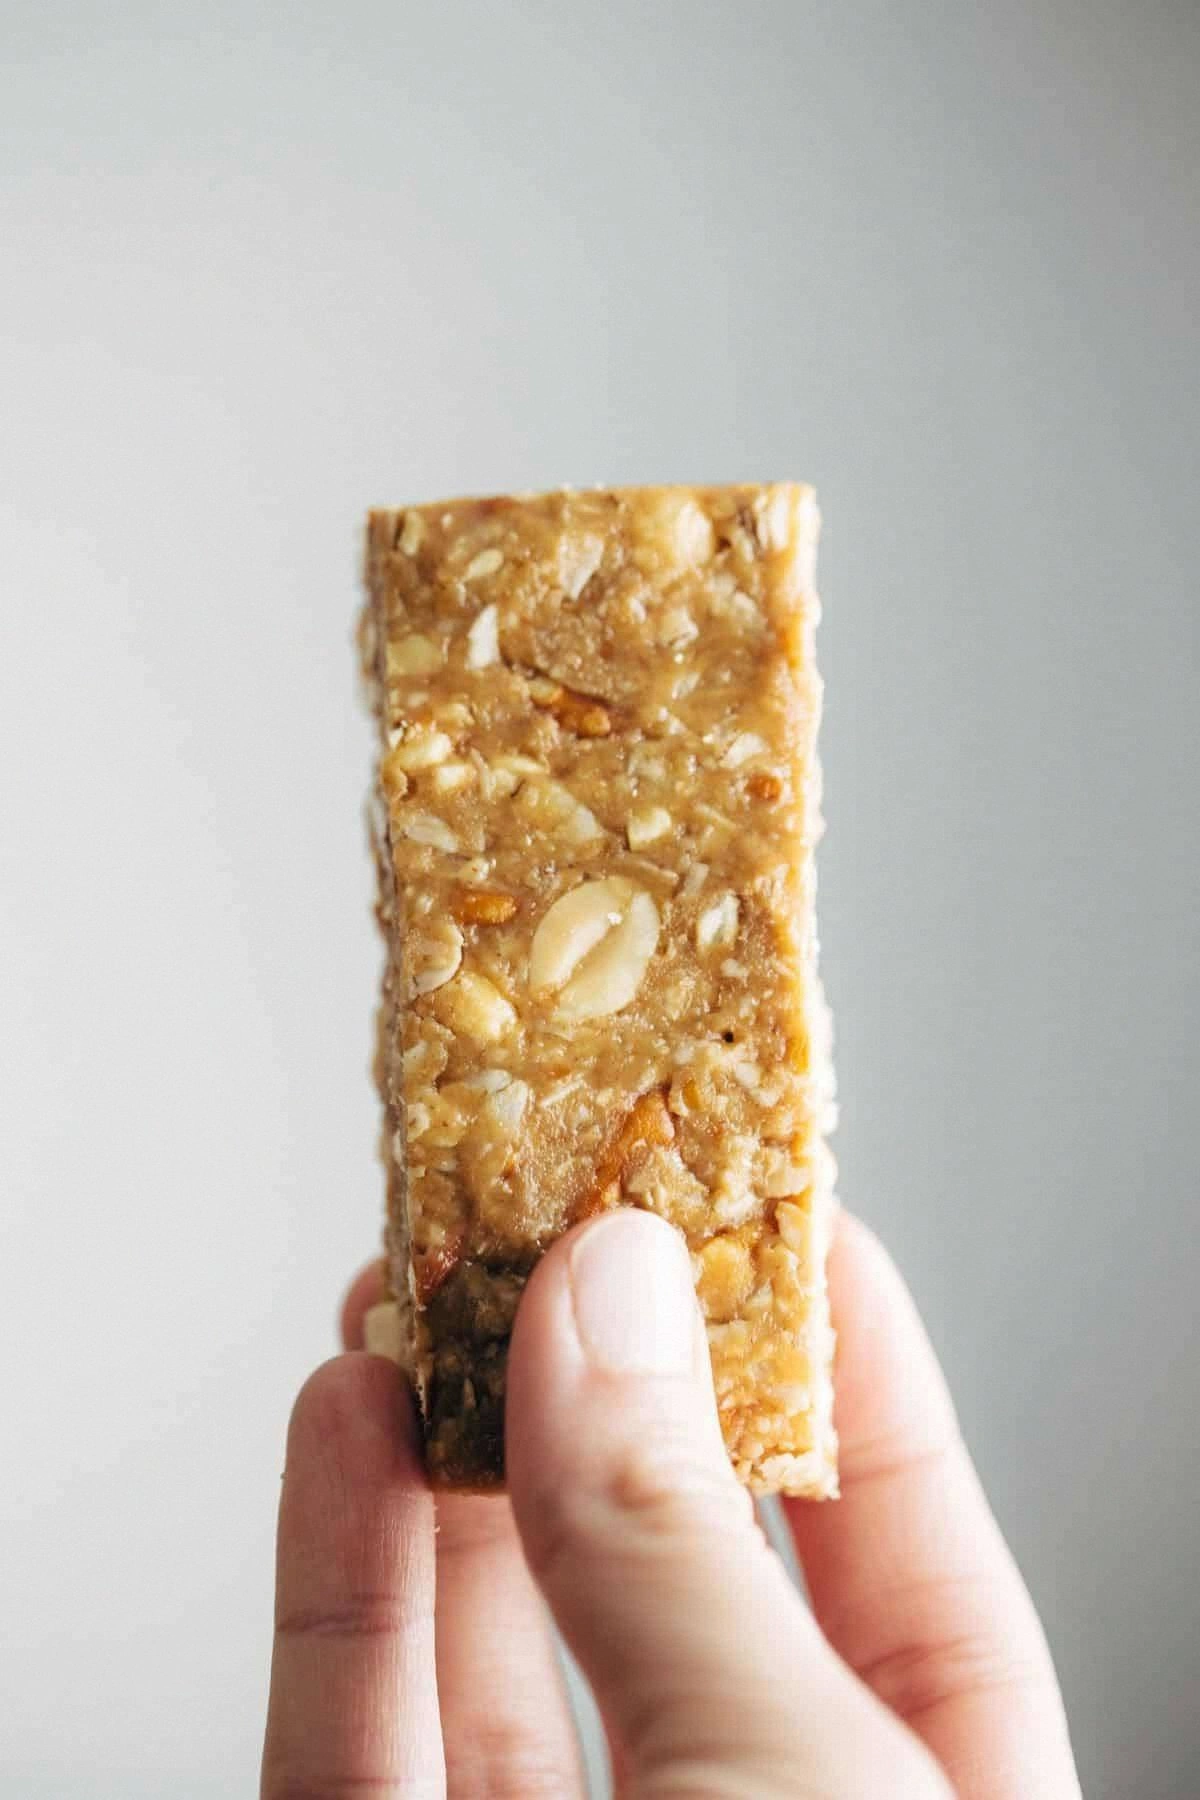
In a massive mixing bowl, combine 2 cups rolled oats, ½ cup chopped almonds, ½ cup chopped walnuts, ⅓ cup dried cranberries, ⅓ cup chocolate chips, 1 tablespoon chia seeds, and 1 tablespoon flaxseed meal. Toss everything together so the dry ingredients are evenly distributed. Watch Out: If you over‑mix at this stage, the oats can start to release starch, making the bars denser than intended.
Pour the warm honey‑butter mixture over the dry ingredients. Using a sturdy spatula, fold everything together until every oat, nut, and fruit is lightly coated. The mixture should look glossy and slightly sticky—if it looks dry, drizzle a teaspoon more honey; if it’s too wet, sprinkle a handful of extra oats.
Transfer the batter to the prepared pan, spreading it out with the spatula to an even ½‑inch thickness. Press firmly but gently; you want the bars to compact without crushing the nuts.
Kitchen Hack: Place a sheet of parchment on top of the mixture and use a rolling pin to press evenly—this ensures uniform thickness and perfect edges.Bake for 20‑25 minutes, or until the edges turn a light golden brown and the top looks set but not overly crisp. Around the 15‑minute mark, you’ll hear a faint crackling sound—this is the honey caramelizing, and it’s a sign you’re on the right track. Resist the urge to open the oven early; the bars need undisturbed heat to set properly.
Remove the pan from the oven and let it cool on a wire rack for 10 minutes. Then, using the parchment overhang, lift the entire slab out and place it back on the rack to cool completely. This cooling step is crucial; as the bars set, the chia seeds gel and the butter solidifies, giving you that coveted soft yet firm bite.
Once fully cooled, cut the slab into 8 equal bars using a sharp, wet knife. The wetness prevents sticking and yields clean cuts. Transfer the bars to an airtight container, and if you’re not eating them right away, store them in the refrigerator for up to a week. That’s it — you did it. But hold on, I’ve got a few more tricks that'll take this to another level...
Insider Tricks for Flawless Results
The Temperature Rule Nobody Follows
Never bake at a temperature lower than 350°F for these bars. Lower temps cause the butter to seep out, leaving a greasy texture, while higher temps risk burning the nuts. If your oven runs hot, set it to 325°F and add an extra 5 minutes to the bake time. I once tried 300°F, and the bars turned into a soggy mess—lesson learned.
Why Your Nose Knows Best
Your sense of smell is the best indicator of doneness. When the edges start to emit a toasted, nutty aroma, you’re minutes away from perfection. If the smell turns slightly caramelized, you’re in the sweet spot. Trust the nose over the timer; ovens can be quirky.
The 5‑Minute Rest That Changes Everything
After baking, let the bars rest in the pan for exactly five minutes before moving them. This short pause lets the interior set while the exterior continues to firm up, preventing the bars from breaking apart when you cut them. Skipping this rest can cause crumbly edges, as I discovered when I was in a rush for a snack.
Pressing with Parchment
Place another sheet of parchment on top of the batter and use a flat spatula or a rolling pin to press down firmly. This technique ensures an even surface and prevents the bars from sticking to the pan. I once tried pressing with my hands, and the heat left fingerprints—definitely not the look I was aiming for.
Cool‑Down Water Splash
If your bars feel a little dry after a week in the fridge, give them a quick 5‑second splash of water before reheating. The steam revives the softness without making them soggy. This trick saved my bars during a marathon study session when I needed a quick energy boost.
Creative Twists and Variations
This recipe is a playground. Here are some of my favorite ways to switch things up:
Tropical Sunrise
Swap the dried cranberries for shredded coconut and add diced dried pineapple. The result is a sun‑kissed bar with a subtle tropical breeze, perfect for summer picnics. The coconut adds extra chewiness that pairs wonderfully with the almond butter.
Double Chocolate Delight
Replace half of the chocolate chips with cocoa nibs and drizzle melted dark chocolate over the finished bars. This turns the snack into a decadent treat that satisfies serious chocolate cravings while retaining the soft texture.
Spicy Nut Crunch
Add a pinch of cayenne pepper and swap walnuts for pecans. The heat balances the sweetness, and pecans bring a buttery richness. Ideal for those who love a sweet‑spicy contrast.
Apple Cinnamon Harvest
Fold in ½ cup finely diced dried apples and increase cinnamon to 1 tsp. The apples add a tender bite, and the extra cinnamon makes the bars taste like a fresh‑baked apple pie in miniature form.
Protein Power
Add a scoop (≈30 g) of vanilla whey protein powder and replace half the oats with protein‑enriched oat flour. The bars become a post‑workout snack that still feels indulgent, with a boost of muscle‑building nutrients.
Storing and Bringing It Back to Life
Fridge Storage
Place the bars in an airtight container or a zip‑top bag and store them in the refrigerator. They stay soft and fresh for up to seven days. If you notice a slight hardening around the edges, let the container sit at room temperature for 10 minutes before serving.
Freezer Friendly
Wrap each bar individually in parchment, then place them in a freezer‑safe bag. They freeze solid for up to three months without losing texture. When you’re ready to eat, let a bar thaw at room temperature for 15 minutes, or pop it in the microwave for 10 seconds.
Best Reheating Method
To revive that just‑baked softness, place a bar on a microwave‑safe plate, sprinkle a tiny splash (about 1 teaspoon) of water around the edges, and heat for 8‑10 seconds. The steam re‑hydrates the interior, making it melt‑in‑your‑mouth again. Avoid microwaving for too long, or you’ll end up with a rubbery texture.